
10.0
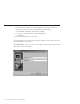


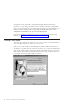
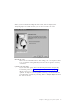

Table Of Contents
- Contents
- Welcome to ViaVoice
- Chapter 1. Setting up your speech system
- Chapter 2. The magic of dictating with ViaVoice
- Chapter 3. Introducing VoiceCenter
- Chapter 4. Dictating into SpeakPad
- SpeakPad menus and buttons
- General hints and tips
- Dictating numbers in the US English version of ViaVoice
- Dictating numbers in number mode
- Spelling words in spell mode
- Saying commands while dictating
- Dictating e-mail user IDs and URLs
- Transferring your dictation to another application
- Saving your dictation in SpeakPad
- Finding new words in your document
- Chapter 5. Dictating into Microsoft Word
- Installing Word Program Support
- Try your first dictation into Word
- ViaVoice menus and buttons in Word
- Using natural commands
- General hints and tips
- Dictating numbers in the US English version of ViaVoice
- Dictating numbers in number mode
- Spelling words in spell mode
- Saying commands while dictating
- Dictating e-mail user IDs and URLs
- Saving your dictation
- Finding new words in your document
- Chapter 6. Correcting your dictation
- Chapter 7. What Can I Say
- Chapter 8. Using the Internet
- Chapter 9. Customizing ViaVoice
- Changing VoiceCenter's appearance
- Changing the microphone's startup state
- Creating additional voice models
- Selecting a vocabulary or topic
- Adding a user
- Making a user name the current user
- Backing up and restoring user data
- Deleting a user name or voice model
- Setting dictation options
- Changing the appearance of the Correction window
- Enabling command sets
- Setting Text-To-Speech options
- Adjusting recognition sensitivity
- Chapter 10. Creating macros
- Chapter 11. Getting help
- Appendix A. Getting technical support
- Appendix B. Frequently used commands in dictation
- Appendix C. Notices
- Glossary
- Index

Audio Setup Wizard—This wizard presents several windows to help you set
up your microphone. We recommend that you use the microphone that comes
with ViaVoice until you are thoroughly comfortable with your speech system.
1. If you have not already done so, remove the microphone and its
equipment from the package:
v The microphone itself
v One or more plugs and USB adapters
2
v Warranty and other material from the manufacturer.
The Audio Setup Wizard will prompt you to identify the type of
microphone and components you have.
2. With the microphone on, complete all audio tests that the Audio Setup
Wizard presents to you.
At the window shown below, for example, click Start and then read aloud the
text inside the box. Speak the text clearly in your normal voice, pausing
naturally between phrases or after punctuation marks. (Imagine you are
speaking to someone for whom English is not the native language.) After you
have read the sentences, ViaVoice will display the quality of your audio.
Should ViaVoice find that the audio quality is poor, click Fixing Poor Audio
Quality to learn how to take corrective action.
2. If you are using a USB microphone and do not have the USB port installed, the Windows program for adding this
new hardware begins. Follow the on-screen instructions to install the USB device driver. After installing the new
hardware and restarting your computer, run VoiceCenter and complete the Audio Setup Wizard.
Chapter 1. Setting up your speech system
7