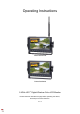
Operating Instructions external antenna internal antenna 2.4GHz HD 7" Digital Wireless Color LCD Monitor Please read this manual thoroughly before operating the device, and keep it for future reference. V 1.
Contents 1. Precautions .............................................................................................1 1.1 Storage and Keeping ........................................................................1 1.2 Operating Precautions ......................................................................1 1.3 Maintenance ..................................................................................... 2 2. Features .................................................................................
1. Precautions 1.1 Storage and Keeping 1) Do not expose the monitor to excessive heat or coldness. Storage temperature is -30~+80℃; Operating temperature is -20~+70℃; Battery operating temperature is 0-70℃; Humidity is Rh90%. 2) Never use this device near a bathtub, wash basin, kitchen, damp basement, swimming pool or similar places. 3) Never use this device in the environment with excessive moisture, dust or smoke. 4) Avoid dropping or striking.
Special Notice 1.Occasionally, a few highlights or dark spots may occur on the LCD screen. That is a very common phenomenon in active matrix display technology, and it doesn’t necessarily indicate any defects or faults. 2.Never try to repair this device by yourself. If any problem, please turn off the display at once and notify our company or authorized dealer. The monitor is a complex device. Any disassembly or modification may lead to damage and invalidate warranty. 1.
2. Features 1) TFT LCD monitor with wide angle view and high resolution display 2) Image can be set to horizontally flipped, vertically flipped and norma 3) Support multiple image display modes like single, dual, quad. 4) Support 5 x triggers, trigger priority & trigger delay are selectable. 5) Support auto scan, scan channel and scan time are selectable.
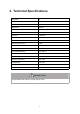
3. Technical Specifications LCD Size 10″ Resolution 1024 x 3(RGB) x 600 Contrast 600:1 Brightness 600cd/㎡ View Angle U: 85 / D: 85, R / L: 85 Aspect Ratio 0.2175(W) x 0.2088(H) Channel 4 channels Operating Frequency 2400 -2483.5MHz Receiving Sensitivity -78dBm Decompression Form H.264 Modulation FHSS Time Delay 200 ms Transmitting Distance Max. 300 m Micro SD Card Max. 128 GB Power Supply DC 10-32V Power Consumption Max. 10W Loudspeaker 1.
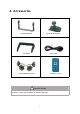
4. Accessories Center Mount Bracket U-Support Bracket Power cable Sun Shield IR Remote control Angle Adjustment Screws Special Notice Accessory supply may be different for different application.
5.
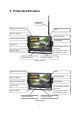
Micro SD Card Slot Mounting bracket installation external antenna Micro SD Card Slot Mounting bracket installation internal antenna 7
6. Remote Control Operation Press to select MUTE or enable sound Press to turn on/off the monitor Press OK button to enter menu item. Press OK button - shortcut for start/stop recording. Press to show menu or exit menu Volume increase and menu selection right Volume decrease and menu selection left MIR-Flip selection Key selector. Switch to next view following CAM1-CAM2-CAM3-CAM4DUAL-QUAD loop Reserve now Fast pairing when camera is activated ● MUTE (Mute) Press to select MUTE or enable sound.
● VOL + Volume increase and menu selection right. ● SEL Key selector. Switch to next view following CAM1-CAM2-CAM3-CAM4-DUAL-QUAD loop. ● PAIR Fast pairing when camera is activated. ● MIR MIR-Flip selection. 7. Basic Operation 7.1 Installation of Center Mounting Bracket 1) Adjust monitor level by sliding the support to the desired height. 2) Adjust the angle of the monitor and tighten the knob on the center mounting bracket. Support attaching piece Knob 7.
Red wire to positive power supply of DC/10-32V. Black wire to Ground. Single brown wire to positive power wire of back-up light. Single white wire to positive power wire of left light . Single blue wire to positive power wire of right light . Green or yellow wire to other positive power wire. Camera DC/ 12V Video inputs 8. Menu Operation and Functional Specification 8.
Swipe left or right on the screen can switch between different views, in the order: CAM1->CAM2->CAM3->CAM4->DUAL->QUAD Slide up/down the screen to exit/enter standby mode quickly In split mode, touch the camera channel to scale to full screen, and touch it again to return to the multi-split mode 8.
Touch the icon to enter the menu or touch outside the red box to exit, long press the power button for 3s will open/close the menu lock, and touch is invalid when the menu is closed Audio source ① The audio channel can be switched in the multi-split view mode, click the area outside ② the menu to exit Mode ① Select different icons to switch to the corresponding view, click the last icon will enable automatic scanning ② Click the area outside the menu to exit Pairing Pairing Camera: connec
Record Control Click the icon to start or stop recording PlayBack Video: The folder will increase with video files, and a new folder will be created once the files exceed a maximum of 997 in a folder. The larger the folder number, the newer folder.
Created:creation date Group Num:the corresponding value will increase by 1 with each recording. The Group Num of the video recorded at the same time is the same, that is, the Group Num of the video recorded under multi-split mode is the same A window will pop up before playing a file recorded in the multiple split mode to select playing multiple views at the same time or a single view; 8.
8.3.
8.3.2 Record Record Time: choose the duration of the video Format SD Card: “SD Card Format?” will pop up, press Yes to format the SD card Date&Time: Touch or press left/right plus OK key of the remote control to enter the value setting interface, and set the date and time through the small keyboard Date: select the corresponding year, month and day Time: select the corresponding hour, minute, and second Power On Record: If it is set to on, the monitor will start recording video upon startup.
8.3.3 System When Auto Backlight (Auto) is off, adjust the slider to adjust the screen brightness; When it is on, adjusting the slider is invalid.
upgrade the firmware with this upgrade package Language: Select language, support English, German, French, Chinese. Reset: reset operation does not change the tx and rx connection status of the system, but only system parameters 8.3.4 Split View Display Settings The text highlighted in green indicates which tx is displayed at that position Touch or press left/right button plus OK button to select any tx in the corresponding position 8.3.
The text highlighted in green indicates which tx is displayed at that position Touch or press left/right button plus OK button to select any tx in the corresponding position 8.3.
Display: you can select the corresponding channel after triggering, only applicable to the yellow trigger line Trigger function takes precedence over automatic scan function When the trigger signal is detected, the signal source will automatically switch to the corresponding view and returns to the previous view when the delay time runs out; support standby trigger 8.3.7 Auto Scan A window will pop up by touching the number box. Press On/Off to turn on/off the automatic scanning function.
8.3.8 Power On Touch or press the left/right button to select the corresponding icon, and the corresponding view will be displayed upon startup or automatic scanning or standby Touch the highlighted icon or press OK button, the green cursor will disappear, and enter the Last mode, specifically, automatically enter the state before shutdown upon power-on 8.3.
Indicates that currently the cursor can be adjusted left or right by left/right keys Indicates that currently the cursor can be adjusted up and down by left/right keys Indicates that currently the cursor size can be adjusted by left/right keys The OK key is used to switch between different modes The cursor position can be adjusted by sliding with one finger, and the cursor size can be adjusted with two fingers.
8.3.10 Guide Line Feature Instructions: ● When the switch is ON, the single view will display the guide line. Pic.8.2.6.9-2 Other Instructions: : The left and right keys enable the cursor to move left and right. : The left and right keys enable the cursor to move up and down. : The left and right keys enable the adjustment of cursor size. Feature Instructions: ● The OK key is used to switch between different modes.
adjusted with two fingers. The status of icons in the middle of the cursor does not affect touch adjustment. 8.4 Standby Screen Off: normal standby mode, the trigger function still works, with only the monitor and camera powered off Shut down: similar to Screen Off mode, but does not respond to trigger signals 9. Installation Tips 1) Antennas should be vertically lined to the ground. Make sure there is no obstacle around antennas.
3) Wireless system installation instruction.
10. Troubleshooting Symptoms Possible Causes / Solutions No picture, no sound Improper connection of automobile adapter. Use of un-authorized power supply. No signal Power switch is on OFF position. Check whether the camera has power supply. Pair the monitor and the camera again. No sound Check whether the sound volume is turned off or set too low. Dark picture Check whether brightness and contrast are adjusted correctly. No color Adjust the HUE settings.