
User's Manual
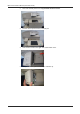
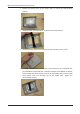
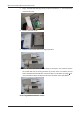
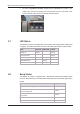


Table Of Contents

MiCard V3 Installation Manual (Full Install Guide)
5
Note that the extended configuration of the MiCard V3 is only possible with MEAP
applets from V2.4.0 onwards.
To connect the MiCard V3 reader to the MFP, simply plug the USB cable into the
USB Host Connection of the MFP and into the USB socket of the card reader
(Please be aware that the USB connections may be arranged in a different order
depending on the model of the copier). You can also connect the MiCard V3
reader to a USB hub that is connected to the MFP, the reader will work in the
same way. The USB connection also acts as the power supply for the MiCard V3
reader.
On ´power up´, the MiCard V3 will send off two short beep tones and the red and
green LED´s will flash twice.
1.6 Installation of the MiCard V3 on the imageRUNNER
ADVANCE
To install the MiCard V3 into a Canon imageRUNNER ADVANCE device proceed as
follows.
The mounting guidelines below are based on an imageRUNNER ADVANCE C5051i. On
other imageRUNNER ADVANCE devices this process is generally the same. However,
some differences may occur concerning the dismounting of the reader cover. This is
shown in a separate picture at the end of this topic.
Required components and tools:
Screwdriver cross recess
MiCard V3
Hook-and-loop fastener
Short USB cable (delivered with the MiCard V3)
The MiCard V3 is delivered with a pull relief. Please do not use the pull relief if you
install the MiCard V3 in an imageRUNNER ADVANCE.
Installation on an imageRUNNER ADVANCE C5051i:
The installation of the MiCard V3 card reader in an imageRUNNER ADVANCE should
only be carried out by trained and authorized people with expert knowledge.
The device must be switched off and the power cord must be unplugged before you
start any operation on the device.
Installation on an imageRUNNER ADVANCE C5051i: