
User's Manual


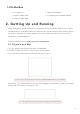


Table Of Contents
- 6.5 Overlap
- 6.5 Overlap
- 6.5 Overlap
- 1. Introduction
- 2. Getting Up and Running
- 3. Hardware Overview
- 4. Launchpad Pro Interface
- 5. Session Mode
- 6. Note mode
- 7. Chord Mode
- 8. Custom Modes
- 9. Sequencer
- 10. Setup
- A. Appendix
- A.1 Default MIDI mappings
- A.1.1 Custom 1: 8x8 Grid, 8 Vertical Unipolar Faders, CC numbers below
- A.1.2 Custom 2: 8x8 Grid, 8 Horizontal Bipolar Faders, CC numbers below
- A.1.3 Custom 3: 8x8 grid, Momentary Note On messages (note numbers below)
- A.1.4 Custom 4: 8x8 grid, Momentary Note On messages (note numbers below)
- A.1.5 Custom 5: 8x8 grid, Program Change messages
- A.1.6 Custom 6: 8x8 grid, Momentary Note On messages (note numbers below)
- A.1.7 Custom 7: 8x8 grid, Momentary Note On messages (note numbers below)
- A.1.8 Custom 8: 8x8 grid, Momentary Note On messages (note numbers below)
- A.1.9 Programmer Mode: Includes buttons and pads (full 9x9 grid), logo LED may be addressed, Momentary Note On messages (note numbers below)
- A.1.1 Custom 1: 8x8 Grid, 8 Vertical Unipolar Faders, CC numbers below
- A.2 Overlap Layouts
- A.1 Default MIDI mappings

8 9
2.2 Launchpad Intro
If you’re brand new to Launchpads, Launchpad Intro is a great place to start. Choose from a variety
of curated packs from Ampify Music and start performing immediately. Your Launchpad Pro will match
the on-screen grid - press pads to launch loops and one-shots to build up your track.
To get there, plug your Launchpad Pro into your computer and visit intro.novationmusic.com/. Your
Launchpad Pro will be automatically detected and you’ll immediately be able to play beats using our
curated packs.
Warning: To access Launchpad Intro, you must use a WebMIDI enabled browser. We recommend
Google Chrome or Opera.
2.2.A – Launchpad Intro