
User's Manual
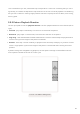


Table Of Contents
- 6.5 Overlap
- 6.5 Overlap
- 6.5 Overlap
- 1. Introduction
- 2. Getting Up and Running
- 3. Hardware Overview
- 4. Launchpad Pro Interface
- 5. Session Mode
- 6. Note mode
- 7. Chord Mode
- 8. Custom Modes
- 9. Sequencer
- 10. Setup
- A. Appendix
- A.1 Default MIDI mappings
- A.1.1 Custom 1: 8x8 Grid, 8 Vertical Unipolar Faders, CC numbers below
- A.1.2 Custom 2: 8x8 Grid, 8 Horizontal Bipolar Faders, CC numbers below
- A.1.3 Custom 3: 8x8 grid, Momentary Note On messages (note numbers below)
- A.1.4 Custom 4: 8x8 grid, Momentary Note On messages (note numbers below)
- A.1.5 Custom 5: 8x8 grid, Program Change messages
- A.1.6 Custom 6: 8x8 grid, Momentary Note On messages (note numbers below)
- A.1.7 Custom 7: 8x8 grid, Momentary Note On messages (note numbers below)
- A.1.8 Custom 8: 8x8 grid, Momentary Note On messages (note numbers below)
- A.1.9 Programmer Mode: Includes buttons and pads (full 9x9 grid), logo LED may be addressed, Momentary Note On messages (note numbers below)
- A.1.1 Custom 1: 8x8 Grid, 8 Vertical Unipolar Faders, CC numbers below
- A.2 Overlap Layouts
- A.1 Default MIDI mappings

48
9.11 Print to Clip
Sequencer patterns may be instantly transferred from Launchpad Pro to Ableton Live and placed in
clip slots, with no need to record them. Print to Clip is extremely useful for taking your ideas from the
sequencer into more complete tracks within Ableton Live.
This function is accessed via the Print to Clip button.
When you have created a sequence with the Launchpad Pro that you would like to transfer to Ableton
Live, select a clip slot in Live by clicking it with your mouse, then press Print to Clip on Launchpad Pro.
The current pattern or pattern chain for the selected track will be transferred to Live.
9.11.A - A selected
empty clip slot
9.11.B – The same
clip slot, now filled
after pressing Print
to Clip
Alternatively, a clip slot in may be selected using Launchpad Pro by navigating to Session View,
holding shift, and pressing a pad on the 8x8 grid.
If you had an empty clip slot selected, the printed pattern will now be in that slot as a clip. If you
press Print to Clip while an occupied clip slot is selected, the sequencer pattern will be printed to the
next empty clip slot below. This enables you to print a pattern multiple times without overwriting any
clips.
You can also use Print to Clip in Patterns view. To do so, hold Print to Clip and press a track select
button. Notice that the track buttons will pulse while Print to Clip is held. The currently selected
pattern or pattern chain on chosen track will be transferred to Ableton Live.
If you are using Ableton Live Lite and all 8 available clip slots for a track are full, the Print to Clip
button will become unlit to indicate that there are no available clip slots to transfer to.