
User's Manual


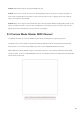
Table Of Contents
- 6.5 Overlap
- 6.5 Overlap
- 6.5 Overlap
- 1. Introduction
- 2. Getting Up and Running
- 3. Hardware Overview
- 4. Launchpad Pro Interface
- 5. Session Mode
- 6. Note mode
- 7. Chord Mode
- 8. Custom Modes
- 9. Sequencer
- 10. Setup
- A. Appendix
- A.1 Default MIDI mappings
- A.1.1 Custom 1: 8x8 Grid, 8 Vertical Unipolar Faders, CC numbers below
- A.1.2 Custom 2: 8x8 Grid, 8 Horizontal Bipolar Faders, CC numbers below
- A.1.3 Custom 3: 8x8 grid, Momentary Note On messages (note numbers below)
- A.1.4 Custom 4: 8x8 grid, Momentary Note On messages (note numbers below)
- A.1.5 Custom 5: 8x8 grid, Program Change messages
- A.1.6 Custom 6: 8x8 grid, Momentary Note On messages (note numbers below)
- A.1.7 Custom 7: 8x8 grid, Momentary Note On messages (note numbers below)
- A.1.8 Custom 8: 8x8 grid, Momentary Note On messages (note numbers below)
- A.1.9 Programmer Mode: Includes buttons and pads (full 9x9 grid), logo LED may be addressed, Momentary Note On messages (note numbers below)
- A.1.1 Custom 1: 8x8 Grid, 8 Vertical Unipolar Faders, CC numbers below
- A.2 Overlap Layouts
- A.1 Default MIDI mappings

26
6.6 Drum Mode
If an Ableton Live Drum rack is loaded to the currently armed track, Note Mode will represent the
current state of the drum rack, showing which slots are currently filled.
In Ableton Live, load a drum kit into a MIDI track by selecting a Drum kit from the browser and double
clicking it (or alternatively drag it to a track). If you cannot hear anything, ensure that the track is
record armed and that monitoring is set to auto (see 5.5 Record Arm & Recording).
The view is divided into four 4x4 areas, each of which represents the areas of the Drum rack, shown
below.
6.6.A – How Launchpad Pro’s Drum layout relates to a Drum Rack in Live
The visible area of the Drum rack may be scrolled through in sets of 16 slots using the ▲▼ buttons,
or in sets of 4 slots using the ◄ ► buttons. The bottom left 4x4 area will always correspond with the
currently visible slots in the Ableton Drum rack.
If there is a sample loaded in the areas 2, 3 or 4 in the diagram above, it will be visible as a brightly lit
yellow pad, exactly as seen in area 1.
When a drum pad is pressed, the pad will turn blue to indicate that it is selected. The sample present
in this slot may then be edited from within the Ableton Drum Rack.
When any other instrument is on the currently armed track, the grid will revert to Scale Mode or
Chromatic Mode.
In Ableton Live, load an instrument into a MIDI track by selecting an instrument from the browser and
double clicking it (or alternatively drag it to a track). If you cannot hear anything, ensure that the track
is record armed and that monitoring is set to auto.