
User's Manual
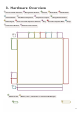
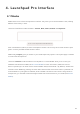

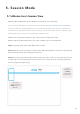

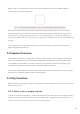


Table Of Contents
- 6.5 Overlap
- 6.5 Overlap
- 6.5 Overlap
- 1. Introduction
- 2. Getting Up and Running
- 3. Hardware Overview
- 4. Launchpad Pro Interface
- 5. Session Mode
- 6. Note mode
- 7. Chord Mode
- 8. Custom Modes
- 9. Sequencer
- 10. Setup
- A. Appendix
- A.1 Default MIDI mappings
- A.1.1 Custom 1: 8x8 Grid, 8 Vertical Unipolar Faders, CC numbers below
- A.1.2 Custom 2: 8x8 Grid, 8 Horizontal Bipolar Faders, CC numbers below
- A.1.3 Custom 3: 8x8 grid, Momentary Note On messages (note numbers below)
- A.1.4 Custom 4: 8x8 grid, Momentary Note On messages (note numbers below)
- A.1.5 Custom 5: 8x8 grid, Program Change messages
- A.1.6 Custom 6: 8x8 grid, Momentary Note On messages (note numbers below)
- A.1.7 Custom 7: 8x8 grid, Momentary Note On messages (note numbers below)
- A.1.8 Custom 8: 8x8 grid, Momentary Note On messages (note numbers below)
- A.1.9 Programmer Mode: Includes buttons and pads (full 9x9 grid), logo LED may be addressed, Momentary Note On messages (note numbers below)
- A.1.1 Custom 1: 8x8 Grid, 8 Vertical Unipolar Faders, CC numbers below
- A.2 Overlap Layouts
- A.1 Default MIDI mappings

14 15
The ▲▼◄ ► buttons let you navigate session view. The outline in the Session View grid shows the
area currently visible on Launchpad Pro.
• Press a pad to play the corresponding clip in Ableton. The colour will match between the screen and
pads.
• When a pad is pressed it will flash green, indicating that the clip is queued and will soon begin to
play. When a clip is playing, the pad will pulse green.
• Only one clip may play at a time per track. Pressing an empty clip will stop the current one on that
track.
• A horizontal line of clips is called a Scene. Scenes can be triggered using the > (scene launch)
buttons on the right-hand side of Launchpad Pro.
5.1.B – Session View seen in Ableton Live and on Launchpad Pro