
Manual

76
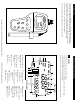
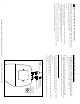
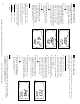
Keypad
The large membrane keypad makes the instrument easy to use. Each button, when
pressed, has a corresponding graphic indicator on the LCD.
ON/OFF............Powers and shuts off the meter.
HOLD ..............Freezes the measured reading. To activate, press HOLD while in
measurement mode. To release, press HOLD again.
pH 310 model only:
When auto endpoint feature is switched on, it
automatically holds reading after 5 seconds of stability. The HOLD
indicator appears on the display. Press HOLD to release auto end-
point feature.
MODE..............Selects the measurement parameter. Press MODE to toggle between
pH; mV (or relative mV); and date/time (date/time available on
pH 310 model only). In pH calibration mode, press MODE to access
temperature calibration.
CAL/MEAS......Toggles user between Calibration and Measurement mode.
• If you were in pH measurement mode, press CAL/MEAS to enter
pH calibration mode.
• If you were in mV measurement mode, press CAL/MEAS
to enter mV calibration mode.
NOTE: Temperature calibration is available from pH calibration mode;
see page 17 for directions.
In advanced set-up mode: Press CAL/MEAS to return to main menu
from sub menus. Press CAL/MEAS again to return to measurement
mode from main menu.
ENTER ............Press to confirm values in Calibration mode and to confirm
selections in Setup mode.
▲▼
..........Press ▲/▼ in setup mode to scroll through subgroups. Also press
▲/▼ in mV calibration mode to adjust the calibration value.
MI/MR work in the measurement mode. MI (memory input) stores
the measured value into memory. MR (memory recall) recalls the
sets of values stored in
the memory.
SET....................Press to enter SETUP
mode. SETUP mode lets
you customize meter
preferences and defaults,
and view calibration and
electrode offset data.
MI MR
2.2
MODE
HOLD
ENTER
ON
OFF
CAL
MEAS
MI
▲
MR
▼
SETUP
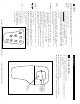
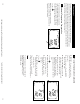
Battery
compartment
Remove these
two screws to
access battery
compartment
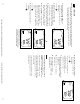
3. Preparation
Inserting the Batteries
Four AAA batteries are included with your meter.
1. Use a Phillips screwdriver to remove the two screws holding the battery cover.
See figure below.
2. Lift off battery cover to expose batteries.
3. Insert batteries. Follow the diagram inside the cover for correct polarity.
4. Replace the battery cover into its original position. Screw cover back into place.
3.1
http://www.novatech-usa.com/Products/Laboratory-Equipment-Supply-Products Tel: (281) 359-8538 Toll Free:(866) 433-6682