
Owner manual


43
SOLUTION
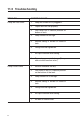
1. Cut about 1 in (25 mm) off tubing and then replace as before.
2. Replace tting if cracked. Carefully hand tighten ttings.
DO NOT USE
PIPE WRENCH
. Once tting comes into contact with seal ring, tighten
an additional 1/8 or 1/4 turn.
3. Replace balls and seal rings (see Section 8.3) Spare Parts (SP-#).
4. Consult your local distributor for alternate materials.
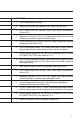
1. Injection pressure cannot exceed pump’s maximum pressure. See
pump data plate.
2. Worn seal rings or cartridge valves may need replacement (see Sec-
tion 9.3). Spare Parts (SP- #), or RPM Pro Pac
™ kit.
3. Replace Liquifram™ (see Section 9.2).
4. Check zero on pump/Re-zero pump (see Section 10.0).
5. Longer tubing runs may create frictional losses sufficient to reduce
pump’s pressure rating. Consult factory for more information.
6. Remove Foot Valve strainer when pumping slurries or when solution
particles cause strainer to clog.
1. Turn on or plug in pump.
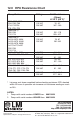
2. Disassemble pump and measure the resistance of the EPU across
the EPU wires. Resistance reading should be in accordance to the
EPU Resistance Chart (see Section 12.0). Also, check EPU leads to
ground. Consult supplier or factory.
3. The pulser should be replaced if EPU checks out OK. Consult supplier
or factory.
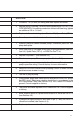
1. Move injection point to a pressurized location or install an LMI 4-FV
(see Section 4.4).
2. If pressure at injection point is less than 25 psi (1.7 Bar), an LMI 4-FV
should be installed (see Section 4.4).
3. Replace pulser or resistor. Consult factory.
Troubleshooting(continued)