
Owner manual


34
CAUTION
!
IftheliquidcannotbepumpedduetoLiquifram
™
rupture
usingprotectiveclothing,glovesandfaceshield,carefully
disconnectthesuctionanddischargetubing.Removethe
fourscrewstotheheadandimmersetheheadinwateror
otherneutralizingsolution.
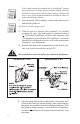
2. Start the pump. While running, set the stroke knob to zero
and turn the pump off.
SeeSection10.0forproperzero
.
3. With the unit off, unscrew the Liquifram
™
by carefully
grasping the outer edge and turning it counter-clockwise
. Discard old Liquifram
™
. Remove the Liquifram
™
disk
if so equipped (located behind the Liquifram
™
) and check
that the size code matches the size code on the replacement
Liquifram
™
(see illustration).
4. Reinstall the disk so the alignment pin on the disk (if pres-
ent) seats in the recessed hole in the EPU.
Be careful not to scratch the Teon
®
face of the new Liquifram
™
.
5. Start the pump and turn the stroke knob to the setting indi-
cated on the following Stroke Setting Chart which matches
the pump series number located on the pump dataplate. With
the pump stroking (running), screw on the new Liquifram
™
clockwise until the center begins to buckle inwards. Stop
the pump.
For Series AA, J, & P
For Series B, C, & E