
Owner manual


25
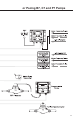
6.3 Start-Up/Priming without Multi-Function Valve
Read this entire section completely before proceeding.
When all precautionary steps have been taken, the pump is
mounted, and the tubing is securely attached, you may now
prime the pump.
1. Plug in or switch on the pump.
2. While the pump is running, set the speed knob at 80% and
the stroke knob at 100%.
If the pump is equipped with pressure control, turn fully
clockwise .
3. The suction tubing should begin to ll with solution from
the tank.
4. Once the solution begins to exit the pump head on the discharge
side, SHUT THE PUMP OFF. (If pump is not equipped
with an on/off switch, disconnect the power cord).
5. The pump is now primed.
6. Proceed to output adjustment, Section 6.4.
Ifthepumpdoesnotself-prime,removethettingonthedis-
chargesideofthepumphead.Removetheballandpourwater
orsolutionintotheportuntiltheheadislled.Replacevalve,
thenfollowstartup/primingsteps.
Start-Up/Priming for AutoPrime™ Heads
Read this entire section completely before proceeding.
When all precautionary steps have been taken, the pump is
mounted, and the tubing is securely attached, you may prime
the pump.
1. Plug in or switch on the pump.
2. While the pump is running, set the speed knob and the stroke
knob at 100%.
3. The suction tubing should begin to ll with solution from
the tank as the AutoPrime™ valve purges air from the pump
head.
4. Once the solution begins to exit the pump head through both
the discharge valve and the AutoPrime™ valve, SHUT
THE PUMP OFF.
5. The pump is now primed.
6. Proceed to output adjustment, Section 6.4.
CAUTION
!