NOTION INK Adam User Manual Overview: This User Manual is designed to provide an overview of Adam’s main features. This Manual will help you understand the basic features and functions of Adam. For more detailed information about Adam, please refer to the Adam Instruction/User Manual. Other trademarks and trade name may be used in this manual to refer to either the entities claiming the marks and names or their products.
INDEX Know your ADAM .................................................. 1 Safety...................................................................... 4 Care........................................................................ 5 Connectivity........................................................... 7 Panel System ......................................................... 8 Browser.................................................................. 11 Mail’d ............................................
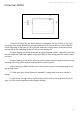
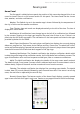
Notion Ink ADAM User Manual: Device Know Your ADAM 1. Search: On Single Tap, the Search feature is enabled for the app, if there is any. Logn pressing the the search button will controls the Back lit LCD. If the device has a transreflective screen, switching off the back lit LCD screen will enable the PixelQi screen. If the device has a normal LCD screen, switching off the LCD will turn the display off. 2. Home: Tapping the ‘Home‘ button will bring up the panel system.
Notion Ink ADAM User Manual: Device 7. Power Port: This port is for the Adapter to be plugged in to charge the device. 8. CPU Indicator Icon: This icon represents the power port. 9. CPU Indicator LED: The CPU indicator LED blinks in Orange while processing. When the CPU indicator and the Power indicator are in solid orange and red the Adam is in Recovery Mode. 10. Battery Indicatior Icon: This icon represents the power indicator. 11.
Notion Ink ADAM User Manual: Device 18. Left Speaker: This is the left side speaker. The audio from the device is outputed through speakers while there is no audio jack plugged in. 19. Volume Up/Down: The volume up/down buttons can be used to adjest the volume of the audio output. Long pressing the ‘+‘ will adjust volume to its maximum level, while long pressing ‘-‘ will mute the device audio output. 20. USB Port: This is a USB 2.0 port.
Notion Ink ADAM User Manual: Sniffer Safety Precautions: 1. DO NOT press or touch the LCD Screen too hard. DO NOT place the Adam with small items, they may scratch LCD Screen or enter the Adam. 2. DO NOT expose the Adam to dirty or dusty environment. Keep Adam in clean and dry environment. 3. DO NOT place the Adam on uneven or unstable surface. 4. DO NOT place or drop objects on the top of the Adam. DO NOT shove any foreign objects into the Adam. DO NOT cover the LCD Screen strongly. 5.
Notion Ink ADAM User Manual: Care Caring for the Adam The Adam is a precision device; the error operation may damage the device. LCD Screen is the most delicate component of the Adam and comprised of thin glass. It may be broken up by external abrupt force. DO NOT scratch the cover of the Adam, or the scrape on the cover cannot remove. • DO NOT cover the LCD Screen strongly, or else damage may occur.
Notion Ink ADAM User Manual: Care If you drive your car with the Adam, DO NOT leave the Adam facing the sun. Place it in the shady and cool area. The connection between Internet and your Adam will be interrupted when the system enter the hibernation mode How to Charge your Device: The Adam comes with a universal AC-DC adapter and the allowable input voltage of adapter is from 100V to 240V. Following the below steps to connect the adapter: 1.
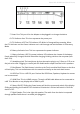
Adjusting the Brightness of the Screen The screen brightness can be set by tapping on the Brightness option under the Display Settings. Checking the ‘Automatic Brightness’ option, will set the brightness of the display automatically depending on the surrounding light. Connecting to Internet Internet can be accessed in two ways. 1. SIM Card – If your device has a SIM card slot, you can access internet by inserting a SIM Card provided by a Mobile Service Provider.
Notion Ink ADAM User Manual: Panel System Panel system Home Panel The first panel is called the home panel; the position of this cannot be changed. Also, it can never be closed. There is no full screen version for this panel. The Home Panel has the current time, weather, and other notifications. Weather: The Default city set in the weather app is shown followed by the temperature of the city in Celsius and the weather conditions.
Notion Ink ADAM User Manual: Panel System Launcher The launcher icon is always displayed on the left edge of the display at the center. Tapping on the launcher icon will display the launcher listing all the apps installed. The first few apps represent the order of the opened panels if any panels are open. Launching a Panel: From the launcher, drag and drop an app to launch the panel if it exists.
Notion Ink ADAM User Manual: Panel System Desktop The Desktop can be accessed by doing a two-finger swipe on the panel system while a panel is in focus. Tapping on the “time” shown on the Home Panel will also display the desktop. When the desktop is displayed, the panels are all minimized. Tapping on any of the minimized panels or doing a two finger swipe up will re-launch the panel system, hiding the desktop. The desktop displays all the apps installed on the device in a grid view.
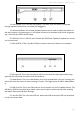
Notion Ink ADAM User Manual: Browser BROWSER Panel View Initial view: The initial view provides various web search options (Google, Yahoo, Bing and Ask). Tapping on any of the options loads the respective search website onto the panel. Back/Forward: To navigate between previously accessed pages, use the backward and forward icons which are displayed as soon as a page loads. Refresh: A web page can be refreshed by tapping on the refresh button, located at the top of the panel.
Notion Ink ADAM User Manual: Browser Full-Screen View Entering the URL: The left side of the browser houses a sidebar with the first icon being the Toggle switch for the URL / Address Bar. Tapping on the url will bring up the keyboard. The standard ‘http’ and ‘www’ protocol representations can be omitted while typing as they are prefixed automatically where needed.
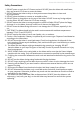
Notion Ink ADAM User Manual: Browser Menu Options Bookmarks & History Bookmarks can be accessed by tapping on the Bookmarks icon under the options menu. This brings up the list of Bookmarks. Tapping on History icon under the options menu, brings up the history. Tapping on any of the links will open the link in a new tab.
Notion Ink ADAM User Manual: Browser Settings The Settings option is available under the options menu. Tapping on the Settings icon will bring up the settings for the browser. Setting Text Size: Tapping on the text size will display the size options which vary from tiny to Huge. By default, ‘Normal’ is selected. Setting Zoom sensitivity: Tapping on Default Zoom will display options to set the sensitivity of the zoom level which include Far, Medium and Close. By default, Medium is selected.
Notion Ink ADAM User Manual: Browser Clear Cookies: Tapping on ‘Clear all cookie data’ will prompt the user for confirmation to clear all cookies. Enable/Disable Locations: Checking this option will allow websites to access the user’s location. Unchecking this option will prevent websites from accessing the user’s location. By default, this check box is checked.
Notion Ink ADAM User Manual: Mail’d MAIL’D Setting up a New Account A new account can be set-up from the panel view if no other account exists. A New account overlay will also show up when the full screen app is opened for the first time, when no account is set-up or when the link 'Add New Account' is tapped on in the Accounts Panel. Default Set-up: The 'set-up new account' feature will prompt the user for the email address and password of the account to sync with.
Notion Ink ADAM User Manual: Mail’d Full Screen View Panels Accounts Panel: The first Panel is the Accounts Panel. This panel lists all the accounts that have been set-up with Mail’d. This panel allows adding a new account by clicking on the ‘Add New Account’ link at the bottom of the accounts list. The accounts are listed in the order in which they are set-up except for the default mail account which is always displayed at the top of the list.
Notion Ink ADAM User Manual: Mail’d Reply/Reply All/Forward/Compose Reply, Reply All, Forward and Compose brings up a new overlay over the screen. The overlay will have the To, Subject, Message, Signature Fields. The fields To, Subject and Message are pre-populated if the user taps on Reply, Reply All or Forward. The signature field is always filled with the signature that has been set for the account; this can be edited at any time before sending the mail.
Notion Ink ADAM User Manual: Mail’d Move/Copy To move or copy email(s) under a label, select the email(s) in the emails panel by tapping on the check-box of the email(s). This will bring up the buttons Move, Copy and Delete in place of the search bar at the top of the panel. Once Move/Copy is tapped, a label can be tapped on to move/ copy the selected email(s) to that Label. Searching E-mail Using the search bar at the top of the emails panel, a selected label can be searched.
Notion Ink ADAM User Manual: Mail’d Settings General Account Settings Change Account Name: Tapping on the option Account Name will prompt for a new Account name. Once a new account name is given, Mail’d uses the new name as default for the account. Making an Account Default: Checking the option ‘Default Account’ will set the current account as Default Account. By default, the first account is set as default. Unchecking this option will remove the current account as default.
Notion Ink ADAM User Manual: Mail’d Auto Expand Folder: Clicking on this option will lead the user to a list of all the Mail category folders in Mail'd (ex: Inbox, All Mail, Important,etc.). Upon selecting one option, any future syncing will only download the category of mail selected and will populate only the selected folder. Sync Remote Deletions: When this option is set, the checked message, when deleted from the server, will also be deleted on Mail’d. By default, this option is checked.
Notion Ink ADAM User Manual: Sniffer SNIFFER Storage Options Adam supports three storage options out of the box. The first one is the internal memory of 8GB, while 2GB is reserved for application installation; the remaining 6GB is free to be used. This memory cannot be removed. The second one is the micro SD card memory. The memory slot is located on the bottom rim of the device beside the SIM card slot. The maximum memory of the card should be no more than 128GB.
Notion Ink ADAM User Manual: Sniffer Full-Screen View The full-screen view will have storage options (Adam Memory, USB Drive, microSD) listed in the left panel, along with Applications link at the bottom of the panel. Initially, Sniffer will show the break-down of Adam Memory, in the space available to the right of the storage options panel. This break down will graphically show the memory occupied by Audio, Video, Images and other files along with the free memory available.
Notion Ink ADAM User Manual: Sniffer Previewing and Opening Files The Panels will list all the files and folders. Tapping on a file will open a new panel towards the right which is the Preview Panel. On the top section of the panel, the file preview is displayed. The preview is available only if there is an app installed which can read the file. It also displays the size of the file. The bottom of the preview panel will provide the list of all installed apps that can open the file.
Notion Ink ADAM User Manual: Sniffer Creating New Folder Tapping on the menu button will allow multiple selections of the files and folders. Once the desired file(s) or folder(s) is selected (to unselect a selected file or folder tap on it again), tap on the copy/cut this enables the paste icon. Now choosing a destination folder and tapping the paste icon will paste the selected content(s) into the destination folder.
Notion Ink ADAM User Manual: Sniffer Rename a Folder To rename a file or folder, select the desired file or folder and tap on the ‘Rename’ Icon under the menu. This prompts for a new file or folder name, once given the file or folder is renamed with the new name. Searching Folders / Files Tapping on the search button or the search icon under the options menu will open a new panel to the right of the last panel.
Notion Ink ADAM User Manual: Calendar CALENDAR Panel View The top of the panel displays the current day in DAY, DATE MONTH, YEAR. Below the current day, the currently selected calendar name is displayed. By default, the default calendar is loaded. Month View: Over the month view is the currently displayed month in MONTH YYYY format. Also, two arrow icons are provided on either sides to display the previous and next months.
Notion Ink ADAM User Manual: Calendar The full screen view will display the 12 months of the year and 5 days of a week beneath the list of months horizontally. The current year is displayed to the extreme left over the months list and the next year is displayed to the extreme right in the same row. If launched from the ‘Launch Application’ link, no day is selected but the current day is in the center of the display. Each Date will have the events on that day listed to the right of the day.
Notion Ink ADAM User Manual: Calendar Add/Edit Event View: This view displays columns to choose the details from the lists in the columns to create the event. The order of the columns is ‘Event title’, ‘Contacts’, ‘Year’, ‘Month’, ‘Day’, ‘Reminder’ option, ‘Event Timings’, ‘Notes’, ‘List of calendars to sync with’ and options to ‘create the event’, ‘cancel’ or ‘switch to standard view’.
Notion Ink ADAM User Manual: Calendar Editing an Event: To edit an event, choose the event and tap on the 'Edit' icon. This brings up the 'Add Event' View with the details of the event pre-populated. Now any desired changes can be made to edit the event and tapping on ‘Update’ will make changes to the event. Deleting an Event: Once the desired event is selected, tapping on the 'Delete' icon will prompt the user for confirmation to delete the event. Once confirmed, the event will be deleted.
Notion Ink ADAM User Manual: Calendar Setting up Syncable Calendar To set-up a syncable calendar, the account has to be added manually under ‘Accounts & Sync Settings‘. Tap on ‘Add Account‘ and select ‘Corporate‘ (Any email account can be added including free email service providers like Gmail and Yahoo)and enter the email address and password. Submitting the details is followed by Server Settings, where details of the Domain\Username, Password and Server are pre-populated.
Notion Ink ADAM User Manual: Canvas Canvas Panel View The Panel View will have an Easel with the board on the easel displaying the most recently edited image. Clicking on this image will open Canvas in full-screen mode with the image displayed. At the bottom of the panel, the options ‘New’ and ‘Load’ are provided. Clicking on ‘New’ opens the Canvas in full-screen view with a new empty white canvas. Tapping on ‘Load’ will display options to select an image either from ‘Gallery’ or from ‘Sniffer’.
Notion Ink ADAM User Manual: Canvas Menu Tapping on menu at any point will bring up four options – Save, Load, New, Set as Wallpaper. Save: Tapping ‘Save’ will prompt for a File name. Once the file name is given the image will be saved. This action also checks if all the layers are merged with the background image and prompts the user for permission to merge before saving. Load: Tapping on ‘Load’ will prompt the user to choose an image file through ‘Gallery’ or ‘Sniffer’.
Notion Ink ADAM User Manual: Canvas Layers There are three editable layers, namely Layer 1, Layer 2 and Layer 3. The image layer is at the bottom of all the editable layers. This is not editable and when any changes are merged they become part of the image layer and then cannot be edited. Selected Layer: A selected layer is represented with an orange background. Selecting an invisible layer will make it visible automatically.
Notion Ink ADAM User Manual: Canvas Brushes: There are three types of brushes provided - ‘Circle’, ‘Square’ and ‘Blur’. These brushes can be used to ‘Paint’, ‘Fill’ or ‘Erase’. Tapping on a brush will select the brush; this is indicated by an orange background. Opacity: Tapping on the ‘Opacity’ option will bring up a slider allowing you to set the opacity of the brush. The selected opacity is displayed over the Opacity link. Size: The size of a brush can be set by tapping on the ‘Size’ link.
Notion Ink ADAM User Manual: Canvas Locked and Unlocked Text: To ‘Lock text’, tap on the ‘√’ icon. This will lock all the text across all layers. Any text that is not locked is unlocked. Once locked, no text can be unlocked. Adding/Editing Text: To add text to a selected layer, there should be no unlocked text on that layer. To lock the text, tap the ‘√’ icon (Warning: This locks the text in all layers and cannot be undone).
Notion Ink ADAM User Manual: Canvas Edit Tapping on ‘Edit’ when mode options are displayed will merge all visible layers with the background. Toolbar: The toolbar houses ‘Vertical Flip’, ‘Horizontal Flip’, ‘Crop’ and also ‘Revert’ between ‘Menu’ and ‘Edit’. The ‘Effects’, ‘Appearance’, ‘Adjustment’ and ‘Auto Correct’ options are provided after ‘Edit’. Flip Vertically: Tapping on the Vertical Flip icon will flip the image vertically.
Notion Ink ADAM User Manual: Canvas Appearance: Tapping on ‘Appearance’ will bring up three options – ‘Invert’, ‘Spotlight’ and ‘Emboss’. Tapping on ‘Invert’ inverts the colors on the image. Tapping on ‘Spotlight’ will display a circular spot on the image with the rest of the image shaded. Also, a horizontal slider is provided to adjust the diameter of the circular spotlight. The position of the spotlight can be adjusted by holding the spotlight and dragging it to the desired position.
Notion Ink ADAM User Manual: Calculator Calculator Panel View The Panel view allows for basic mathematical operations which include addition, subtraction, multiplication and division. It also supports square, square root, and additive inverse of a number. It includes other basic functions like clear display and backspace. The memory or previous calculations are displayed on the top right side of the panel along with an option to clear memory. Clicking on any result will copy the result to the clipboard.
Notion Ink ADAM User Manual: Calculator Percentage: Enter the value for which percentage has to be calculated, tap on the Percentage (%) button and enter the value to which the percentage has to be calculated. Now tap ‘=’ to view results. Tapping on ‘=’ without entering the value to which the percentage has to be calculated takes a default value of 100. Upon Tapping on the ‘%’ icon first, the cursor can be placed at the desired positions to enter the values. Ex: 75%90 = 67.5; 38% = 0.
Notion Ink ADAM User Manual: Support For any support, please contact us at - support@notionink.