
User Manual
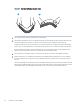

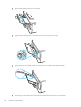
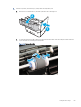
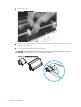
Table Of Contents
- Printer overview
- Paper trays
- Supplies, accessories, and parts
- Manage the printer
- Solve problems
- Customer support
- Restore the factory-set defaults
- A “Cartridge is low” or “Cartridge is very low” message displays on the printer control panel
- Printer does not pick up paper or misfeeds
- Clear paper jams
- Resolving print quality problems
- Solve wired network problems
- Introduction
- Poor physical connection
- The computer is unable to communicate with the printer
- The printer is using incorrect link and duplex settings for the network
- New software programs might be causing compatibility problems
- The computer or workstation might be set up incorrectly
- The printer is disabled, or other network settings are incorrect
- Solve wireless network problems
- Introduction
- Wireless connectivity checklist
- The printer does not print after the wireless configuration completes
- The printer does not print, and the computer has a third-party firewall installed
- The wireless connection does not work after moving the wireless router or printer
- Cannot connect more computers to the wireless printer
- The wireless printer loses communication when connected to a VPN
- The network does not appear in the wireless networks list
- The wireless network is not functioning
- Perform a wireless network diagnostic test
- Reduce interference on a wireless network
- Service and support
- HP limited warranty statement
- HP's Premium Protection Warranty: LaserJet toner cartridge limited warranty statement
- Long life consumable and maintenance kit limited warranty statement
- HP policy on non-HP supplies
- HP anticounterfeit Web site
- Data stored on the toner cartridge
- End User License Agreement
- Customer self-repair warranty service
- Customer support
- Environmental product stewardship program
- Protecting the environment
- Ozone production
- Power consumption
- Toner consumption
- Paper use
- Plastics
- HP LaserJet print supplies
- Paper
- Material restrictions
- Battery information
- Disposal of waste equipment by users (EU, UK, and India)
- Electronic hardware recycling
- Brazil hardware recycling information
- WEEE (Turkey)
- Chemical substances
- Product Power Data per European Union Commission Regulation 1275/2008 and the UK Relevant Statutory Requirements
- SEPA Ecolabel User Information (China)
- The regulation of the implementation on China energy label for printer, fax, and copier
- Restriction on Hazardous Substances statement (India)
- Substances Table (China)
- Material Safety Data Sheet (MSDS)
- EPEAT
- Substances Table (Taiwan)
- For more information
- Regulatory information
- Regulatory statements
- Regulatory model identification numbers
- European Union & United Kingdom Regulatory Notice
- FCC regulations
- Canada - Industry Canada ICES-003 Compliance Statement
- VCCI statement (Japan)
- Power cord instructions
- Power cord statement (Japan)
- Laser safety
- Laser statement for Finland
- Nordic Statements (Denmark, Finland, Norway, Sweden)
- GS statement (Germany)
- Eurasian Conformity (Armenia, Belarus, Kazakhstan, Kyrgyzstan, Russia)
- Taiwan BSMI USB Port (Walk-up) statement
- Product stability
- Wireless statements
- European regulatory notice
- Belarus
- FCC compliance statement—United States
- Australia statement
- Brazil: (Portuguese)
- Canadian statements
- Products with 5 GHz Operation Industry of Canada
- Exposure to Radio Frequency Radiation (Canada)
- European Regulatory Notice
- China CMIIT Wireless Statement
- Notice for use in Japan
- Notice for use in Russia
- Mexico statement
- Taiwan statement
- Taiwan NCC statement
- Korean statement
- Thailand Wireless Statement
- RFID/NFC Statement
- Regulatory statements
- Index

1. Open the printer and remove any jammed sheets of paper. Verify that no torn remnants of paper remain
inside of the printer.
2. Load the tray with the correct size of paper for the job.
3. Make sure the paper size and type are set correctly on the printer control panel.
4. Make sure the paper guides in the tray are adjusted correctly for the size of paper. Adjust the guides to the
appropriate indentation in the tray. The arrow on the tray guide should line up exactly with the marking on
the tray.
NOTE: Do not adjust the paper guides tightly against the paper stack. Adjust them to the indentations or
markings in the tray.
The following image shows examples of the paper-size indentations in the trays. Most HP printers have
markings similar to these.
Figure 6-1 Examples of size markings
5. Verify that the humidity in the room is within specications for this printer, and that paper is being stored in
unopened packages. Most reams of paper are sold in moisture-proof wrapping to keep paper dry.
In high-humidity environments, paper at the top of the stack in the tray can absorb moisture, and it might
have a wavy or uneven appearance. If this happens, remove the top 5 to 10 sheets of paper from the stack.
In low-humidity environments, excess static electricity can cause sheets of paper to stick together. If this
happens, remove the paper from the tray, and ex the stack by holding it at each end and bringing the
ends up to form a U shape. Then, rotate the ends down to reverse the U shape. Next, hold each side of
the stack of paper, and repeat this process. This process releases individual sheets without introducing static
electricity. Straighten the paper stack against a table before returning it to the tray.
62
Chapter 6Solve problems