
User Manual
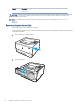
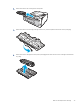


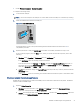
Table Of Contents
- Printer overview
- Paper trays
- Supplies, accessories, and parts
- Manage the printer
- Solve problems
- Customer support
- Restore the factory-set defaults
- A “Cartridge is low” or “Cartridge is very low” message displays on the printer control panel
- Printer does not pick up paper or misfeeds
- Clear paper jams
- Resolving print quality problems
- Solve wired network problems
- Introduction
- Poor physical connection
- The computer is unable to communicate with the printer
- The printer is using incorrect link and duplex settings for the network
- New software programs might be causing compatibility problems
- The computer or workstation might be set up incorrectly
- The printer is disabled, or other network settings are incorrect
- Solve wireless network problems
- Introduction
- Wireless connectivity checklist
- The printer does not print after the wireless configuration completes
- The printer does not print, and the computer has a third-party firewall installed
- The wireless connection does not work after moving the wireless router or printer
- Cannot connect more computers to the wireless printer
- The wireless printer loses communication when connected to a VPN
- The network does not appear in the wireless networks list
- The wireless network is not functioning
- Perform a wireless network diagnostic test
- Reduce interference on a wireless network
- Service and support
- HP limited warranty statement
- HP's Premium Protection Warranty: LaserJet toner cartridge limited warranty statement
- Long life consumable and maintenance kit limited warranty statement
- HP policy on non-HP supplies
- HP anticounterfeit Web site
- Data stored on the toner cartridge
- End User License Agreement
- Customer self-repair warranty service
- Customer support
- Environmental product stewardship program
- Protecting the environment
- Ozone production
- Power consumption
- Toner consumption
- Paper use
- Plastics
- HP LaserJet print supplies
- Paper
- Material restrictions
- Battery information
- Disposal of waste equipment by users (EU, UK, and India)
- Electronic hardware recycling
- Brazil hardware recycling information
- WEEE (Turkey)
- Chemical substances
- Product Power Data per European Union Commission Regulation 1275/2008 and the UK Relevant Statutory Requirements
- SEPA Ecolabel User Information (China)
- The regulation of the implementation on China energy label for printer, fax, and copier
- Restriction on Hazardous Substances statement (India)
- Substances Table (China)
- Material Safety Data Sheet (MSDS)
- EPEAT
- Substances Table (Taiwan)
- For more information
- Regulatory information
- Regulatory statements
- Regulatory model identification numbers
- European Union & United Kingdom Regulatory Notice
- FCC regulations
- Canada - Industry Canada ICES-003 Compliance Statement
- VCCI statement (Japan)
- Power cord instructions
- Power cord statement (Japan)
- Laser safety
- Laser statement for Finland
- Nordic Statements (Denmark, Finland, Norway, Sweden)
- GS statement (Germany)
- Eurasian Conformity (Armenia, Belarus, Kazakhstan, Kyrgyzstan, Russia)
- Taiwan BSMI USB Port (Walk-up) statement
- Product stability
- Wireless statements
- European regulatory notice
- Belarus
- FCC compliance statement—United States
- Australia statement
- Brazil: (Portuguese)
- Canadian statements
- Products with 5 GHz Operation Industry of Canada
- Exposure to Radio Frequency Radiation (Canada)
- European Regulatory Notice
- China CMIIT Wireless Statement
- Notice for use in Japan
- Notice for use in Russia
- Mexico statement
- Taiwan statement
- Taiwan NCC statement
- Korean statement
- Thailand Wireless Statement
- RFID/NFC Statement
- Regulatory statements
- Index

● macOS: Printers & Scanners > Options & Supplies
To complete Job Storage setup:
1. Locate the rear USB port.
NOTE: On some models, the rear USB port is covered. Remove the rear USB port cover before proceeding.
2. Insert the USB ash drive into the rear USB port.
Figure 4-1 Insert USB ash drive
A message displays on the control panel warning that the USB drive will be formatted. Select OK to
complete the procedure.
3. Open the print driver to verify the Job Storage tab is visible. If it is visible, the feature is ready to use.
From a software program, select the Print option, select your printer from the list of printers, and do the
following:
● Windows: Select Properties or Preferences. Click the Job Storage tab.
If the Job Storage tab is not showing, activate it as follows:
From the Start menu, open Settings, click Devices, and then click Devices and Printers. Right-click on
the printer name and click Printer Properties. Click the Device Settings tab, click on Job Storage, and
then select Automatic. Click Apply and OK.
● macOS: The print driver displays the Copies & Pages menu. Open the drop-down list, and then click the
Job Storage menu.
If the Job Storage menu is not showing, close the Print window and then reopen it to activate the menu.
Disable or enable the job storage feature
Disable the job storage feature to make it unavailable, even if a USB drive is inserted into the printer. Enable the
feature to make it available again.
1. Open the Printer Properties:
● Windows: From the Start menu, open Settings, click Devices, and then click Devices and Printers.
Right-click on the printer and click Printer properties.
● macOS: From the Apple menu, open System Preferences, and then click Printers & Scanners. Select the
printer and click Options & Supplies.
Disable or enable the job storage feature
41