
Installation Sheet


For assistance call 800-522-7336 Monday through Friday 7am to 6pm Mountain Time
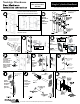
USE INCLUDED DOOR PREPARATION
TEMPLATE FOR NON-PREPPED DOORS
USE INCLUDED PLASTIC TEMPLATE FOR
PREPPED DOORS
14
14
2
2
13
13A
Install
Deadbolt
and
Handleset
Latches
Tongue
(See D Below Before
Deadbolt Latch
Installation)
(See Latch
Tongue Note
in Panel C)
Latch Tongue Note
Bevel Side
Face Plate Curve
Strike Plate Curve
Bevel side of latch tongue should
contact curved end of face plate,
and curved end of strike plate.
Nostalgic Warehouse
Deadbolt Latch Tongue Note
3C
3
4
Install
Cylinder
and
Escutcheon
*Georgetown & Newport do not require spin ring
*
Door Inside
3
5
6
Cylinder
Assembly
Insert Cylinder
Assembly
into Escutcheon,
and place on
door exterior.
Attach deadbolt
adaptor plate
with provided
screws.
7
8
Attach
Thumbturn
Assembly
with
provided
screws.
Push down Button
and Hold During
Insertion
Insert
Handleset
Spindle
(short end of spindle
goes on outside)
Door-Outside
1
2
Insert Handleset Spindle
3 & 4
Cylinder and Escutcheon
Install
Exterior
Handleset
on Door
Exterior
(part #16)
20
22
21
17
18
Rosette
1-1/2” or 1-3/4” Machine Mounting Screws
Install
Long Plate
with Knob
on Door
Inside
19
9
10
12
2
11
Install Jamb Strike Plate
Door
Jamb
Note: Handlesets fit doors 1-3/4” to 2-1/4” thick.
Single Cylinder Handleset
ROSETTE
PRE-ATTACHED
KNOBS