All products are trademarks of Nostalgia Products LLC. Worldwide design & utility patented or patents pending. © 2015 Nostalgia Products LLC. www.nostalgia products.com (rev.
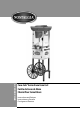
SCC399COKE Coca-Cola® Series Snow Cone Cart Carrito de Conos de Nieve Chariot Pour Cornet Glacé Instructions and Recipes Instrucciones y Recetas Consignes et Recettes
CONTENTS IMPORTANT PRECAUTIONS . . . . . . . . . . . . . . . . . . . . . . . . . . . . . . 3 IMPORTANT SAFEGUARDS . . . . . . . . . . . . . . . . . . . . . . . . . . . . . . 3 INTRODUCTION . . . . . . . . . . . . . . . . . . . . . . . . . . . . . . . . . . . . . 4 PARTS & ASSEMBLY . . . . . . . . . . . . . . . . . . . . . . . . . . . . . . . . . . . 5 HOW TO OPERATE . . . . .
ENGLISH IMPORTANT PRECAUTIONS 1. NEVER immerse in water. 2. NEVER use near water. 3. NEVER use an abrasive sponge or cloth. 4. NEVER use a scouring pad on the appliance. 5. NEVER leave appliance unattended while in use. 6. NEVER try to force the cover in the locking mechanism. 7. Unplug unit from outlet when not in use and during cleaning. 8. DO NOT operate this appliance with a damaged cord or plug, or if the appliance ever malfunctions. 9.
12. Position the appliance as close to the outlet as possible to prevent injury due to tripping over cord. 14. DO NOT use the appliance for other than its intended use. 15. An appliance that is plugged into an outlet should not be left unattended while in operation. 16. Check Ice Hopper for presence of foreign objects prior to use. 17. Blades are extremely sharp. Use with extreme caution. 18.
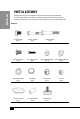
ENGLISH PARTS & ASSEMBLY Please ensure that you have removed all of the hardware and parts listed before discarding packaging. In our efforts to reduce packaging, we maximize the packing material to protect your new purchase. As a result, small parts may not be readily visible. Hardware #1 Bolt (10mm) Qty. 10 #2 Bolt (38mm) Qty. 2 #4 Screw (10mm) Qty. 4 #5 Screw (15mm) Qty. 2 #8 Locking Washer Qty. 4 #12 Door Handle Qty. 1 5 #3 Bolt (60mm) Qty.
Parts ENGLISH (A) Main Unit (E) Wheel Qty. 2 (I) Ice Shovel (B) Storage (C) Push Handle Compartment (F) Base Support Qty. 2 (G) Cross Bar Qty. 2 (J) Wrench (K) Disassembly Tool Qty. 2 (D) Bottom Plate (H) Leg Qty.
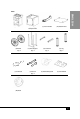
ENGLISH Assembly of Base Support 1. Attach Push Handle (C) from inside Storage Compartment (B) using two #1 Bolts and two #6 Flat Washers. Attach two #11 Nuts to bottom. 2. Attach Cross Bar (G) to Base Support (F) and secure with four #1 Bolts and four #6 Flat Washers. 3. Secure Bottom Plate (D) to Base Support (F) using four #1 Bolts and four #6 Flat Washers. 4. Attach Legs (H) to protruding ends of Base Support (F) using two #2 Bolts, two #7 Flat Washers and two #8 Locking Washers.
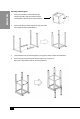
5. Assemble Base Support (F) into the bottom of the Storage Compartment (B) and secure with four #4 Screws. ENGLISH Assembly of Wheels 1. Place #7 Flat Washer onto #3 Bolt and insert into predrilled hole on inside of Base Support (F). 2. Put #7 Flat Washer and #13 Sleeve Barrel on end of inserted #3 Bolt. 3. Attach the Wheel (E) to the #3 Bolt. Place #7 Flat Washer and #8 Locking Washer on Wheel (E). Use the end of Wrench (J) with small notch to hold the #3 Bolt in place.
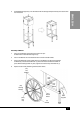
ENGLISH Attaching Door Handle Attach #9 Magnet to transparent door of Main Unit (A). 2. Place #12 Door Handle using two #5 Screws. 3. Place Main Unit (A) onto the top of the Storage Compartment (B). 4. Ensure that the two inserting pins at the bottom of the Main Unit (A) line up correctly so that Main Unit (A) can be locked under the beam of the Storage Compartment (C). PDF 文件使用 "pdfFactory Pro" 试用版本创建 www.fineprint.cn 1.
ENGLISH HOW TO OPERATE ON / OFF Switch Ice Hopper Door Handle Before first use, clean the inside of the unit by wiping with a moist, non-abrasive sponge, towel or cloth and then wipe with a non-abrasive dry towel. 1. First, find a flat surface near an electrical outlet before starting. Make sure your cord is away from any water source. It is acceptable to use an extension cord if needed. 2.
ENGLISH HELPFUL TIPS Ice For optimal ice shaving results, ice cubes should sit out of the freezer, in a bowl, for about 10 minutes before putting them into the shaving unit. If ice is frosty in appearance, it is too hard to shave. When ice is clear and wet to the touch, then it is ready to shave. CLEANING & MAINTENANCE 1. Make sure appliance is turned off and unplugged before cleaning. 2.
Steps to Replace the Blade Remove the Ice Tray and insert the Disassembly Tool (K) over the three arms of the Spinner. 2. Once the Disassembly Tool (K) is properly inserted, twist counterclockwise (as the arrow shows) and lift the Spinner out. 3. Carefully press the tabs of the Blade Housing inward and lift up to release. 4. Twist off the Blade Cap and, using extreme caution, remove the Blade Cartridge. Insert the replacement Blade Cartridge, and reverse the above steps to reassemble.
ENGLISH RECIPES The COCA-COLA® SERIES SNOW CONE CART makes light, fluffy mounds of ice. Use different fruits, syrups, teas, and juices to create a number of refreshing, icy, low-fat treats, drinks and desserts. BOTTLED SYRUP CONCENTRATE • 19 oz. Warm Water • 2¾ Cups Sugar (1.25 lb.) • 1 oz. Food Coloring • 1 qt. Empty Bottle Put 19 ounces of warm water into a one quart (or larger) bottle. Using a funnel, add 2¾ cups of sugar to the water. Screw cap on tightly.
PEACH SPRITZER 2 Cups Peach Seltzer Fill a cup halfway with freshly shaved ice. • 2 Tbsp. Freshly Squeezed Orange Juice Pour peach seltzer and orange juice over ice. • 1 Packet of Sugar Substitute Stir until well blended. ENGLISH • Empty packet of sugar substitute into cup. Add additional ice if desired, until cup is full. Serves one. VANILLA SNOW • 3 Scoops of Vanilla Ice Cream • Shaved Ice • Vanilla Flavored Syrup Put scoops of ice cream in a bowl.
ENGLISH RETURNS & WARRANTY SHOULD YOUR UNIT NOT WORK OR IF DAMAGED WHEN YOU FIRST TAKE IT OUT OF THE BOX, PLEASE RETURN IT TO THE PLACE OF PURCHASE IMMEDIATELY. COCA-COLA® SERIES SNOW CONE CART / SCC399COKE Should you have any questions, please contact us via email or at the customer service number listed below between the hours of 8:00 AM and 5:00 PM, Monday through Friday, Central Standard Time. Distributed by: Nostalgia Products LLC 1471 Partnership Dr.