All products are trademarks of Nostalgia Products LLC. Worldwide design & utility patented or patents pending. © 2015 Nostalgia Products LLC. www.nostalgia products.com (rev.
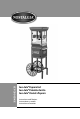
CCP399COKE Coca-Cola® Popcorn Cart Coca-Cola® Palomitas Carrito Coca-Cola® Chariot à Popcorn Instructions and Recipes Instrucciones y recetas Instructions et recettes
CONTENTS IMPORTANT PRECAUTIONS . . . . . . . . . . . . . . . . . . . . . . . . . . . . . . 3 IMPORTANT SAFEGUARDS . . . . . . . . . . . . . . . . . . . . . . . . . . . . . . 3 INTRODUCTION . . . . . . . . . . . . . . . . . . . . . . . . . . . . . . . . . . . . . 4 PARTS & ASSEMBLY . . . . . . . . . . . . . . . . . . . . . . . . . . . . . . . . . . . 5 HOW TO OPERATE . . . . .
ENGLISH IMPORTANT PRECAUTIONS 1. NEVER immerse in water. 2. NEVER use near water. 3. NEVER use an abrasive sponge or cloth on the appliance. 4. NEVER use a scouring pad on the appliance. 5. NEVER leave appliance unattended while in use. 6. NEVER force Kettle in or out of the brackets as this may cause gears to become misaligned and appliance will not operate properly. 7. Unplug unit from outlet when not in use and during cleaning. 8.
DO NOT use the appliance for other than its intended use. 13. An appliance that is plugged into an outlet should not be left unattended while in operation. 14. Check Kettle for presence of foreign objects prior to use. 15. Make sure the Kettle is properly attached to brackets before operating and that the motor plug is plugged into the Kettle. 16. A short power supply cord is provided to reduce the risk resulting from becoming entangled or tripping over a long cord. 17.
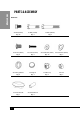
ENGLISH PARTS & ASSEMBLY Hardware 5 #1 Bolt (10mm) Qty. 10 #2 Bolt (38mm) Qty. 2 #3 Bolt (60mm) Qty. 2 #4 Screw (10mm) Qty. 4 #5 Screw (15mm) Qty. 2 #6 Flat Washer (6mm) Qty. 10 #7 Flat Washer (8mm) Qty. 8 #8 Locking Washer Qty. 4 #9 Magnet Qty. 1 #10 Nut Cap Qty. 2 #11 Nut Qty. 2 #12 Door Handle Qty. 1 #13 Sleeve Barrel Qty.
Parts ENGLISH (A) Main Unit (E) Wheel (2) (H2) Oil Measuring Spoon (1 Tbsp.) (B) Storage (C) Push Handle Compartment (F) Base Support Qty. 2 (G) Cross Bar Qty. 2 (I) Leg (J) Popcorn Scoop Qty. 2 (D) Bottom Plate (H1) Kernel Measuring Cup (2-oz.
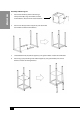
ENGLISH Assembly of Base Support 1. Attach Push Handle (C) from inside Storage Compartment (B) using two #1 Bolts and two #6 Flat Washers. Attach two #11 Nuts to bottom. 2. Attach Cross Bar (G) to Base Support (F) and secure with four #1 Bolts and four #6 Flat Washers. 3. Secure Bottom Plate (D) to Base Support (F) using four #1 Bolts and four #6 Flat Washers. 4. Attach Legs (I) to protruding ends of Base Support (F) using two #2 Bolts, two #7 Flat Washers and two #8 Locking Washers.
5. Assemble Base Support (F) into the bottom of the Storage Compartment (B) and secure with four #4 Screws. ENGLISH Assembly of Wheels 1. Place #7 Flat Washer onto #3 Bolt and insert into predrilled hole on inside of Base Support (F). 2. Put #7 Flat Washer and #13 Sleeve Barrel on end of inserted #3 Bolt. 3. Attach the Wheel (E) to the #3 Bolt. Place #7 Flat Washer and #8 Locking Washer on Wheel (E). Use the end of Wrench (K2) with small notch to hold the #3 Bolt in place.
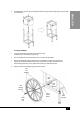
Assembly of Main Unit ENGLISH ON / OFF / LIGHT Switch Crank Handle Stainless Steel Kettle Attaching Door Handle 1. Attach #9 Magnet to transparent door of Main Unit (A). 2. Place #12 Door Handle using two #5 Screws. 3. Place Main Unit (A) onto the top of the Storage Compartment (B). 4. Ensure that the two inserting pins at the bottom of the Main Unit (A) line up correctly so that Main Unit (A) can be locked under the beam of the Storage Compartment (C).
ENGLISH HOW TO OPERATE Before first use, clean the inside of the unit by wiping with a moist, non-abrasive sponge, towel or cloth and then wipe with a non-abrasive dry towel. Wipe down the inside of the Kettle and be sure it is properly placed in the brackets before starting. 1. First, find a flat surface near an electrical outlet before starting. Make sure your cord is away from any water source. It is acceptable to use an extension cord if needed. 2.
ENGLISH HELPFUL TIPS NEVER leave the unit unattended while operating. SMOKING If your COCA-COLA® POPCORN CART begins to smoke during cooking, it may be due to grease build up. In order to reduce smoking, make sure that you clean the inside of the Kettle between uses. POPCORN For best results, use an all natural soft-shelled popping corn. Organic popping corn is not recommended for use in your COCA-COLA® POPCORN CART as it has a harder husk and will result in more unpopped kernels.
ENGLISH RECIPES The COCA-COLA® POPCORN CART makes hot, fresh, theater style popcorn every time – anytime! Enjoy your freshly popped corn in a variety of ways: • Regular theater style popcorn – add butter and salt. • Add a pinch of sugar and salt to popcorn for a sweet kettle corn taste. • Flavored popcorn – add seasoning from any gourmet popcorn seasoning kit.
ENGLISH CHUNKY MONKEY • 1 Gallon Popped Corn • 1 (12-oz.) Bag Semi-Sweet Chocolate Chips Pop corn kernels using the COCA-COLA® POPCORN CART as directed on page 10. Melt chocolate chips and peanut butter morsels over stove, as packaging recommends. • 1 (12-oz.) Bag Peanut Butter Morsels Line cookie sheet with wax paper. • 1 (4.2-oz.) Bag Banana Chips, broken into small pieces Toss together popcorn and banana chips. • 1 (11-oz.
ENGLISH RETURNS & WARRANTY SHOULD YOUR UNIT NOT WORK OR IF DAMAGED WHEN YOU FIRST TAKE IT OUT OF THE BOX, PLEASE RETURN IT TO THE PLACE OF PURCHASE IMMEDIATELY. COCA-COLA® POPCORN CART / CCP399COKE Should you have any questions, please contact us via email or at the customer service number listed below between the hours of 8:00 AM and 5:00 PM, Monday through Friday, Central Standard Time. Distributed by: Nostalgia Products LLC 1471 Partnership Dr.
¡Convierta todos los días en una fietsa! Visite www.nostalgiaproducts.com para ver más productos divertidos. CONTENIDO PRECAUCIONES IMPORTANTES . . . . . . . . . . . . . . . . . . . . . . . . . . . 16 MEDIDAS IMPORTANTES. . . . . . . . . . . . . . . . . . . . . . . . . . . . . . . 16 INTRODUCCIÓN . . . . . . . . . . . . . . . . . . . . . . . . . . . . . . . . . . . . 17 PARTES Y ENSAMBLE . . . . . . . . .
PRECAUCIONES IMPORTANTES JAMÁS sumerja en agua. 2. NUNCA lo utilice cerca del agua. 3. NUNCA use una esponja o paño abrasivo en el aparato. 4. JAMÁS utilice una esponjita de acero para limpiar el electrodoméstico. 5. NUNCA deje el aparato sin supervisar mientras está en uso. 6. JAMÁS fuerce la olla fuera o dentro de los soportes dado que esto puede causar que los engranajes se desalinean y el dispositivo puede no funcionar de modo correcto. 7.
11. Se deberá tener gran precaución cuando se mueva este electrodoméstico. 12. NO utilice este electrodoméstico para otro uso que no sea el previsto. 13. Un electrodoméstico enchufado no debe dejarse solo mientras está en funcionamiento. 14. Verifique la no existencia de objetos extraños en la olla antes de proceder a su uso. 15. Asegúrese que la olla esté correctamente colocada dentro de los soportes antes de proceder a su operación y que el enchufe del motor esté en la misma. 16.
PIEZAS Y ENSAMBLAJE Tornillería #2 Perno (38mm) Cantidad 2 #3 Perno (60mm) Cantidad 2 #4 Tornillo (10mm) Cantidad 4 #5 Tornillo (15mm) Cantidad 2 #6 Arandela plana (6mm) Cantidad 10 #7 Arandela plana (8mm) Cantidad 8 #8 Arandela de retención Cantidad 4 #9 Imán Cantidad 1 #10 Tuerca ciega Cantidad 2 #11 Tuerca Cantidad 2 #12 Manija de puerta Cantidad 1 #13 Cilindro Cantidad 2 ESPAÑOL #1Perno (10mm) Cantidad 10 18
Piezas (B) Compartimiento de (C) Manija almacenamiento (D) Placa base (E) Rueda (2) (F) Soporte de la base Cantidad 2 (G) Barra transversal Cantidad 2 (H1) Medidor Taza (2-oz.
Montaje del soporte de la base Coloque la manija (C) desde dentro del Compartimiento de almacenamiento (B) utilizando los dos Pernos #1 y dos Arandelas planas #6. Coloque dos Tuercas #11 en la parte inferior. 2. Coloque la Barra transversal (G) en el Soporte de la base (F) y asegúrela con cuatro Pernos #1 y cuatro Arandelas planas #6. 3. Coloque la Placa base (D) en el Soporte de la base (F) y asegúrela con cuatro Pernos #1 y cuatro Arandelas planas #6. 4.
5. Monte el Soporte de la base (F) dentro del Compartimiento de almacenamiento (B) y asegúrelo con cuatro tornillos #4. ESPAÑOL Montaje de las ruedas 1. Coloque la arandela plana #7 en el perno #3 e insértelo dentro del orificio pre-perforado dentro del Soporte de la base (F). 2. Coloque una arandela plana #7 y un Cilindro #13 en el extreme del perno #3 colocado. 3. Coloque la Rueda (E) al Perno #3. Coloque la Arandela plana #7 y la Arandela de retención #8 en la Rueda (E).
Montaje de la unidad principal LUZ DE ENCENDIDO/ APAGADO Manija accionadora Olla de acero inoxidable Manija de la puerta ESPAÑOL 1. Coloque el Imán #9 en la puerta transparente de la Unidad principal (A). 2. Coloque la Manija #12 usando dos tornillos #5. 3. Coloque la Unidad principal (A) sobre la parte superior del Compartimiento de almacenamiento (B). 4.
CÓMO FUNCIONA ESPAÑOL Antes del primer uso, limpie la parte interior de la unidad, mojándola con una esponja, toalla o paño húmedo, no abrasivo y luego enjuague con una toalla seca no abrasiva. Enjuague el interior de la Olla y asegúrese que esté colocada de modo correcto en los soportes antes de comenzar. 1. Primero, encuentre una superficie plana cerca de la salida eléctrica antes de comenzar. Asegúrese que el cable esté alejado de cualquier tipo de recipiente con agua.
CONSEJOS ÚTILES NUNCA deje la unidad sin supervisión mientras está en uso. HUMO Si su COCA-COLA® PALOMITAS CARRITO comienza a producir humo mientras cocina, puede deberse a la acumulación de grasa. Para reducir el humo, asegúrese limpiar la parte interior de la Olla entre usos. PALOMITAS DE MAÍZ Para mejores resultados, utilice un maíz natural de cáscara blanda. No se recomienda el uso de maíz para palomitas de maíz orgánico dado que su cáscara es más dura y resultará en semillas que no se abrirán.
RECETAS ¡Este COCA-COLA® PALOMITAS CARRITO prepara palomitas de maíz frescas y calientes: en cualquier momento! Disfrute de palomitas de maíz frescas de muchas formas: • Palomitas de maíz al estilo del cine: con manteca y sal. • Agregue una pizca de azúcar y sal a las palomitas de maíz para un sabor dulce. • Palomitas de maíz con sabores: Agregue condimentos para palomitas de maíz de cualquier marca.
CHUNKY MONKEY • 1 galón de maíz • 1 (12 oz) bolsa de chispas de chocolate semi amargo Granos para palomitas de maíz utilizando el COCA-COLA® PALOMITAS CARRITO como se indica en la página 23. Derrita las chispas de chocolate y las golosinas de manteca de maní, como indica el envase. • 1 (12 oz) bolsa de golosinas de manteca de maní Alinee la lámina de galletita con el papel de cera.
DEVOLUCIONES Y GARANTÍA SI LA UNIDAD NO FUNCIONA O ESTÁ DAÑADA AL SACARLA POR PRIMERA VEZ DE LA CAJA, DEVUÉLVALA AL LUGAR DE COMPRA INMEDIATAMENTE. COCA-COLA® PALOMITAS CARRITO / CCP399COKE Si tiene preguntas, contacte con nosotros por correo electrónico o por el número telefónico de servicio al cliente que aparece a continuación en el horario de 8:00 AM a 5:00 PM, de lunes a viernes, Hora Estándar del Este. Distribuida por: Nostalgia Products LLC 1471 Partnership Dr.
Faire une fête tous les jours! Visiter le site Web www.nostalgiaproducts.com pour d’autres produits agréables. TABLE DES MATIÈRES PRÉCAUTIONS IMPORTANTES . . . . . . . . . . . . . . . . . . . . . . . . . . . 29 MISES EN GARDE SÉCURITAIRES IMPORTANTES . . . . . . . . . . . . . . . . 29 INTRODUCTION . . . . . . . . . . . . . . . . . . . . . . . . . . . . . . . . . . . . 30 PIÈCES ET ASSEMBLAGE. . . . . . . . . . . . .
PRÉCAUTIONS IMPORTANTES 1. NE JAMAIS immerger dans l'eau. 2. NE JAMAIS utiliser l'appareil près de l'eau. 3. NE JAMAIS utiliser une éponge abrasive ou un chiffon sur l'appareil. 4. NE JAMAIS utiliser aucun tampon à récurer sur l'appareil. 5. NE JAMAIS laisser l'appareil sans surveillance lorsqu'il est utilisé. 6. NE JAMAIS retirer la Chaudière de ses supports ou l'enfoncer de force parce que ceci pourrait désaligner l'engrenage et l'appareil ne fonctionnera pas correctement. 7.
pour éviter de se blesser en trébuchant sur le cordon. 10. NE PAS laisser le moteur de la Chaudière tourner lorsque l'éclatement du maïs a cessé. 11. Faire preuve d'une extrême prudence au moment de déplacer le présent appareil. 12. NE PAS utiliser l'appareil à une autre fin que celle pour laquelle il est prévu. 13. Un appareil qui est branché dans une prise de courant ne devrait pas être laissé sans surveillance lorsqu'il est en fonctionnement. 14.
PIÈCES ET ASSEMBLAGE Quincaillerie N0 2 Boulon (38mm) Qté 2 N0 4 Vis (10mm) Qté 4 N0 5 Vis (15mm) Qté 2 N0 6 Rondelle plate (6mm) Qté 10 N0 7 Rondelle plate (8mm) Qté 8 N0 8 Rondelle-frein Qté 4 N0 9 Aimant Qté 1 N0 10 Cache-écrou Qté 2 N0 11 Écrou Qté 2 N0 12 Poignée de la porte Qté 1 N0 13 Douille Qté 2 FRANÇAIS N0 1 Boulon (10mm) Qté 10 31 N0 3 Boulon (60mm) Qté 2
Pièces (A) Appareil principal (E) Roue (2) (H2) Cuillère à mesurer l'huile (1 c.
Assemblage de la base Fixer la Poignée-poussoir (C) depuis l'intérieur du Compartiment de rangement (B) à l'aide de deux Boulons no 1 et de deux Rondelles plates no 6. Fixer les deux Écrous no 11 au fond. 2. Fixer la Barre transversale (G) à la Base (F), puis la fixer à l'aide de quatre Boulons no 1 et de quatre Rondelles plates no 6. 3. Fixer la Plaque de fond (D) à la Base (F) à l'aide de quatre Boulons no 1 et de quatre Rondelles plates no 6. 4.
5. Assembler la Base (F) dans le fond du Compartiment de rangement (B), puis fixer solidement à l'aide de quatre Vis no 4. Assemblage des roues 1. Mettre la Rondelle plate no 7 sur le Boulon no 3 Bolt, puis insérer dans le trou prépercé à l'intérieur de la Base (F). 2. Mettre la Rondelle plate no 7 et la Douille no 13 à l'une des extrémités du Boulon inséré no 3. 3. Fixer la Roue (E) au Boulon no 3. Mettre la Rondelle plate no 7 et la Rondellefrein no 8 sur la Roue (E).
Assemblage de l'appareil principal Commutateur de MARCHE / ARRÊT / LUMIÈRE Manivelle Chaudière en inox Fixation de la poignée de la porte 1. Fixer l'Aimant no 9 à la porte transparente de l'Appareil principal (A). 2. Mettre la Poignée de porte no 12 à l'aide de deux Vis n no 5. 3. Mettre l'Appareil principal (A) sur le dessus du Compartiment de rangement (B). 4.
COMMENT FAIRE FONCTIONNER Avant son utilisation, nettoyer l'intérieur de l'appareil en l'essuyant avec une éponge, une serviette ou un chiffon humide non abrasi(f )ve, puis l'assécher avec une serviette sèche, non abrasive. Essuyer l'intérieur de la Chaudière et s'assurer qu'elle est correctement placée sur les supports avant de la démarrer. 1. Premièrement, trouver une surface plane près d'une prise murale avant de la démarrer. S'assurer que le cordon est éloigné de toute source d'eau.
CONSEILS PRATIQUES NE JAMAIS laisser l'appareil sans surveillance lorsqu'il est utilisé. FUMÉE Si le CHARIOT À MAÏS SOUFFLÉ DE STYLE SALLE DE CINÉMA D'ANTAN commence à fumer pendant la cuisson, il se peut qu'il y ait une accumulation de graisse. Afin de diminuer le risque de fumée, s'assurer de nettoyer l'intérieur de la Chaudière entre les utilisations. MAÏS SOUFFLÉ Pour de meilleurs résultats, utiliser un maïs à souffler naturel à enveloppe molle.
RECETTES LE CHARIOT À MAÏS DE TYPE SALLE DE CINÉMA D'ANTAN fait du maïs chaud, frais, de style salle de cinéma chaque fois - en tout temps ! Dégusté un maïs fraîchement soufflé de plusieurs façons : • Maïs régulier de style salle de cinéma - ajouter du beurre et du sel. • Ajouter une pincée de sucre et de sel au maïs pour un goût sucré de style chaudière. • Maïs parfumé - ajouter les assaisonnements de l'ensemble d'assaisonnement pour un maïs soufflé au goût fin.
DÉLICES CHUNKY MONKEY • 4 litres (1 gallon) de maïs soufflé • 1 emballage (340 g/12 oz) de grains de chocolat semi-sucré • • • 1 emballage (340 g/12 oz) de beurre d'arachide en morceaux 1 emballage (119 g/4,2 oz) de croustilles de bananes, en petits morceaux 1 emballage (311 g/11 oz) d'arachides Faire souffler les grains de maïs à l'aide du CHARIOT À MAÏS SOUFFLÉ DE STYLE SALLE DE CINÉMA D'ANTAN, tel qu'il est indiqué à la Page 36.
RETOUR ET GARANTIE SI VOTRE APPAREIL NE FONCTIONNE PAS OU S'IL EST ENDOMMAGÉ QUAND VOUS LE RETIREZ DE LA BOÎTE, VEUILLEZ LE RETOURNER IMMÉDIATEMENT À L'ENDROIT OÙ IL A ÉTÉ ACHETÉ. COCA-COLA® CHARIOT À POPCORN / CCP399COKE Pour toute question, communiquer par courriel ou au numéro de téléphone du service à la clientèle, entre 08 h 00 et 17 h 00, du lundi au vendredi, heure normale du Centre. Distribué par : Nostalgia Products LLC 1471 Partnership Dr.