3-Pt. PTO Rough Cut Mower Owner’s Manual WARNING: Read carefully and understand all ASSEMBLY AND OPERATION INSTRUCTIONS before operating. Failure to follow the safety rules and other basic safety precautions may result in serious personal injury.
Thank you very much for choosing a Nortrac™ product! For future reference, please complete the owner’s record below: Serial Number/Lot Date Code: ________________________________ Purchase Date: ____________________________________________ Save the receipt, warranty, and this manual. It is important that you read the entire manual to become familiar with this product before you begin using it. This 3-Pt. PTO Rough Cut Mower is designed for certain applications only.
Table of Contents Intended Use .......................................................................................................................................... 4 Technical Specifications ...................................................................................................................... 4 Specific Operation Warnings ............................................................................................................... 6 Assembly Instructions ..............................
Intended Use The NorTrac 3-Pt. PTO Rough Cut Mower is ideal for owners requiring an economical machine to handle their land maintenance requirements. This mower was built to take on the toughest terrain. The front or rear mount capability, combined with PTO’s full-floating hitch mechanism, gives you incredible mobility and allows the mower to follow the contour of the land even when cresting hills or crossing gullies.
• Inspect the work area before each use. Keep work area clean, dry, free of clutter, and well lit. Cluttered, wet, or dark work areas can result in injury. Using the mower in confined work areas may put you dangerously close to other cutting • tools and rotating parts. • Do not use the mower where there is a risk of a fire or an explosion; e.g., in the presence of flammable liquids, gases, or dust. The product can create sparks, which may ignite the flammable liquids, gases, or dust.
• Disconnect the power/air supply from the mower and place the switch in the locked or off position before making any adjustments, changing accessories, or storing the mower. Such preventive safety measures reduce the risk of starting the mower accidentally. • Store the mower when it is not in use. Store it in a dry, secure place out of the reach of children. Inspect the mower for good working condition prior to storage and before re-use.
To prevent serious injury or death: • • • • • • • • • • • • • Read and understand owner’s manual before operating, servicing or repairing equipment. Stop engine, remove key and set brake before dismounting tractor. Operate from tractor seat only. DO NOT operate without guards in place and in good condition. Never allow riders on equipment. DO NOT operate or transport on steep inclines. DO NOT operate with blade in the raised position. DO NOT exceed this implement’s maximum speed of 5 MPH.
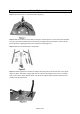
Assembly Instructions Step 1: Place the mower on a flat level surface (Figure 1). Step 2: Remove the wired-on PTO shaft, the lift pins, and the spacers. Loosen and remove the bolts four (4) on the lift arm brackets that secure the lift arm support straps, the lift arms, and the lift arm braces (from the shipping positions) and set all pieces aside (Figure 2).
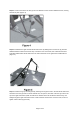
Step 5: Loosen and remove the two (2) nuts and washers for the A-frame tailwheel section, leaving the bolts in place (Figure 4). Step 6: Install both the right and left side lift arm braces by sliding them over the two (2) A-frame tailwheel bolts that were loosened in Step 4. Start the nuts on the bolts, but at this time DO NOT TIGHTEN THEM. Allow the lift arm braces to rotate forward and rest against the installed lift arm (Figure 5).
Note: You may have to move the assembly around to start the nut and washer. If you are unable to get the nut and washer started, a ‘C’ clamp may be necessary to compress the assembly in order to start the nut & washer.
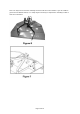
Step 8: Using the right side lift arm as a lever, pull to the outside of the lift arm bracket and insert the bolt through the lift arm and the lift arm bracket. (See Figure 9.) Install the washer and nut. Place the lift pin in the larger of the two (2) holes on the lift arm brace and loosely attach the lift arm. Finally, inset the bolt, nut, and washer to lower the section of lift arm support strap to lift the arm bracket (Figure 10).
Step 9: Tighten all nuts and bolts. Before Each Use • Before each use, perform the maintenance described in the maintenance section • Read, understand, and follow the information on safety, preparation, starting and stopping safety, operational safety, operational safety and transport safety warning sections of this manual • With the tractor running, lower the mower into working position. • With the tractor at idle RPM, engage the PTO, and slowly advance the throttle to approximately 540 PTO RPM.
Operating Instructions DO NOT overfill the gearbox. This could cause damage to the oil seals and can cause permanent damage to the gearbox and which would not be covered under the warranty. Before Putting the Mower into Service The mower shipped without oil in the gear box and without grease in the grease fitting. The unit needs to be serviced before using. Fill the gearbox with oil using multi-purpose gear oil. For all grease fittings, use a high-temperature, multi-purpose grease.
Figure 11 Arrows Indicate Grease Points Figure 12 Step 6: Inspect all guards to insure they are in good working order. If they are not, replace them before using the unit. Step 7: Check the bolts, the nuts, and the belt to insure each is tight and secure. Height Adjustment To prevent blades from striking the ground, your mower should be set to the highest position that will give the desired grass height. By setting the mower, you will reduce the blade wear and stress on the mower.
Step 4: With the tractor at an idle RPM, engage the PTO and slowly advance the throttle to 540 PTO RPM. NOTE: The mower is designed to run at 540 PTO RPM only. Step 5: Select a low gear for the tractor and begin to mow. The tractor ground speed is controlled by the gear selector only and not the engine speed. The tractor’s ground speed should allow the mower to maintain 540 PTO RPM and thus maximum blade tip speed. NOTE: Do not allow the tractor’s engine or mower to bog down or stall.
Troubleshooting Use the table below to troubleshoot problems before contacting customer service or your local dealer. If the problem continues after troubleshooting, call your local dealer for assistance.
Parts Diagram Page 17 of 21
Parts List Page 18 of 21
Replacement Parts • For replacement parts and technical questions, please call Customer Service at 1-800-222-5381. • Not all product components are available for replacement. The illustrations provided are a convenient reference to the location and position of parts in the assembly sequence. • When ordering parts, the following will be required: the item model number, item serial number/lot date code, item description, and the part’s reference number.
Limited Warranty Northern Tool and Equipment Company, Inc. ("We'' or '"Us'') warrants to the original purchaser only ("You'' or “Your”) that the Nortrac product purchased will be free from material defects in both materials and workmanship, normal wear and tear excepted, for a period of one year from date of purchase. The foregoing warranty is valid only if the installation and use of the product is strictly in accordance with product instructions.
Distributed by: Northern Tool & Equipment Company, Inc. Burnsville, Minnesota 55306 www.northerntool.