3-Pt. Grader Blade Owner’s Manual WARNING: Read carefully and understand all ASSEMBLY AND OPERATION INSTRUCTIONS before operating. Failure to follow the safety rules and other basic safety precautions may result in serious personal injury.
Thank you very much for choosing a Nortrac™ product! For future reference, please complete the owner’s record below: Serial Number/Lot Date Code: ________________________________ Purchase Date: ____________________________________________ Save the receipt, warranty, and this manual. It is important that you read the entire manual to become familiar with this product before you begin using it. This 3-Pt. Grader Blade is designed for certain applications only.
Table of Contents Intended Use .......................................................................................................................................... 4 Technical Specifications ...................................................................................................................... 4 Important Safety Information ............................................................................................................... 4 Specific Operation Warnings .......................
Intended Use The Nortrac 3-Pt. Grader Blade is suitable for a variety of jobs, including driveway maintenance, snow removal, dirt, and gravel spreading. Technical Specifications Properties# Ship Weight (lbs) Working Width (in) Category Type Hitch Type #51451 #51452 #51453 158 185 213 48 60 72 1 1 1 3 point 3 point 3 point Important Safety Information Read and understand all instructions. Failure to follow all instructions may result in serious injury or property damage.
Be aware of all power lines, electrical circuits, water pipes, and other mechanical hazards in your work area. Some of these hazards may be hidden from your view and may cause personal injury and/or property damage if contacted. PERSONAL SAFETY Stay alert, watch what you are doing, and use common sense when operating the grader blade. Do not use the grader blade while you are tired or under the influence of drugs, alcohol, or medication.
Specific Operation Warnings To prevent serious injury or death: Read and understand the Owner’s Manual before operating, servicing, or repairing equipment. Stop the engine, remove the key, and set the brake before dismounting the tractor. Operate from the tractor seat only. DO NOT operate without guards in place and in good condition. Never allow riders on equipment. Keep bystanders at least 25 feet away while operating. DO NOT operate or transport on steep inclines.
6. Before operating the machine, thoroughly read the Operating Instructions section. 7. Before operating equipment – if you have any questions regarding the proper assembly or operation, contact you dealer or representative. Tractor Hook-Up A 3-point category I hitch is required for the grader blade. The lower 3-point arms of the 3-point hitch must be stabilized to prevent side-to side movement. Most tractors have sway blocks or adjustable chains for this purpose. 1.
3. Carefully raise and lower the implement to ensure the drawbar, tires, and other equipment on the tractor do not contact the grader blade frame. 4. Verify that the grader blade is level from left to right and front to back. Field Inspection Do not use the grader blade in wet conditions. Wet material will build up causing the grader blade to lose effectiveness. 1.
properly attach the grader blade to your tractor, make leveling and angle adjustments, and conduct pre-field and field inspections. Before starting the tractor, make sure that it is out of gear, the park brake is engaged, and the grader blade is resting on the ground. Start the tractor and set the engine throttle speed at a low idle. Raise the grader blade with the tractor’s rear hydraulic lift control lever to transport position, making sure that the tractor does not contact the grader blade.
Maintenance Clean, inspect, service, and make necessary repairs to the grader blade when parking it for long periods and when parking it at the end of a working season. This will help ensure that the grader blade is ready for field use the next time you hook up to it. 1. Clean off any dirt or grease that may have accumulated on the grader blade. Scrape off compacted dirt and wash the surface thoroughly with a garden hose. 2. Check the blade for wear and replace if necessary. 3.
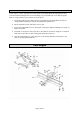
Parts List Reference Description Quantity 1 Moldboard 1 3 Lift Pin 1 5 Angle Plate Assembly 1 6 Pull Pin 1 7 Main Frame Weld 1 8 Threaded Stud 1 9 Brace Grander Blade 1 10 Spacer 2 15 Cutting Edge 1 19 A Frame 1 20 Lock Washer 30, Flat Washer 30 1 85 5/8’’ x 2’’ Bolt 2 87 5/8’’ x 2’’ Bolt Plow 1 91 Hair Pin 1 97 5/8’’ x 4’’ Bolt 1 99 5/8’’ NC Nut w/ Nylon Insert 3 102 5/8’’ Lock Washer 1 103 5/8’’ Nut 1 105 5/8’’ Flat Washer 2 149 Nut M30 1 Rep
Limited Warranty Northern Tool and Equipment Company, Inc. ("We'' or '"Us'') warrants to the original purchaser only ("You'' or “Your”) that the Nortrac product purchased will be free from material defects in both materials and workmanship, normal wear and tear excepted, for a period of one year from date of purchase. The foregoing warranty is valid only if the installation and use of the product is strictly in accordance with product instructions.
Distributed by: Northern Tool & Equipment Company, Inc. Burnsville, Minnesota 55306 www.northerntool.