
Product Manual


Assembly
16
5. Connect the power
cords together
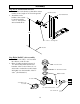
Connect the power cords together.
a) Check to be sure the power switch is in the “OFF” position on the remote
switch power cord.
b) Connect the remote switch power cord to the solenoid valve power cord.
6. Connect remote
switch power cord
to 12V DC power
source
1. Insert the car adapter plug on the remote switch power cord into a car
adapter, or
2. Connect the remote switch power cord to the vehicle battery using the
following procedure:
a) Disconnect the vehicle battery ground wire.
b) Connect the remote switch’s red battery clamp or red wire connector to the
positive(+) terminal of the battery.
c) Connect the remote switch’s black battery clamp or black wire connector to
the negative(-) terminal of the battery.
d) Reconnect the vehicle battery ground wire.
WARNING: Always connect in this sequence to avoid possible shock.
7. Verify connection
Verify a complete connection has been made by turning the remote switch to the
“ON” position and listening for a click from the solenoid valve.
8. Attach remote
switch to vehicle
Using supplied Velcro pads, affix remote switch to vehicle in a position that is
easily reached from the driver’s seat.
9. Disconnect after
use
AFTER EACH USE, disconnect power to the solenoid valve.
NOTE: It is important to disconnect power to the solenoid valve when not in
use, both for safety reasons and to prevent the solenoid valve from draining the
battery. ALWAYS verify that the power has been disconnected before servicing
the sprayer.
Switch in the “OFF” position
(Note location of mark on switch)
To solenoid valve
Remote switch
power cord
Solenoid valve power cord