
Product Manual


Assembly
15
Hoop
Prongs
Strip ½”
Red wire
Handle
shield
Solenoid valve
power cord
Male tabs on
solenoid valve
2. Identify broadcast
kit’s wiring
components
Identify the wiring components shipped with the broadcast kit.
There are two power cords (solenoid valve power cord and remote switch power
cord) and two battery clamps you will connect to power the solenoid valve.
3. Connect the
solenoid power
cord
Connect the solenoid valve power cord to the male tabs on the back of the
solenoid valve.
4. Prepare wire ends
Prepare the wire ends of the remote switch power cord for connection to a
12V DC power supply:
a) If you will connect the remote switch power cord to a 12V car adapter, the
remote switch power cord will not have to be modified.
b) If you choose to connect the remote switch power cord directly to a battery,
cut off the car adapter plug and install battery clamps (supplied) or end
connectors of your choosing on the bare ends of the remote switch power
cord wires.
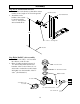
To install battery clamps:
1. Cut off car adapter plug.
2. Remove red plastic handle
shield from red battery
clamp and slide onto red wire
3. Strip red battery cord wire ½”
4. Insert bare wire under raised hoop
on red battery clamp handle.
5. Use pliers to press hoop down and crimp wire.
6. Fold prongs over wire insulation to hold wire in place.
7. Push plastic handle shield back over battery clamp handle.
8. Repeat for black wire and black battery clamp.
Battery clamps
Remote switch
power cord
Solenoid valve
power cord