M2681781G.1 MODEL NUMBER: 2681781 SERIAL NUMBER: _________________ Owner's Manual Instructions for Assembly, Testing, Operation, Servicing, and Storage NorthStar 3-Point Sprayer: Category 1 tractor implement for outdoor use with agricultural pesticides and other liquids** WARNING READ and UNDERSTAND the Owner's Manual completely before using this sprayer. Assemble, test, and use only in accordance with the Owner's Manual instructions. READ and FOLLOW chemical label instructions.
Hazard Signal Word Definitions 2
Table of Contents Intended Use .............................................................................................................................................. 4 Summary of Important Safety Information ............................................................................................. 5 During Assembly During Operation General Chemical Safety Chemical Application Safety Transporting Safety Chemical Accident Procedures Warning Label Location ...................................
Intended Use The sprayer is intended for use in spraying agricultural pesticides and other non-flammable liquids. SPRAYING PESTICIDES: Pesticides are hazardous chemicals that must be handled with caution as directed throughout this manual and on the pesticide label. Pesticides are regulated by the United States Environmental Protection Agency (EPA) and defined as: Any substance or mixture of substances intended for preventing, destroying, repelling, or mitigating any pest.
Summary of Important Safety Information WARNING Read and understand this owner's manual completely before using the sprayer. Read each chemical label's instructions before handling the chemical. Improper use of the sprayer or handling of chemicals could result in serious injury or illness for the operator or nearby persons/animals, or cause damage to the environment. LISTED BELOW is a summary of safety information of particular importance. See individual sections of this owner's manual for more details.
Summary of Important Safety Information (continued) During Spraying DO NOT OVERAPPLY pesticide. Apply at rate recommended by chemical manufacturer. Excess pesticide can be dangerous to humans/animals, damage desirable plants, and contaminate soil and water sources. DO NOT EAT, DRINK, SMOKE, RUB YOUR EYES, or TOUCH YOUR BARE SKIN while handling chemicals and spraying. NEVER POINT THE SPRAY GUN at people or animals.
Summary of Important Safety Information (continued) Chemical Accident Procedures Immediate response is necessary in the event of sprayer leaks, bodily chemical contact, poisoning, or spills. See instructions below: Sprayer leak Bodily chemical contact If the sprayer develops a leak, immediately stop spraying. Turn off power to the sprayer and follow directions below, as applicable. Personal contamination can occur when chemicals splash, spill, or spray directly onto a person. 1.
Warning Label Location WARNING READ and UNDERSTAND the Owner's Manual completely before using this sprayer. Assemble, test, and use only in accordance with the Owner's Manual instructions. READ and FOLLOW chemical label instructions. Pesticides are hazardous chemicals which must be handled carefully. KNOW emergency procedures BEFORE handling chemicals. Sprayer leaks, bodily chemical contact, poisoning, and spills require immediate response.
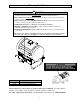
Unpacking Machine Components Closely inspect all contents Note that some parts are shipped inside the tank. If you have missing or damaged components, please contact NorthStar Product Support at 1-800-270-0810.
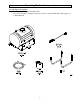
Unpacking the Manual Bag The following items are found in the 2681781 manual bag: 5/16 x 2" Bolt Qty. 8 (Part #82018) 5/16 Nut Qty. 12 (Part # 82019) Lynch pin Qty. 2 (Part # 39159) Lance clip Qty. 2 (Part # 52034) Threaded hose hook Qty. 2 (Part # 38510) #10 Nut Qty. 2 (Part # 82065) #10 x 1/2" Screw Qty. 2 (Part # 82059) Hose guide Qty. 1 (Part # 777110) Nozzle coupler Qty. 1 (Part # 38545) Broadcast nozzle Qty. 1 (Part # 36576) Hose clamp Qty. 2 (Part # 30746) Anti-drip filter Qty.
Assembly Step One: Attach legs Line the holes of the legs up with the holes in the frame and fasten with 8 bolts and 8 nuts Bolts Legs Nuts Step Two: Install lance clips Fasten the two lance clips to the sprayer frame with the 2 screws and 2 #10 nuts Lance clips Screws 11 Nuts
Assembly (continued) Step Three: Attach gun hose to pump 1. Install hose clamp on hose. i) Slide hose clamp over the end of the hose. ii) Push the hose onto the hose barb. iii) Slide the hose clamp over the hose barb. iv) Tighten the hose clamp. 2. Attach one end of the gun hose to the pump hose barb. Hose clamp Gun hose Step Four: Attach hose guide to frame and install hose hooks 1. Route gun hose through hose guide. 2. Thread nuts onto hose hooks as shown 3.
Assembly (continued) Step Five: Attach gun hose to spray gun Install hose clamp on hose. i) Slide hose clamp over the end of the hose. ii) Push the hose onto the hose barb. iii) Slide the hose clamp over the hose barb. iv) Tighten the hose clamp. 2. Attach the end of the gun hose to the gun hose barb. 1. Hose barb Spray gun Hose clamp Gun hose Step Six: Attach broadcast nozzle 1. Insert anti-drip nozzle filter into 11/16" x 1/2" Hose barb – Note orientation 2.
Assembly (continued) Step Seven: Connect sprayer to tractor WARNING The sprayer must be correctly mounted and then attached to the tractor for safe operation. Follow the instructions below for safety mounting and connecting the sprayer. 1. Read instructions 2. Tractor off & parking brake engaged 3. Attach to tractor 3-point hitch links Review your tractor manual or check with your dealer for instructions and safety information about how to properly connect the sprayer to your tractor's hydraulics.
Assembly (continued) Step Eight: Connect remote switch to vehicle battery WARNING Batteries are hazardous because they contain caustic acid, can emit explosive gases, and can cause electric shock. Caution must be exercised when making connections to a battery to avoid shock and contact with the acid, and to prevent any sparking that could lead to an explosion. ALWAYS follow the safety instructions and steps listed below in exact sequence when connecting the sprayer's remote switch to the battery terminals.
Assembly (continued) 4. Verify connection Verify a complete connection has been made by checking with a DC voltmeter, or by briefly turning the remote switch to the ON position and listening for pump activation. 5. Disconnect after use AFTER EACH USE, disconnect power to the sprayer by disconnecting the sprayer's pump cord from the remote switch – the remote switch may remain connected to the battery. NOTE: It is important to disconnect power to the sprayer when not in use for safety reasons.
Machine Components 03 16 2 1. Fill Cap. The fill cap has a vent to allow air to enter the tank as the chemical is dispensed. 2. Hose Hooks. Provides a storage location for the gun hose 3. Gun Hose. The 15-foot gun hose transfers chemical from the pump to the spray gun. 4. Sprayer Pump. The sprayer pump makes the chemical flow to the spray gun and the broadcast nozzle. 5. 3 Point Frame. Attaches to category 1 tractor. 6. Pump Power Cord. The pump power cord connects the sprayer pump to the remote switch.
Machine Components 9. Spray Gun. Use the spot spray gun to apply chemical to specific areas. The spray pattern is adjustable from stream to cone by twisting the spray nozzle (see Operation Instructions). When the remote switch is in the ON position, the spray gun trigger is the pump ON/OFF control. Squeeze the trigger and the pump turns on, let go and the pump turns off. 10. Broadcast Nozzle. Creates a single wide spray pattern for even coverage. 11. Broadcast Nozzle Shut Off Valve.
Operation – Important Safety Information Now that you have completed and tested your assembly, there is some important safety and health information you need to know with regard to handling and spraying chemicals, as well as vehicle handling with the sprayer attached. WARNING Carefully read and make sure you understand the following safety information before using the sprayer. General Chemical Safety: WARNING Pesticides are hazardous chemicals.
Operation – Important Safety Information (continued) Chemical Application Safety: WARNING Caution must be used when spraying chemicals to avoid unsafe exposure to humans and the environment. Heed the warnings below and follow all instructions carefully. Before Spraying Sprayer prep. ALWAYS inspect and prepare the sprayer before use according to the directions provided in this manual. Keep sprayer off.
Operation – Important Safety Information (continued) Transporting sprayer: WARNING Serious injury can occur if the tractor on which the sprayer is mounted is driven unsafely. 1. Drive to desired location Drive tractor and sprayer carefully to the desired work site. Important safety instructions: 2. Engage parking brake Read tractor instructions. Review safety instructions in your tractor manual with regard to driving with 3-point hitch mounted equipment attached. Securely attached.
Operation – Important Safety Information (continued) Bodily chemical contact Poisoning by ingestion or inhalation Chemical spills Personal contamination can occur when chemicals splash, spill, or spray directly onto a person. 1. Follow the emergency first aid instructions on the chemical label listed in the "First Aid" or "Statements of Practical Treatment" section. General procedures include: a) Eyes – immediately flush with water or follow other directions as specified on the chemical label.
Operation – Preparing the Sprayer for Each Use If the sprayer has been used previously, it must be prepared BEFORE EACH SUBSEQUENT USE. WARNING Read instructions below carefully for inspecting and preparing the sprayer. Damaged or clogged equipment could result in leaks or uncontrolled spray. Leaks could result in injury to the operator or bystanders from chemical exposure, or cause damage to the environment. Important safety rules: Power off.
Operation – Preparing the Sprayer for Each Use (continued) 4. Inspect & repair Inspect and test the sprayer thoroughly: a) Inspect hoses for exposed mesh and holes. Replace all worn or damaged hoses. b) Inspect tank and fittings for cracks and leaks. Replace all damaged fittings with original NorthStar parts. c) Check to be sure retaining nut on gun nozzle is tight. d) Check to be sure all other nuts, bolts, and screws are tight. e) Partially fill tank with plain water and spray to test for leaks.
Operation – Using the Sprayer Step One: Assess wind conditions and clear work area. Before you decide to spray, you must determine whether wind conditions are suitable. You must also restrict access to the work area to ensure the safety of bystanders. WARNING Do not spray if wind speeds are greater than 4 MPH or if there are bystanders in the intended spray area. 1. Assess wind speed Assess weather conditions to ensure that it is not too windy to spray. DO NOT SPRAY if wind speeds are greater than 4 MPH.
Operation - Using the Sprayer (continued) 5. Remove fill cap Remove the fill cap located on top of the sprayer. Fill cap 6. Ensure tank flushed 7. Fill tank Ensure tank is flushed of all chemicals from prior uses. - Chemicals can interact dangerously when mixed, and residue chemicals are also a health hazard. Add pesticide to tank through fill cap: a) Confirm the chemical/water dilution ratios specified on the chemical label.
Operation - Using the Sprayer (continued) Step 3: Operate the sprayer. WARNING ALWAYS wear personal protective equipment as directed on the chemical label when spraying. Long pants and sleeves, chemical-resistant gloves, and eye protection are strongly recommended. Additional protective gear may be required depending on the particular pesticide. 1.
Operation - Using the Sprayer (continued) 4. Close broadcast nozzle shut off valve Turn the broadcast nozzle shut off valve to the closed position. Broadcast nozzle shut off valve 5. Turn on power Turn on the power to the sprayer. 1.Verify the remote switch is connected to the pump power cord. 2.Turn the remote switch to the "ON" position. Note: The pump will start automatically when power is turned on. The pump will cycle on and off as needed to retain pressure in the hose. 6.
Operation - Using the Sprayer (continued) 7. Operate broadcast spraying system A. Open broadcast nozzle shut off valve Ensure power to the pump is off. Broadcast nozzle shut off valve B. Ensure correct spray pattern Rotate the broadcast nozzle, if needed, so that the spray pattern is pointed down and evenly distributed. Note: It is not unusual for the operator to be exposed to chemical drips while adjusting the broadcast nozzle. Wear chemical resistant gloves.
Operation - Using the Sprayer (continued) C. Begin to spray Turn the power ON. D. Ensure uniform coverage To ensure proper coverage, overlap the ends of the spray pattern 12". Use the tables in Appendix A to determine what speed to drive your vehicle for the desired application rate. Correct 12" Overlap 12" Overlap Incorrect IMPORTANT: Make sure broadcast nozzle is oriented to spray straight down before you start. An incorrectly positioned broadcast nozzle may spray chemicals on you or others. 7.
Operation - Using the Sprayer (continued) Step Four: Clean sprayer and decontaminate after use. When done using the sprayer, it is important to clean the sprayer and decontaminate yourself. Do not store the sprayer with chemicals in the tank, as it is unsafe and could also result in damage to the equipment. WARNING Clean-up and decontamination procedures must be followed after each use.
Operation - Using the Sprayer (continued) 2. Unused chemical 3. Flush sprayer 4. Decontaminate & launder Properly store or dispose of unused chemical: a) If the unused pesticide is to be stored for future use: Store all unused pesticide in its original, or a suitably marked, container in a secure location out of the reach of children & animals.
Storage When not in use, store the sprayer indoors. For long term or winter storage, prepare the sprayer by running RV antifreeze through the system. This will keep internal parts lubricated, protect against corrosion, and keep the unit from freezing. CAUTION The sprayer will be damaged if it freezes. Protect the sprayer from freezing during storage by following the instructions below. Preparing for storage: 1. Add antifreeze Pour 1 gallon of RV antifreeze into the tank.
Troubleshooting WARNING Before troubleshooting or attempting to service, read the following safety rules to avoid accidental exposure to chemical and also risk of electric shock. Note: A reserve, clean container capable of holding at least 55 should be kept for use when the sprayer tank needs to be emptied temporarily for repairs. It is advisable to purchase a reserve tank suitable for pesticide storage from Northern Tool + Equipment for use in these circumstances.
Specifications Electrical System Requirements Electrical connection……………… Amp draw from pump…………….. 12 VDC 8 Amps Sprayer Specifications Maximum GPM…………………... Maximum Pressure………..……… 2.2 GPM (8.3 Liters/min.) 70 PSI (4.8 Bar) Tank Maximum Capacity……………… 55 Gallons (208.20 Liters) Overall Dimensions……………………. LxWxH 39.0" x 30.0" x 40.0" (99.1cm x 76.2cm x 101.6cm) Dry Weight / Weight full of water…….. 95 lbs. / 535 lbs. (43 kg./243 kg.) Broadcast Nozzle Specifications Spray Width ………………………..
Exploded View – 2681781 – Rev G.
Exploded View – 2681781 – Rev G.
Exploded View – 2681781 – Rev G.
Appendix A –Broadcast Spray Calibration Tables Below are some guidelines to help you calibrate your broadcast sprayer. This is a very important step in operating the broadcast sprayer such that too much or too little chemical may be applied. 1. Using Table 1, find a table that corresponds with the chemical manufacturer's suggested application rate (gallons per acre, gallons per 1000 sq. ft., or gallons per 100 sq. ft.). 2.
This page has intentionally been left blank.
Limited Warranty Dear Valued Customer: The NorthStar Product you just purchased is built with the finest material and craftsmanship. Use this product properly and enjoy the benefits from its high performance. By purchasing a NorthStar product, you show a desire for quality and durability. Like all mechanical equipment this unit requires a due amount of care. Treat this unit like the high quality piece of machinery it is. Neglect and improper handling may impair its performance.
Assembled by Northern Tool & Equipment Company, Inc. Burnsville, MN 55306 NorthernTool.