
Product Manual
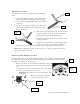

2. Locate the middle of the safety chain (A13).
3. Slide the bolt back in one hole, through the chain, and out the other hole.
Warning: Be sure to slide the bolt through the hole without pinching or cutting the
wires.
4. Reattach the washer and lock nut.
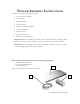
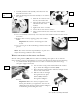
ROTATING THE TRAILER
Rotate the trailer to an upright position with the tires now on the ground.
Warning: The trailer is very heavy, be sure to have help to rotate the trailer into position.
ATTACHING THE SIDE RAILS
With the trailer right side up you can install the side rails(A3). Perform the following steps to
install the side rails:
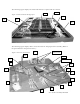
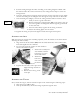
PREPARING THE SIDE RAIL SUPPORT BRACKETS
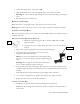
1. Install the ramp locating pins (11) on the front (A5) and rear (A4)
support brackets.
2. Tighten a nut onto a ramp locating pin all the way to the end of the
threads.
3. Slide a lock washer up against the nut on the ramp locating pin.
4. Thread the ramp locating pin into the front (or rear)
support bracket until it fits snug.
Hint: You can use the smooth side of the ramp locating
pin to give you more leverage to get the ramp locating pin
snug.
Warning: Do not grip the smooth side too hard with a
tool to avoid bending the ramp locating pin.
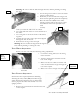
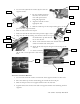
5. Stop tightening the ramp locating pin with the holes in the ramp retaining pin side
running straight up and down (in direction with the installation direction of the rail
bracket.
This helps keep the ramp retaining pin secure during trailer operation.
6. Use a wrench to tighten the nut against the front (or rear) support bracket.
7. Repeat the above steps for each side rail bracket.
ATTACHING THE SIDE RAILS
1. Install the rear support brackets before installing the front brackets.
Note: You can exchange the front bracket for the rear bracket on the Two-Place
ATV Trailer.
ATV Trailer Assembly Manual 9
11
11
A4/A5