
Product Manual

Warning: Be sure to slide the bolts through the holes without pinching or cutting
the wires.
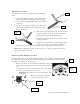
3. Use the longest two bolts to secure the trailer
tongue to trailer frame.
4. Wait until you have attached the tongue side
braces before tightening the bolts completely.
5. Place the side braces (A14) on the frame
meeting on either side of the tongue so that
the Northstar name reads upside-down, it
reads
correctly
when you rotate the trailer onto its wheels.
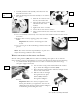
6. Use a bolt and lock washer to secure the braces to
the frame.
7. Use a long bolt to secure the fronts of the braces
together.
8. Tighten the nuts until a cotter pin can be slipped
through the hole in the bolt.
9. Bend at least one leg of the cotter pin.
Warning: Be sure to slide the larger bolt through the
hole without pinching or cutting the wires.
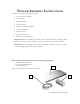
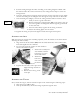
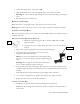
FINAL WIRING ADJUSTMENT
Before you turn over make the following wiring adjustments:
1. Connect the wiring harness to the wiring
main connector.
2. Tuck the wiring main connector into the
base of the tongue.
3. Make sure the tow-vehicle connector and
wires extend from the tongue through the
rear of the coupler.
4. Make sure to leave enough wire slack to tow
the trailer.
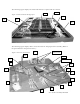
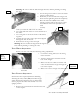
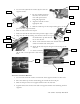
FIRST COUPLER ADJUSTMENT
Perform the first coupler adjustments including
attaching the safety chain (A13) and trailer tongue
stand. Perform the following steps to attach these
devices prepare the trailer to be turned over to its
upright position:
1. Remove the second bolt forward from the side
of the coupler.
ATV Trailer Assembly Manual 8
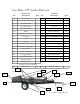
Main
Wiring
Harness
Vehicle
Connector
A13
A2
A14