
Product Manual

5. Feed the wiring through the trailer according to the wiring diagram available with
this manual and in the owner’s manual. Use the wiring harness clips to secure the
wiring harness.
6. Leave the wiring main connection near the location for the end of the tongue. Make
sure that the wiring for the taillights runs through the loops and holes on the trailer.
7. After mounting the taillights, connect the wiring with the bullet connectors. Press
firmly to ensure a good connection.
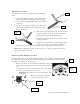
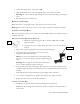
8. Before fastening the running lights (A17) to the trailer, start one
screw through the mounting hole and through the ground lead
on the same side.
9. Press the wires firmly together in the wiring connector.
10. Fasten the running lights onto the trailer.
11. Tighten the wiring away from the lights towards the tongue mount point.
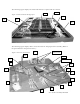
ATTACHING THE AXLE
With the wiring run and the axle assembly prepared, secure the fenders to the frame before
attaching the axle assembly.
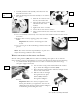
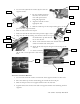
1. Align the holes in the fenders (A10) with the fender bolt holes on the trailer frame,
located alongside the axle channels.
2. Use two bolts and lock washers on each fender to
secure both fenders in place.
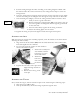
3. Install axle assembly into
axle channels with the
leaf spring eye to the
front of the trailer.
4. Install four
bolts and
four nuts in
the frame to
secure the leaf spring and axle.
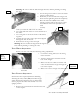
5. Tighten the nuts until a cotter pin can be
slipped through the hole in
the bolt.
6. Bend at least one leg of the
cotter pin.
ATTACHING THE TONGUE
Next, attach the tongue, with its attached coupler to the trailer using the following steps:
1. Align the tongue (A2) in place.
2. Line up the bolt holes, extend the wiring coupler through the base.
ATV Trailer Assembly Manual 7
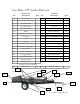
A17
A10