
Product Manual
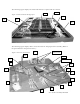
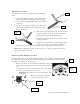

3. Carefully slide the hub assembly and wheel onto the
threaded end of the axle.
4. Slide the bearings into the hub carefully to not remove
the grease.
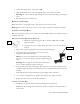
5. Place the two washers onto
the axle, flat washer first.
6. Align the flat surface of the
axle with the flat of the
washers.
7. Tighten axle nut to 35 ft-lbs.
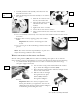
8. Loosen the crown nut two notches.
9. Align a notch with the one of the tabs of the tabbed
washer.
10. Use a screwdriver to bend only one of the tabs of the tabbed washer into the crown
nut notch.
11. Replace dust covers by tapping gently with a rubber
mallet.
Important: Be careful to not damage the dust
covers.
12. Use a grease gun on the Zerk fitting to fill the hubs with
grease.
Note: The owner must take responsibility to re-pack and
adjust the bearings within the first 100 miles
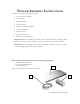
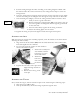
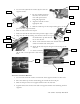
WIRING THE FRAME AND ATTACHING THE LIGHTS
Run the wiring harness (A18) and wires before assembling other parts to do so with the
fewest number of snags and problems. To run the wire through the frame, do the following:
1. Lay Trailer Frame flat upside down on a table or other raised, flat surface large
enough to support the frame.
2. Use two M10 x 20 (3), with attached M10 lock washers
(6), to attach the taillight L-brackets (A15).
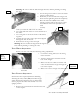
3. Place the license plate bracket under the tail light for the
driver’s side of the trailer.
4. Slide the studs on the light
through the license plate
bracket (A16) and then
through the taillight L-
Bracket.
Important: Make sure when you tighten on the
license plate bracket, you tighten the wires for the
taillight between the license plate and the taillight to
avoid twisting and breaking the wires.
ATV Trailer Assembly Manual 6
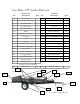
A9
A7
A15
A16
Bearing
and
Washer
Dust Cover