
Product Manual
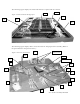
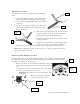

2. Use two bolts (5) and lock washers (6) for each rear
support bracket.
3. Do not completely tighten
the bolts; leave about 1/8
of an inch space before
being fully tightened.
4. Align the side rails to their
appropriate side.
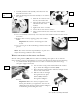
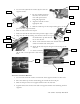
5. Slide the cable loop of the ramp retaining pin over the rail
pin on the rear support bracket.
6. Slide the side rail onto the rail pin.
7. Make sure that all the side rail bottom pin slots align as well.
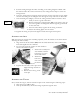
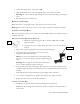
8. Align the side rails by making sure that the bolt tab on top of
the fender lines up with the bolt
tab on the side rail.
9. Insert a bolt with lock washer into the bolt tab on the
fender to hold the side rail in place.
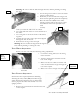
10. Insert all the side rail pins along the bottom edge of the
side rail.
11. Secure each side
rail pin with a cotter pin with at least one leg
bent.
ATTACHING THE FRONT BRACKETS
1. Use two bolts and lock washers to attach the front support bracket on either side.
2. Place the cable loop for the rail retaining pin around the front rail pin.
3. Slide the rail pin of the front support brackets into the side rails.
4. Tighten all the bolts for the front and rear support brackets after attaching all front
supports.
ATV Trailer Assembly Manual 10
A4
A3
A4
11
A3
A3
A10
17
Bolt Tab
A17
A1
11 with 13
A5
13