ATV Trailer Assembly Instructions for the SportStar II, IIWG, IIIWG, and Unistar Trailers ATV Trailer Assembly Manual 1
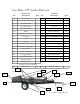
Two-Place ATV Trailer Parts List Trailer Parts Hardware No. Description QTY No.
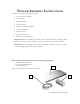
TRAILER ASSEMBLY INSTRUCTIONS Assemble your trailer in the following order: 1. Axle and wheel assembly 2. Frame wiring 3. Light attachment 4. Axle attachment 5. Tongue assembly attachment 6. Coupler adjustment 7. Trailer rotation 8. Side rail attachment 9. Ramp (or gate) attachment Important: Before assembling your trailer, remove all parts from the packaging and lay them out to ensure you have all parts. If any parts are missing, contact your seller.
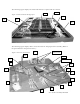
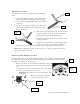
The following figure displays the trailer and frame box opened with its contents. A14 A9 Figure 3 Trailer and Frame Package Open A8 A1 A3 A2 The following figure displays all the accessories laid out and prepared for assembly. (Refer to the part numbers in the parts list above.
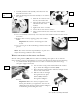
ASSEMBLING THE AXLE Assemble the axle and tire components in the following order: A8 1. Lay the axle (A9) on a table or raised flat surface with the threaded portion hanging off each side. 2. Attach the leaf springs (A8) to the spacer welded to the axle. 3. Secure the leaf springs, with the curve upward, by placing the head of the leaf spring bolt into the hole in the spacer. 8&4 9 A9 4.
Bearing and Washer 3. Carefully slide the hub assembly and wheel onto the threaded end of the axle. 4. Slide the bearings into the hub carefully to not remove the grease. 5. Place the two washers onto the axle, flat washer first. 6. Align the flat surface of the axle with the flat of the washers. 7. Tighten axle nut to 35 ft-lbs. 8. Loosen the crown nut two notches. 9. Align a notch with the one of the tabs of the tabbed washer. 10.
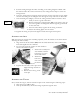
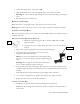
A17 5. Feed the wiring through the trailer according to the wiring diagram available with this manual and in the owner’s manual. Use the wiring harness clips to secure the wiring harness. 6. Leave the wiring main connection near the location for the end of the tongue. Make sure that the wiring for the taillights runs through the loops and holes on the trailer. 7. After mounting the taillights, connect the wiring with the bullet connectors. Press firmly to ensure a good connection. 8.
A2 Warning: Be sure to slide the bolts through the holes without pinching or cutting the wires. 3. Use the longest two bolts to secure the trailer tongue to trailer frame. 4. Wait until you have attached the tongue side braces before tightening the bolts completely. 5. Place the side braces (A14) on the frame meeting on either side of the tongue so that the Northstar name reads upside-down, it reads correctly A14 when you rotate the trailer onto its wheels. 6.
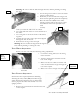
2. Locate the middle of the safety chain (A13). 3. Slide the bolt back in one hole, through the chain, and out the other hole. Warning: Be sure to slide the bolt through the hole without pinching or cutting the wires. 4. Reattach the washer and lock nut. ROTATING THE TRAILER Rotate the trailer to an upright position with the tires now on the ground. Warning: The trailer is very heavy, be sure to have help to rotate the trailer into position.
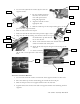
11 with 13 A4 2. Use two bolts (5) and lock washers (6) for each rear support bracket. 3. Do not completely tighten the bolts; leave about 1/8 of an inch space before being fully tightened. 13 A5 4. Align the side rails to their appropriate side. A3 5. Slide the cable loop of the ramp retaining pin over the rail pin on the rear support bracket. 6. Slide the side rail onto the rail pin. A4 7. Make sure that all the side rail bottom pin slots align as well. A3 Bolt Tab A10 8.
A6 5. Mount the ramps on the ramp locating pins, one ramp per end. 6. Use the ramp retaining clips attached to the cables to secure the ramps to the ramp locating pins. 11 7. Tighten all bolts on the Note: The owner bears responsibility to tighten all bolts and nuts on trailer to ensure safe operation. Coupler Final Coupler Adjustment The customer bears responsibility to perform the final adjustments to the hitch coupler before operation. Adjust after you finish all other assembly on the trailer.
INSTALLING THE REAR GATE (ON A SPORTSTAR IIWG, SPORTSTAR IIIWG, AND UNISTAR TRAILERS) On the Sportstar IIWG, Sportstar IIIWG, the rear brackets differ from the front brackets: The rear brackets do not use a ramp retaining pin. And, both ramps mount on the front ramp pins. Install the rear brackets using the same method as above mentioned for the rear brackets. Important: Install the rear brackets and side rails before installing the gate.