
User's Manual


124 Chapter 18 Configuring telephones: Digital telephones
N0060600N0060600
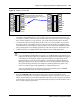
Line Assignment and Line Pools
Programming references: “Job aid: Answer DN notes” on page 124
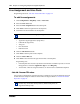
To add line assignments
1 Click Configuration > Telephony > Sets > Active Sets.
2 Select the Line Access tab.
3 Select the Line Assignment tab in the bottom panel.
4 Click Add to add line assignments for the telephone.
5 Determine how the line behaves at the telephone.
• Appearance Type/Appearances (target lines)
• Caller ID Set (target lines)
•Vmsg Set
• Priv. Received #
• Pub. Received #
6 Click the Line Pool Access tab.
7 Click Add to add line pools for the telephone.
8 Click the Answer DNs tab.
9 Click Add to add a maximum of eight Answer DNs to the telephone.
Programming note:
• If the telephone does not have any buttons with indicators available to provide an Answer
DN appearance, ensure that Appearance Type is set to Ring only.
• Answer DNs, which are assigned to buttons, can also be used to autodial that telephone.
Job aid: Answer DN notes
You can assign a maximum of eight Answer DNs to a telephone. You can also determine the types
of calls alert at the telephone where the answer DNs are assigned. Refer to “Answer DN answer
key levels” on page 76.
Note: Not all of these fields apply to all types of lines.
Note: You cannot assign Answer DNs to 7000 or 7100 telephones,
because they do not have memory buttons. (Model 7000 phones are
supported in Europe only)