
Network Device Maintenance and Diagnostics


June 2007 RAID operations
1005r Server Maintenance and Diagnostics 143
3 From the Objects menu, select Adapter and press Enter.
4 From the Adapter menu, select Factory Default.
5 Select Yes to confirm the selection and press Enter.
6 Press Ctrl+Alt+Delete when prompted to restart system.
7 During bootup, press Ctrl+M to re-enter the RAID setup utility.
8 From the Management menu, select Objects
➝ Adapter, and then
ensure the Adapter 1 values are set as follows:
Flex RAID Power Fail: Enabled
Fast Initialization: On
Disk Spin up Timing: 1 Disk every 6 secs
Cache Flush Timings: Every 4 seconds
Rebuild Rate: 30%
Alarm Control: Enabled (There is no audible alarm)
Other Adapter Options:
— Emulation: Mass Storage
— Auto Rebuild: Disabled
— Initiator ID: 7
— Cluster Mode: Disabled
— Multiple PCI Delayed Transactions: Disabled
— Force Boot: On
— Coercion Algorithm: GigaByte Way
— Cc Restoration: Enabled
Note: The Coercion Algorithm must be set properly. When
changed, it cannot be changed again without clearing the
configuration.
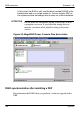
9 From the Configuration menu, select New Configuration. Click Yes
to proceed.
Result: The system displays the SCSI channel with two drives.
SCSI IDs are automatically assigned for each of the two drives. All
disk drives must be in READY state.
Note: Do not use the Load command on the Configure menu. This
command is not for RAID operations.
10 Create the logical drive by selecting Channel-1 A01-0 and pressing
the spacebar.