
User's Manual


Page 684 of 910 IP Line administration using OTM 2.2
553-3001-365 Standard 4.00 August 2005
4 The OTM site name, OTM system name, and customer number must
exist in the OTM Navigator before a new IP Telephony node can be
added.
Note: Ensure the system type is defined correctly.
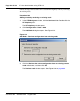
Under Node Location in the Retrieve node window:
a. OTM site: Select the OTM Site.
b. OTM system: Select the system.
c. Customer: Select the Customer number.
d. Node Number: Ensure the node number is unique under the
customer number. Also, ensure that all IP Telephony nodes
connected to the same TLAN subnet have a unique node number
regardless of the OTM site, Meridian 1 system, and customer
number.
e. Active leader management (ELAN) IP: Enter the active Leader
management IP address field for the existing node.
f. SNMP community read/write name: Enter the SNMP read/write
community name.
Note: The SNMP read community name cannot be used.
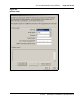
5 Click Start retrieve.
The results of the retrieval are shown under Retrieve control. The node
properties are retrieved from the active Leader. The card properties are
retrieved from Leader 0.
6 Click Close when the download is complete.
7 In the IP Telephony window, select the newly added node in the top part
of the window.
8 Refresh the card status (View > Refresh) and verify that the cards in the
newly added node are responding.
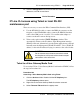
A new node has been created by retrieving data from another node
9 Double-click on the new node in the IP Telephony window. The Node
Properties window opens for the newly-added node.
10 Inspect each tab in the node properties and verify the data is correct and
consistent with the node from which the data was retrieved.