
User's Manual


Configuration of IP Telephony nodes using Element Manager Page 371 of 910
IP Line Description, Installation and Maintenance
If this is the first node to be added, the “No nodes are configured”
message is displayed. There are two options: “New Node_ to Add” or
“Import Node Files”.
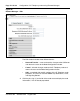
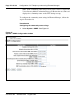
The Node Configuration window shows a list of all the configured nodes.
To expand a node and view its elements, click the plus sign (+) to the left
of the Node name. Figure 84 on page 372 shows one expanded node.
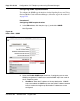
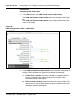
The Node Configuration window includes five buttons:
• to Add – used to add a new IP Telephony node. Enter an unused
Node ID and then click to Add.
• Import Node Files – imports the configuration files from an existing
node.
• Edit – retrieves the node information from the Call Server and returns
the information to the Edit window. The node information can then be
changed.
• Transfer/Status – used to transfer/obtain the status on the
requested changes to the node. The node then obtains its
information (CONFIG.INI and BOOT.P files) from the Call Server.
Note: If any element within the Node fails to transfer either BOOTP or
CONFIG files, the Transfer/Status button is highlighted in red. If the
transfer status of the node elements is unavailable, the Transfer/Status
button is highlighted in yellow.
• Delete – This button is used to delete the selected node and its
information from the Call Server.