
Ethernet Routing Switch Installation Guide
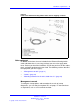
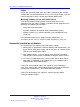

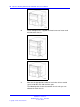
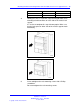
Table Of Contents
- toc
- Regulatory Information and Safety Precautions
- International Regulatory Statements of Conformity
- National Electromagnetic Compliance (EMC) Statements of Complian
- ICES Statement (Canada only)
- CE Marking Statement (Europe only)
- VCCI Statement (Japan/Nippon only)
- BSMI Statement for 8310, and 8306 Chassis (Taiwan only)
- MIC notice for 8310, and 8306 chassis (Republic of Korea only)
- National Safety Statements of Compliance
- NOM Statement 8310 and 8306 Chassis (Mexico only)
- Información NOM (unicamente para México)
- Denan Statement (Japan/Nippon only)
- Safety Messages
- Software license
- New in this release
- Introduction
- Chassis installation fundamentals
- Ethernet Routing Switch 8310 and 8306 chassis installation
- Switch operations
- Part Numbers
- Technical specifications
- Navigation
- Ethernet Routing Switch 8310 chassis specifications
- Ethernet Routing Switch 8306 chassis specifications
- Ethernet Routing Switch 8301 AC power supply specifications
- Ethernet Routing Switch 8302 AC power supply specifications
- Ethernet Routing Switch 8005DC power supply specifications
- Ethernet Routing Switch 8005DI DC power supply specifications
- Translations of safety messages
- Regulatory Information and Safety Precautions
36 Ethernet Routing Switch 8310 and 8306 chassis installation
Prerequisites
• Provide adequate space around the unit for access to cable
connectors.
•
Ensure that the surface can safely support the weight of the chassis,
its components, and its attached cables. See “Chassis installation time
requirements” (page 35).
Procedure steps
Step Action
1 Set the switch on the flat surface and check for proper
ventilation.
Allow at least 2 inches 5.1 cm) on each side for proper
ventilation and 5 inches (12.7 cm) at the front for power cord
clearance.
2 Attach rubber feet to each marked location on the bottom of the
chassis.
The rubber feet are optional but recommended to keep the unit
from slipping.
3 Attach all devices to the ports.
--End--
Procedure job aid: Chassis weight including components
The following table shows the weight of each chassis including the
components.
Chassis
Maximum weight (chassis and components)
8310
225 pounds (lb) (102 kilograms [kg])
8306
140 lb (63 kg)
Mounting the Ethernet Routing Switch 8310 and 8306 chassis in
an equipment rack
Install the Ethernet Routing Switch 8310 and 8306 chassis in a standard
19-inch equipment rack to provide a convenient location for the safe
operation of the switch.
ATTENTION
If you are mounting the chassis in a 23-inch equipment rack, see the rack
manufacturer’s 23-inch-to-19-inch rack adapter installation instructions.
Nortel Ethernet Routing Switch 8300
Installation — Chassis
NN46200-309 01.01 Standard
16 June 2008
Copyright © 2008 Nortel Networks
.