
Ethernet Routing Switch Installation Guide
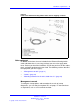
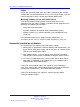

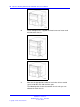
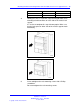
Table Of Contents
- toc
- Regulatory Information and Safety Precautions
- International Regulatory Statements of Conformity
- National Electromagnetic Compliance (EMC) Statements of Complian
- ICES Statement (Canada only)
- CE Marking Statement (Europe only)
- VCCI Statement (Japan/Nippon only)
- BSMI Statement for 8310, and 8306 Chassis (Taiwan only)
- MIC notice for 8310, and 8306 chassis (Republic of Korea only)
- National Safety Statements of Compliance
- NOM Statement 8310 and 8306 Chassis (Mexico only)
- Información NOM (unicamente para México)
- Denan Statement (Japan/Nippon only)
- Safety Messages
- Software license
- New in this release
- Introduction
- Chassis installation fundamentals
- Ethernet Routing Switch 8310 and 8306 chassis installation
- Switch operations
- Part Numbers
- Technical specifications
- Navigation
- Ethernet Routing Switch 8310 chassis specifications
- Ethernet Routing Switch 8306 chassis specifications
- Ethernet Routing Switch 8301 AC power supply specifications
- Ethernet Routing Switch 8302 AC power supply specifications
- Ethernet Routing Switch 8005DC power supply specifications
- Ethernet Routing Switch 8005DI DC power supply specifications
- Translations of safety messages
- Regulatory Information and Safety Precautions
Installing the chassis on a flat surface 35
• “Mounting the Ethernet Routing Switch 8310 and 8306 chassis in an
equipment rack” (page 36)
• “Installing the cable guides” (page 40)
Chassis installation time requirements
The following table lists procedures you must use to install the Nortel
Ethernet Routing Switch 8300 chassis and the estimated time you need
to complete each procedure. Not all procedures are required for every
Ethernet Routing Switch 8300 system.
Procedure Time requirement
Positioning the chassis on a flat surface 5 minutes
Mounting the chassis in an equipment rack 9–17 minutes depending on the chassis
Installing the cable management brackets 5 minutes
Reducing the chassis weight
Reduce the chassis weight to make the chassis easier to lift, and thus
you can reduce the risk of personal injury or equipment damage. This
procedure requires approximately 5 minutes to complete.
Procedure steps
Step Action
1 Remove the power supply filler panels.
For more information, see Nortel Ethernet Routing Switch 8300
Installation — AC Power Supply, NN46200-301.
2 Remove the module filler panels.
For more information, see Nortel Ethernet Routing Switch 8300
Installation — Modules, NN46200-305.
3 Remove the fan trays.
For more information see Nortel Ethernet Routing Switch 8300
Installation — Fan Tray, NN46200-302.
--End--
Installing the chassis on a flat surface
Mount the Ethernet Routing Switch 8310 and 8306 chassis on any flat,
level surface, such as a tabletop or shelf, that can safely support the
weight of the chassis, its components, and its attached cables to provide a
convenient location for the safe operation of the switch.
Nortel Ethernet Routing Switch 8300
Installation — Chassis
NN46200-309 01.01 Standard
16 June 2008
Copyright © 2008 Nortel Networks
.