
Ethernet Routing Switch Installation Guide


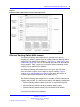
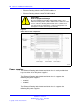
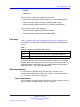
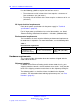
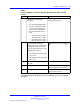
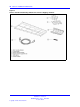
Table Of Contents
- toc
- Regulatory Information and Safety Precautions
- International Regulatory Statements of Conformity
- National Electromagnetic Compliance (EMC) Statements of Complian
- ICES Statement (Canada only)
- CE Marking Statement (Europe only)
- VCCI Statement (Japan/Nippon only)
- BSMI Statement for 8310, and 8306 Chassis (Taiwan only)
- MIC notice for 8310, and 8306 chassis (Republic of Korea only)
- National Safety Statements of Compliance
- NOM Statement 8310 and 8306 Chassis (Mexico only)
- Información NOM (unicamente para México)
- Denan Statement (Japan/Nippon only)
- Safety Messages
- Software license
- New in this release
- Introduction
- Chassis installation fundamentals
- Ethernet Routing Switch 8310 and 8306 chassis installation
- Switch operations
- Part Numbers
- Technical specifications
- Navigation
- Ethernet Routing Switch 8310 chassis specifications
- Ethernet Routing Switch 8306 chassis specifications
- Ethernet Routing Switch 8301 AC power supply specifications
- Ethernet Routing Switch 8302 AC power supply specifications
- Ethernet Routing Switch 8005DC power supply specifications
- Ethernet Routing Switch 8005DI DC power supply specifications
- Translations of safety messages
- Regulatory Information and Safety Precautions

Hardware requirements 29
Table 3
Chassis shipping accessories: Ethernet Routing Switch 8310 and 8306
chassis
Check
Accessory Use to
Bracket kit containing the
following:
•
two rack mounting brackets
• bracket- mounting machine
screws, each being 0.164
inches wide, 32 threads to
the inch and 0.250 inches
long
— The 8310 chassis ships
with 24 of these screws.
— The 8306 chassis ships
with 14 of these screws.
Prepare the chassis for installation
in an equipment rack.
Screw package containing
wafer head screws each being
0.190 inches wide, 32 threads
to the inch and 0.75 inches long
with flat nylon washers:
•
The 8310 chassis ships with
14 of each.
• The 8306 chassis ships with
10 of each.
Mount the chassis in an equipment
rack.
2 side cable management
brackets
Manage network interface cables.
Rubber footpads Keep the chassis from slipping
when mounting it on a flat surface.
Console cable Connect an optional management
console to the chassis.
The following figures illustrate the items included in the chassis shipping
container.
Nortel Ethernet Routing Switch 8300
Installation — Chassis
NN46200-309 01.01 Standard
16 June 2008
Copyright © 2008 Nortel Networks
.