
Secure Router Quick Start Guide


56 Configuring the Secure Router 4134 for remote access
Prerequisites
• Ensure you have the supplied console cable.
• Ensure you have the supplied female DB-9 to RJ-45 adapter if you
require it for connection to your terminal or PC.
• Ensure you have the Secure Router 4134 securely installed in the
equipment rack.
• Ensure you have powered up the terminal or PC.
Procedure steps
Step Action
1 Set the terminal protocol as follows:
a 9600 baud
b 8 data bits
c 1 stop bit
d no parity
e flow control: None
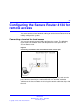
2 Insert the male RJ-45 connector in the console port on the rear
panel of the Secure Router 4134.
3 Connect the female DB-9 to RJ-45 adapter to the opposite end
of the console cable, if necessary.
4 Insert the RJ-45 or female DB-9 connector (dependent on your
equipment) in a terminal or PC.
5 Power up the Secure Router 4134.
--End--
Establishing remote access
The first time you log on to the Secure Router 4134 CLI, you perform initial
configuration such as the following:
1. Configure the IP address for the management port.
2. Configure the next hop (gateway IP address).
3. Verify a successful connection.
4. Enable remote access.
You can enable SSH or Telnet for remote connections.
Nortel Secure Router 4134
Quick Start
NN47263-100 02.01 Standard
18 February 2008
Copyright © 2007, 2008 Nortel Networks
.