
Network Router User's Manual


Chapter 3 Instant Internet 400-S hardware installation 45
Setting Up the BayStack Instant Internet 400-S Unit
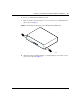
• If you are using an Ethernet connection to attach to a router or bridge, use
the Ethernet connector (Eth2) on the bottom left of your unit. Be sure to
use the proper cable (straight-through or crossover) for this connection.
4 Attach the other end of the communications cable to the appropriate source
(phone jack, ISDN jack, T1 jack, E1 jack, cable modem, or external router).
5 Do one of the following:
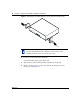
• To use the Instant Internet unit as your LAN switch, attach up to seven
workstations to the seven-port switch on the front panel of the unit.
• To connect the Instant Internet unit to your LAN, attach one end of the
LAN cable (straight-through or crossover) to one of the ports on the
seven-port switch and attach the other end of the cable to your LAN.
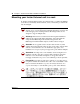
6 Plug the power cord into the rear panel of the Instant Internet unit.
7 Plug the power cord into an AC wall outlet.
8 Turn on the Instant Internet unit.
When you turn on your Instant Internet 400-S unit, the LEDs on the top left of
the front panel illuminate. LED 2 glows amber when the unit is ready for
configuration. For information about setting up your unit, see Installing the
BayStack Instant Internet Management Software Version 7.11.
Note: You use the second Ethernet connection (Eth2) to connect a DMZ
or to connect two LANs together. You use the third Ethernet connection
(Eth3), available in slot C, to configure a backup connection to your telco
or for a second WAN bounded/in-band channel card.