Carrier VoIP Nortel IP Phone 2004 User Guide (CICM) Release: CICM 10.1 Document Revision: 09.01 www.nortel.com NN10300-009 .
Carrier VoIP Release: CICM 10.1 Publication: NN10300-009 Document status: Standard Document release date: 4 July 2008 Copyright © 2008 Nortel Networks All Rights Reserved. Printed in Canada, the United States of America, and the United Kingdom LEGAL NOTICE While the information in this document is believed to be accurate and reliable, except as otherwise expressly agreed to in writing NORTEL PROVIDES THIS DOCUMENT "AS IS" WITHOUT WARRANTY OR CONDITION OF ANY KIND, EITHER EXPRESS OR IMPLIED.
. Contents New in this release Features 7 Other changes 7 7 Overview 9 Functional components Hardware features 10 IP Phone display 11 9 Connecting the IP Phone 2004 components 13 Before you begin 13 Logging on 15 Displaying the menu 17 Logging off 19 Using the Audio menu 21 Viewing and editing the default volumes 23 Viewing and editing the dialpad feedback 25 Adjusting the display contrast 27 Using the Feature menu 29 Using the Assign menu 29 Defining the key type 29 Assigning
Selecting a language 37 Using the Time menu 39 Setting the time zone 39 Enabling Daylight Saving Time 39 Disabling Daylight Saving Time 40 Setting the time format 40 Setting the date format 41 Resetting the default time 41 Using the User menu Viewing your user name 43 Viewing your login type 43 Viewing, disabling, or enabling the auto login feature Changing your password 45 43 44 Testing the local mode 47 Performing a firmware upgrade 49 Making a call 51 Use off-hook dialing 51 Using handsf
Using the Outbox 67 Accessing the Outbox 68 Viewing Outbox call information 68 Storing a number from the Outbox 68 Using the Outbox to make a call 69 Resetting the Outbox 69 Additional features and controls Using the dialpad to enter text 71 Use the Symbol key to enter special characters Procedure job aid 72 Using the directory 72 Adding or editing a directory entry 72 Deleting an entry from the directory 73 Making a call using the directory 74 Softkey functionality 74 Volume Control Bar 75 Selecting
Carrier VoIP Nortel IP Phone 2004 User Guide (CICM) NN10300-009 09.01 Standard 4 July 2008 Copyright © 2008 Nortel Networks .
. New in this release The following sections detail what is new in Nortel IP Phone 2004 User Guide (CICM), (NN10300-009) for release CICM 10.1. • • “Features” (page 7) “Other changes” (page 7) Features There were no feature changes made to this document. Other changes There were no other changes made to this document. Carrier VoIP Nortel IP Phone 2004 User Guide (CICM) NN10300-009 09.01 Standard 4 July 2008 Copyright © 2008 Nortel Networks .
New in this release Carrier VoIP Nortel IP Phone 2004 User Guide (CICM) NN10300-009 09.01 Standard 4 July 2008 Copyright © 2008 Nortel Networks .
. Overview The Nortel IP Phone 2004 brings voice and data to the desktop by connecting directly to a local area network (LAN) through an Ethernet connection.
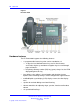
Overview Figure 1 IP Phone 2004 Hardware features The IP Phone 2004 supports the following features: • 11 programmable feature keys that can be extended to 14 — six physical user-defined feature keys and six lines/features accessed using the up and down navigation keys to scroll through pages of features — the primary directory number (DN) key (green) always has the PDN displayed against this key • four softkeys; one softkey is for navigation and selection of menu options, three remaining softkeys
IP Phone display — Quit — Directory — Message (Inbox) — Outbox — Services — Expand to PC (not used with the IP Client Manager) • four call-processing fixed keys: — Hold — Goodbye — Handsfree — Mute • shared LAN access with a PC through the use of the Internet Switch Module; splits the LAN drop into separate feeds for the phone and a PC • • • • • adjustable angle stand headset jack with On/Off key handsfree microphone automatic network configuration hearing-aid compatibility Not all features are ava
Overview Figure 2 IP Phone 2004 display • The login screen shows the digits on information line 0 as entered. The user name and password can be a maximum of 15 digits. • Six user-defined feature keys (soft-labeled 0-5) provide additional call features for the IP Phone. • Menu items appear on information lines 0 to 2 with the selected item indicated by a shaded bar behind the item. • Four softkeys allow you to select menu options and three additional features.
. Connecting the IP Phone 2004 components Before you begin CAUTION Damage to Equipment Do not plug the IP Phone into a regular telephone jack. This results in severe damage to the IP Phone 2004. Consult your system administrator to ensure that you plug your telephone into a 10/100BaseT Ethernet jack. See Figure 1 "IP Phone 2004" (page 10) for the location of the connectors.
Connecting the IP Phone 2004 components 5 Secure the IP Phone footstand to the base. Use the angle grip on the top back of the phone to adjust the angle of the phone. --End-- Figure 3 IP Phone connectors Carrier VoIP Nortel IP Phone 2004 User Guide (CICM) NN10300-009 09.01 Standard 4 July 2008 Copyright © 2008 Nortel Networks .
. Logging on Follow this procedure to log on to the network. If the Centrex IP Client Manager (CICM) is set up as part of a group of CICMs, you can choose which CICM to connect to. After you select a gateway, the terminal directs itself at that CICM and the Username screen appears. If a firmware upgrade for the IP Phone is available, the system prompts you to upgrade when you log on.
Logging on You are logged on and the Menu screen appears. --End-- Carrier VoIP Nortel IP Phone 2004 User Guide (CICM) NN10300-009 09.01 Standard 4 July 2008 Copyright © 2008 Nortel Networks .
. Displaying the menu Follow this procedure to access the main menu. You must be logged on to access the main menu system. Step Action 1 On the IP Phone, perform one of these actions: • • press the Menu soft key press the Services key The main menu opens. 2 Perform one of these actions: • • Select Logout. See “Logging off ” (page 19). • Select Display. See “Adjusting the display contrast” (page 27). • • • • • • • Select Feature. See “Using the Feature menu” (page 29).
Displaying the menu Figure 4 IP Phone 2004 menu hierarchy Carrier VoIP Nortel IP Phone 2004 User Guide (CICM) NN10300-009 09.01 Standard 4 July 2008 Copyright © 2008 Nortel Networks .
. Logging off Follow this procedure to log off from the network. Step Action 1 From the main menu, select Logoff. 2 Press Ok. A confirmation screen appears. 3 Press Yes. You are logged off from the system. --End-- Carrier VoIP Nortel IP Phone 2004 User Guide (CICM) NN10300-009 09.01 Standard 4 July 2008 Copyright © 2008 Nortel Networks .
Logging off Carrier VoIP Nortel IP Phone 2004 User Guide (CICM) NN10300-009 09.01 Standard 4 July 2008 Copyright © 2008 Nortel Networks .
. Using the Audio menu Follow this procedure to view and edit your audio profile. Local Area Network is an example of a profile datafilled by your administrator. Use this menu to select the profile you wish to use. Contact your administrator for recommended profiles. Step Action 1 From the main menu, select Audio, then select and open Audio Profile. The Audio Profile screen appears. 2 Press Ok. The Audio Profile screen appears.
Using the Audio menu Carrier VoIP Nortel IP Phone 2004 User Guide (CICM) NN10300-009 09.01 Standard 4 July 2008 Copyright © 2008 Nortel Networks .
. Viewing and editing the default volumes Follow this procedure to change the default volume of the handset, headset, handsfree speaker, ringer, or buzzer. Step Action 1 From the main menu, select Audio. 2 From the Audio Menu, use the up/down cursor keys to select Default Volumes and press Ok. 3 You are now presented with a list of audio devices whose default volumes may be adjusted. Use the up/down cursor keys to find the device you wish to adjust and press Ok.
Viewing and editing the default volumes reset will set the volume level to the nominal level. Press OK and the settings will be saved. 8 You may also press Play to hear the volume level of the Ringer or Buzzer volume settings. 9 Also included in the menu for default volumes is the Help option. --End-- Carrier VoIP Nortel IP Phone 2004 User Guide (CICM) NN10300-009 09.01 Standard 4 July 2008 Copyright © 2008 Nortel Networks .
. Viewing and editing the dialpad feedback Follow this procedure to view and edit the dialpad feedback. Step Action 1 From the main menu, select Audio. 2 From the Audio Menu, use the up/down cursor keys to select Dialpad feedback. 3 You are now presented with a list of options for Dialpad feedback. The currently selected option has a tick against it. 4 To change the settings, use the up/down cursor keys to find the option you want and then press ok.
Viewing and editing the dialpad feedback Carrier VoIP Nortel IP Phone 2004 User Guide (CICM) NN10300-009 09.01 Standard 4 July 2008 Copyright © 2008 Nortel Networks .
. Adjusting the display contrast Follow this procedure to adjust the contrast level of the display. Step Action 1 From the main menu, select and open Display. The Display menu opens. 2 Press Ok. 3 Perform one of these actions: • To decrease the contrast level, press the soft key on the far left. • To increase the contrast level, press the soft key second from the left. The percentage figure shows the change in the contrast.
Adjusting the display contrast Carrier VoIP Nortel IP Phone 2004 User Guide (CICM) NN10300-009 09.01 Standard 4 July 2008 Copyright © 2008 Nortel Networks .
. Using the Feature menu Follow this procedure to use the Feature menu. You can add or edit feature key associations on your IP Phone 2004. Features are assigned by your system administrator, so the features you have available may differ from those described in this user guide. Changing the keys to which a feature is associated does not create new functionality.
Using the Feature menu Step Action 1 From the main menu, open the Feature menu. A list of the feature keys and their current assignments appears. 2 Select a key to change. The Feature submenu appears. 3 Select and open Assign. If the key you selected in step 2 is assigned to a Centrex feature, these soft key labels appear: Key Type and Autoscroll. If the selected key is assigned to a local feature, these soft key labels appear: Key Type and Feature. 4 Press Key Type.
Using the Assign menu 3 Press Feature. The directory contact list opens. 4 Scroll through the list and select the entry to assign to the feature key. 5 Press Ok. A check mark appears beside that entry in the directory. The number is dialed when you press the key. --End-- Enabling or disabling autoscroll If autoscroll is enabled, the IP Phone automatically directs you to the screen for the active feature.
Using the Feature menu Step Action 1 From the main menu, open the Feature menu. 2 From the Feature menu, select and Assign. The Assign menu opens. 3 From the Assign menu, select and open Inbox. The Inbox screen appears. 4 Perform one of these actions: • • 5 To enable the Inbox, select Enable. To disable the Inbox, select Disable. Press Ok. A check mark appears beside the option to indicate your choice. You return to the Assign menu.
Using the Options menu Step Action 1 From the main menu, open the Feature menu. 2 From the Feature menu, select and open Options. 3 Press Ok. The Options menu opens. 33 --End-- Enabling or disabling auto hide When you enable the Auto Hide feature, only those features that are relevant to the current activity on your phone are shown in the display. For example, the Call Transfer and Three Way call features can only be activated when a user has a call in progress.
Using the Feature menu 4 Perform one of these actions: • • 5 To enable auto hide, select Enable. To disable auto hide, select Disable. Press Ok. A check mark appears beside your selection. You return to the Options menu. --End-- Selecting the default line key Follow this procedure to select a feature key to be your default line key. Step Action 1 From the main menu, open the Feature menu. 2 From the Feature menu, select and open Options. The Options menu opens.
Resetting the feature key to the default settings The selected key is now your Outbox key. You return to the Options menu. For more information, see “Using the Outbox” (page 67). --End-- Resetting the feature key to the default settings Follow this procedure to reset the feature keys to the default settings. Step Action 1 From the main menu, open the Feature menu. 2 From the Feature menu, select and open Reset. The Reset screen appears. 3 Press Yes. The keys are reset to the default settings.
Using the Feature menu Carrier VoIP Nortel IP Phone 2004 User Guide (CICM) NN10300-009 09.01 Standard 4 July 2008 Copyright © 2008 Nortel Networks .
. Selecting a language Follow this procedure to select your language preference. Step Action 1 From the main menu, select and open Language. A list of available languages appears. 2 Scroll through the list and select your preferred language. 3 Press Ok. The terminal now displays text in the selected language. 4 Press Cancel. You return to the main menu. --End-- Carrier VoIP Nortel IP Phone 2004 User Guide (CICM) NN10300-009 09.01 Standard 4 July 2008 Copyright © 2008 Nortel Networks .
Selecting a language Carrier VoIP Nortel IP Phone 2004 User Guide (CICM) NN10300-009 09.01 Standard 4 July 2008 Copyright © 2008 Nortel Networks .
. Using the Time menu Follow procedures in this section to configure time and date formats. Navigation • • • • • • “Setting the time zone” (page 39) “Enabling Daylight Saving Time” (page 39) “Disabling Daylight Saving Time” (page 40) “Setting the time format” (page 40) “Setting the date format” (page 41) “Resetting the default time” (page 41) Setting the time zone Follow this procedure to select the time zone. Step Action 1 From the main menu, open the Time menu.
Using the Time menu Step Action 1 From the main menu, open the Time menu. 2 From the Time menu, select and open Daylight Saving. The Daylight Saving screen appears. The word Off appears with a check mark beside it to indicate that the feature is disabled. 3 Select On. 4 Press Ok. Daylight Saving Time is enabled. The word On appears with a check mark beside it to indicate the feature is enabled. You return to the previous screen.
Resetting the default time 41 2 From the Time menu, select and open Time Format. The Time Format screen appears. 3 Scroll through the Time Format options to select the format you want. A check mark appears beside the format currently in use. 4 To enable a format, select it, and press Ok. A check mark appears beside the option to indicate that it is enabled. The time is displayed in the selected format. You return to the previous screen.
Using the Time menu Step Action 1 From the main menu, open the Time menu. 2 Form the Time menu, select and open Reset. A confirmation screen appears. 3 Confirm the action. The terminal reverts to the default time settings. You return to the previous screen. --End-- Carrier VoIP Nortel IP Phone 2004 User Guide (CICM) NN10300-009 09.01 Standard 4 July 2008 Copyright © 2008 Nortel Networks .
. Using the User menu Follow procedures in this section to view and edit your User profile. Navigation • • • • “Viewing your user name” (page 43) “Viewing your login type” (page 43) “Viewing, disabling, or enabling the auto login feature” (page 44) “Changing your password” (page 45) Viewing your user name Follow this procedure to view your user name. Step Action 1 From the main menu, open the User menu. 2 From the User menu, select and open Username.
Using the User menu Step Action 1 From the main menu, open the User menu. 2 From the User menu, select and open Login Type. The Unique screen appears. If Unique is enabled, Ok appears above the far left soft key. 3 Press the down navigation key to view the Joint screen. If Joint is enabled, Ok appears above the far left soft key. --End-- Viewing, disabling, or enabling the auto login feature Follow this procedure to view, enable, or disable the Auto Login feature.
Changing your password 45 A check mark appears beside the item you selected. You return to the Auto Login screen. --End-- Changing your password Follow this procedure to change your password. If you are unfamiliar with how to use the dialpad to enter text, see “Using the dialpad to enter text” (page 71) before you perform this procedure. Step Action 1 From the main menu, open the User menu. 2 From the User menu, select and open Password. The Old Password screen appears.
Using the User menu Carrier VoIP Nortel IP Phone 2004 User Guide (CICM) NN10300-009 09.01 Standard 4 July 2008 Copyright © 2008 Nortel Networks .
. Testing the local mode The Diagnostics menu is mainly used by an administrator for registering the terminal with a Survivable Remote Gateway. Follow this procedure to test the local mode. Step Action 1 From the main menu, open the Diagnostics menu. 2 From the Diagnostics menu, select and open Test Local Mode. A confirmation screen appears. 3 Press Ok. 4 Press Yes. The terminal transitions to its secondary IP address and temporarily disconnects from the Centrex IP Client Manager.
Testing the local mode Carrier VoIP Nortel IP Phone 2004 User Guide (CICM) NN10300-009 09.01 Standard 4 July 2008 Copyright © 2008 Nortel Networks .
. Performing a firmware upgrade Follow this procedure to upgrade the IP Phone firmware. If a firmware upgrade for the IP Phone is available, the system prompts you to upgrade when you log on. If the firmware level is between the minimum and maximum level set by the administrator, Yes and No options appear on the soft keys. If the terminal is below the minimum level, the only option is Yes. You cannot log on until you perform the upgrade.
Performing a firmware upgrade Carrier VoIP Nortel IP Phone 2004 User Guide (CICM) NN10300-009 09.01 Standard 4 July 2008 Copyright © 2008 Nortel Networks .
. Making a call There are several ways to make a call from an IP Phone 2004. Use off-hook dialing Follow this procedure to make a call using off-hook dialing. 1 Your primary extension is assigned to the lower right-hand feature key. 2 Pick up the handset and your primary extension is automatically activated and ready for you to make a call. 3 Dial the number. Using handsfree dialing Follow this procedure to make a call using handsfree dialing.
Making a call 4 For privacy, lift the handset. 5 To return to Handsfree, press the Handsfree key (the small green circular button on the bottom left corner of your telephone) and put the handset down in its cradle. Using Predial Follow this procedure to use the predial feature to make a call. To use Predial: 1 Without selecting the Line (DN) key, enter the number to be dialed. 2 Press the OK option on soft key 1 to dial the number. 3 Lift the handset when the called party answers.
Using Predial 53 2 Choose one of the following: • To change numbers one-at-a-time, press the Delete soft key to delete characters after the cursor or press the Bkspc key to delete characters before the cursor. Enter a new number. 3 Press the OK option on soft key 1 to dial the number. You can press the OK, Line, Handsfree or Headset key to confirm the predial. Carrier VoIP Nortel IP Phone 2004 User Guide (CICM) NN10300-009 09.01 Standard 4 July 2008 Copyright © 2008 Nortel Networks .
Making a call Carrier VoIP Nortel IP Phone 2004 User Guide (CICM) NN10300-009 09.01 Standard 4 July 2008 Copyright © 2008 Nortel Networks .
. Answering and terminating calls Answering a call Each incoming call causes the telephone to sound, the an arrow beside the Line (DN) key to flash, and the Message Indicator lamp to flash. Follow this procedure to answer a call. Choose one of the following to answer a call: • Lift the handset. • Press the Handsfree button located on the left side of the handset. • Press the line (DN) key beside the LCD indicator as it flashes.
Answering and terminating calls Choose one of the following to terminate a call: • Return the handset into the cradle. • Press the Goodbye button located on the left side of the handset. The Goodbye key is especially useful for disconnecting Handsfree calls, dropping out of a Conference Call or exiting Voice Mail. Carrier VoIP Nortel IP Phone 2004 User Guide (CICM) NN10300-009 09.01 Standard 4 July 2008 Copyright © 2008 Nortel Networks .
. While on an active call This section describes features available during an active call. Placing a call on hold The Hold feature allows you to suspend a call without terminating it. Follow this procedure to use the hold feature. To place a call on hold, press the Hold key. The LCD indicator flashes beside the line on hold. To retrieve a call on hold, press the line (DN) key beside the flashing LCD indicator. Using the mute feature Muting prevents the transmission of sounds through the microphone.
While on an active call 1 Press the Transfer key in the upper display area. The other party is on hold and a dial tone sounds. The LCD indicator light flashes steadily. 2 Dial the DN to which the call is to be transferred. 3 When that number rings or a person answers, announce the call and then press the Transfer key to connect the calling party. 4 To return to the original call, if the transfer is incomplete, press the line (DN) key (next to the LCD indicator) to reconnect to the original call.
. While away from your desk This section describes features to use when you are away from your desk. Forwarding calls Follow this procedure to forward calls to another IP Phone when you are away from your desk. 1 To activate Call Forward, without lifting the handset, press the Forward key in the upper display area. 2 Dial the Extension to which you want your calls to be answered. 3 Press the Forward key. An icon next to the label on the feature key will appear on your display.
While away from your desk Carrier VoIP Nortel IP Phone 2004 User Guide (CICM) NN10300-009 09.01 Standard 4 July 2008 Copyright © 2008 Nortel Networks .
. Conference calls This section describes features that enable conversations between more than two people. Setting up a conference call The conference feature enables you to add up to five people to an established call (either internal or external). Follow this procedure to engage in a conference call. 1 While on a call, press the Conference key in the upper display area to place the party on hold. You receive a dial tone. 2 Dial the number of the person you want to add to the conference call.
Conference calls 1 While on a call, press the Conference key in the upper display area. 2 Press the extension key that has the number of the person you want to connect to your current call. 3 Press the Conference key to join the person on hold to your conversation. Carrier VoIP Nortel IP Phone 2004 User Guide (CICM) NN10300-009 09.01 Standard 4 July 2008 Copyright © 2008 Nortel Networks .
. Using the Inbox After you assign a feature key to the Inbox, the IP Phone 2004 logs all incoming calls to that key. The system logs the incoming key number, time and date, as well as the display shown on the IP Phone 2004 at the time of the incoming call. The information from the display can be captured only if the call lasts for more than two seconds.
Using the Inbox • • • “Storing a number from the Inbox” (page 65) “Using the Inbox to make a call” (page 65) “Resetting the Inbox” (page 65) Accessing the Inbox Follow this procedure to access and use the Inbox. Step Action 1 Press the Inbox key. The Inbox screen appears, showing a list of the 10 most recent incoming calls. 2 Select an item from the list, and press Ok . 3 Perform one of these actions: • • • Select Dial to call the number. Select Display to view call information.
Resetting the Inbox 65 Storing a number from the Inbox Follow this procedure to select a number from the Inbox and save it to the directory. Step Action 1 Press Inbox key. The Inbox screen appears, showing a list of the 10 most recent incoming calls. 2 Select a number from the list. 3 Press Ok. The Dial screen appears. 4 Press the down navigation key to select Store. The directory submenu opens. 5 See “Adding or editing a directory entry” (page 72).
Using the Inbox Step Action 1 From the main menu, select and open History. 2 From the History menu, select Reset Inbox. A confirmation screen appears. 3 Press Yes. The calls in the Inbox are deleted. You return to the previous screen. --End-- Carrier VoIP Nortel IP Phone 2004 User Guide (CICM) NN10300-009 09.01 Standard 4 July 2008 Copyright © 2008 Nortel Networks .
. Using the Outbox After you assign a feature key to the Outbox, the IP Phone 2004 logs all outgoing calls to that DN. The system logs the outgoing key number, time, and date. If the duration of the call is longer than two seconds, the system captures the display as it appeared when the call was made. You can assign only one feature key to the Outbox. The Outbox can store a maximum of 10 calls. When the maximum is reached, the oldest call is dropped.
Using the Outbox Accessing the Outbox Follow this procedure to access and use the Outbox. Step Action 1 Press the Outbox key. The Outbox screen appears, showing a list of the 10 most recent outgoing calls. 2 Select an item from the list, and press Ok. 3 Perform one of these actions: • • • Select Dial to call the number. Select Display to view call information. Select Store to store the number in the directory. --End-- Viewing Outbox call information Step Action 1 Press the Outbox key.
Resetting the Outbox 2 Select a number from the list. 3 Press Ok. The Dial screen appears. 4 Press the down navigation key to select Store. The directory submenu appears. 5 See “Adding or editing a directory entry” (page 72). 69 --End-- Using the Outbox to make a call Follow this procedure to make a call from within the Outbox. Step Action 1 Press the Outbox key. The Outbox screen appears, showing a list of the 10 most recent outgoing calls. 2 Select the number you want to dial.
Using the Outbox Carrier VoIP Nortel IP Phone 2004 User Guide (CICM) NN10300-009 09.01 Standard 4 July 2008 Copyright © 2008 Nortel Networks .
. Additional features and controls Using the dialpad to enter text Follow this procedure to use the dialpad to enter text. Use the Symbol key to enter special characters A flashing cursor appears in the display when you can enter text on the screen. Step Action 1 To enter text, find the number key associated with the letter you want to enter, and perform one of these actions: • • • To enter the first letter, press the key once. To enter the second letter, press the key twice.
Additional features and controls Procedure job aid Figure 5 Special characters Using the directory Follow the procedures in this section to use the directory feature. Navigation • • • “Adding or editing a directory entry” (page 72) “Deleting an entry from the directory” (page 73) “Making a call using the directory” (page 74) Adding or editing a directory entry Follow this procedure to add an entry to the directory. The directory stores a maximum of 16 entries.
Using the directory 73 The number is entered in the directory, and you return to the New Entry menu. 5 To add or edit the surname, perform these steps: a From the New Entry menu, select and open Surname. b Use the dialpad to enter the surname. c Press Ok. The surname is entered in the directory, and you return to the New Entry menu. 6 To add or edit the first name, perform these steps: a From the New Entry menu, select and open First Name. b Use the dialpad to enter the first name. c Press Ok.
Additional features and controls 6 Press Ok and then press Yes to confirm the action. --End-- Making a call using the directory Follow this procedure to make a call from within the directory. Step Action 1 Press the directory key to access the directory menu. The directory opens. 2 From the Directory list, select the name or number that you want to call. 3 Press Ok. The Dial screen appears. 4 Press Ok The number is dialed.
Selecting a ring tone 75 Figure 6 Softkeys on IP Phone Volume Control Bar Use the Volume Control Bar to adjust the volume of the handset, speaker or ringer while active. Raise or lower the volume of each by pressing the right or left sides of the bar. Selecting a ring tone Follow this procedure to select a ring tone. Step Action 1 From the Menu Option screen, select Audio. 2 Select Play Ring Patterns. 3 Select a ring pattern. You can listen to it using the Play and Stop options.
Additional features and controls LCD Indicator A steady indicator means that an extension or feature beside it is active. A flashing indicator means the line is on hold or the feature is in the process of being programmed. Message Waiting Lamp The light bar at the top of your telephone illuminates with a steady light to indicate a new Voice Mail message(s) is waiting. You access Message Waiting by pressing the Message Waiting feature provisioned on one of the feature keys in the upper display area.
. Accessories IP Phone Key Expansion Module The Nortel IP Phone Key Expansion Module (KEM) is an optional hardware module that provides additional line appearances and feature keys on your IP Phone 2004. You can connect up to two KEMs to your IP Phone 2004, providing a total of 44 additional keys; 22 keys per KEM. For more information about the IP Phone Key Expansion Module, consult theNortel IP Phone Expansion Module User Guide (CICM), (NN10300-011).
Accessories Carrier VoIP Nortel IP Phone 2004 User Guide (CICM) NN10300-009 09.01 Standard 4 July 2008 Copyright © 2008 Nortel Networks .
Carrier VoIP Nortel IP Phone 2004 User Guide (CICM) Copyright © 2008 Nortel Networks All Rights Reserved. Release: CICM 10.1 Publication: NN10300-009 Document status: Standard Document revision: 09.01 Document release date: 4 July 2008 To provide feedback or to report a problem in this document, go to www.nortel.com/documentfeedback. www.nortel.