
User's Manual


30 Chapter 3 Physical installation
N0060602N0060602
To power up the BCM system
1 Connect the BCM main unit power cord to an electrical outlet that is a non-switchable,
third-wire ground AC outlet.
If you use a power bar, plug the power cords into the power bar and connect the power bar to
the AC outlet.
2 Connect the BCM expansion unit power cord to an electrical outlet that is a non-switchable,
third-wire ground outlet.
3 Turn on the power switch located on the BCM main unit and expansion unit.
The BCM system powers up.
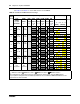
Connecting the data networking hardware
Refer to the chapter “Connect the cables” in the BCM200/400 4.0 Installation and Maintenance
Guide for more detailed information.
This section describes how to connect network cards to the BCM system.
The data networking hardware (MSC) is installed in the BCM main unit at the factory. All systems
have dual embedded Ethernet interfaces. Some models come with an embedded V.90 modem.
WAN cards and modems are ordered separately.
To connect the BCM system to the WAN
1 Ensure the system is powered up before connecting this cable.
2 Do one of the following:
Note: If you are using the Startup Profile to configure the BCM system, insert the
USB storage device (containing the Startup Profile file) into the USB port on the
main unit before powering up the system.
Danger: Do not fasten the BCM main unit or expansion unit power supply cords to any
building surface.
Warning: If the default IP address creates a network conflict, you must change the IP
address of the BCM system before you connect to the network. Refer to “Connecting to
the BCM system” on page 33 for detailed instructions about connecting to the BCM
system.
Note: Your BCM system might have a different WAN card than the one described.
Refer to the documentation that came with your WAN card.
6 minutes
5 minutes