
User's Manual


Chapter 3 Physical installation 21
BCM 4.0 Installation Checklist and Quick Start Guide
To install a BCM unit on flat surface
1 Attach four rubber feet to the corners on the bottom of the BCM unit.
2 Position the unit on the table or shelf. Make sure you leave enough space around the unit for
ventilation and access to the cables and MBMs.
3 If the BCM system has an expansion unit, mount the expansion unit in the same way as the
main unit.
Connecting the expansion unit to the main unit
After the main unit and expansion unit have been installed, use the supplied DS256 cable to
connect the expansion unit to the main unit.
Refer to the chapter “Installing an expansion unit” in the BCM200/400 4.0 Installation and
Maintenance Guide for more detailed information.
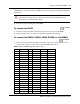
To connect the expansion unit to the main unit
1 Plug one end of the cable into the DS256 connector on the expansion unit (see Figure 7).
2 Plug the other end of the cable into the DS256 connector on the main unit (see Figure 7).
Figure 7 Main unit connected to expansion unit
Installing the MBMs
Refer to the chapter “Installing a media bay module (MBM)” in the BCM200/400 4.0 Installation
and Maintenance Guide for more detailed information.
Warning: The timing in the BCM system is critical. Use the correct length cable as
supplied with the expansion unit. The system will not work properly if you connect the
BCM expansion unit using a cable that varies in length.
Warning: Install DTMs in the BCM main unit only. DTMs do not function if installed in
the BCM expansion unit. If there are no empty MBM bays in the BCM main unit, move
MBMs to the expansion unit to provide space for the DTMs.
10 minutes/unit
1 minutes
CTM 4
1Aux 2 3 4
DSM 16+
1234 1234
StatusPower
Main unit DS256 connector
Expansion unit DS256 connector
Expansion unit connector cable