
User's Manual


20 Chapter 3 Physical installation
N0060602N0060602
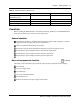
5 Align the screw holes on one side of the BCM unit with the wall-mount bracket.
6 Fasten the wall-mount brackets securely to the BCM unit using the screws provided. Refer to
Figure 6.
Figure 6 Attach the wall-mount bracket to the BCM400 main unit
7 Hang the BCM unit on the backboard screws. Make sure the BCM unit is level. Ensure the
wood screw heads seat fully into the wall-mount bracket slots.
8 Tighten the wood screws against the wall-mount bracket.
9 If the BCM system has an expansion unit, mount the expansion unit in the same way as the
main unit.
Installing a BCM unit on a flat surface
Follow this procedure to install a BCM unit (main unit or expansion unit) on a flat surface.
Note: The bracket suspends the BCM unit on the wall. Consider the direction you want
the MBMs to face, left or right, when you choose the side on which to install the bracket.
Caution: Use only the screws supplied with the wall-mount bracket kit
(NTAB3422). Other screws can damage the unit.
Caution: Do not place anything directly on top of the BCM main unit.
The wall-mount brackets for
the BCM200 main unit and
expansion unit are installed in
a similar manner.