
User's Manual


Chapter 3 Physical installation 19
BCM 4.0 Installation Checklist and Quick Start Guide
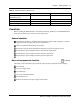
Figure 5 Fasten the BCM400 main unit to an equipment rack
5 If the BCM system has an expansion unit, mount the expansion unit in the same way as the
main unit.
Installing a BCM unit on a wall
To wall-mount a BCM unit (main unit or expansion unit), you need the optional wall-mount kit
(NTAB3422).
To install a BCM unit on a wall
1 Mark the location of the plywood backboard on the wall using a pencil. Use a ruler and
bubble-level to check that the plywood backboard is level with respect to the wall.
2 Mount the plywood backboard securely to the wall.
3 Mark the location of the wall-mount bracket holes on the plywood backboard.
a Use the wall-mount bracket as a template.
b Use a bubble-level to check that the wall-mount bracket is level with respect to the
plywood backboard.
4 Install four #10 x 2.5 cm (#10 x 1 in.) round-head wood screws in the backboard (supplied).
a Do not tighten the screws heads against the backboard. Leave approximately 0.5 cm (0.25
in.) of the screw exposed from the backboard.
b Perform a trial installation of the wall-mount bracket on the plywood backboard. Ensure
the wood screw heads seat in the wall-mount bracket slots. If the wood screws are too
tight, loosen until the screw heads fit fully in the slots.
c Ensure that the wall-mount bracket is level with respect to the plywood backboard.
d Remove the wall-mount bracket.
The BCM200 main unit and
expansion unit are installed in
a similar manner.
12 minutes/unit