
User's Manual


Chapter 25 Replacing or installing a cooling fan 329
BCM200/400 4.0 Installation and Maintenance Guide
5 Restore the BCM system to operation. For details, refer to “Restarting the system after
maintenance” on page 232.
The BCM system starts up when you connect the AC power cord. The start-up process takes
several minutes to complete.
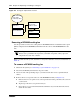
6 Test the direction of the fan exhaust air flow to determine if the fan is correctly installed.
a Hold a piece of paper or your hand close to the fan exhaust. A correctly installed fan blows
air away from the main unit. If you are testing two fans, cover one fan at a time with your
hand.
b If the fan exhaust air flow is incorrect, remove the cooling fan (see “Removing a BCM400
cooling fan” on page 324) and reinstall the fan in the correct position (this procedure).
Removing a BCM200 cooling fan
Use this procedure to remove the cooling fan in a BCM200 main unit.
To remove a BCM200 cooling fan
1 Shut down the system (see “Performing a system shutdown” on page 231).
2 Disconnect the BCM system from the AC power outlet.
3 Attach one end of the grounding strap to your wrist and the other end to a grounded metal
surface.
4 Remove the top cover from the main unit (see “Installing the main unit top cover” on page
246).
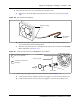
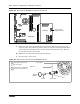
5 Disconnect the I/O card fan cable connection (see Figure 184 on page 330).
Warning: Protect the hardware components against damage from electrostatic discharge.
Always wear a grounded wrist strap before you handle components. Always place the
components in a static-free container.