
User's Manual


Chapter 24 Replacing data cards and processing hardware 321
BCM200/400 4.0 Installation and Maintenance Guide
To install a new clock/calendar battery
1 Remove the old battery. See “To remove the clock/calendar battery” on page 319.
2 Ensure you have the positive side of the battery facing up when you position it in the socket.
3 Push down until the battery snaps into the socket.
4 Install the media services card. See “To install the media services card (MSC)” on page 306.
5 Install the WAN card (if applicable). See “Installing the WAN card” on page 302.
6 Partially insert the base function tray into the main unit.
7 Connect the DS30 connectors to the MSC.
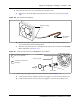
8 Position the PCI cover plate on the front of the base function tray so that the base function tray
and cover plate screw holes align.
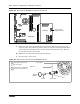
9 Position the PCI cover plate locking screw in the PCI cover plate. Tighten the PCI cover plate
locking screw until the plate is firmly set in place (see Figure 163).
10 Install the base function tray bezel (see “To install the base function tray bezel” on page 238).
11 Completely insert the base function tray into the main unit. See “To install the base function
tray” on page 236.
12 Restore the BCM system to operation. For details, refer to “Restarting the system after
maintenance” on page 232.
Warning: There is a danger of explosion if you do not replace the battery correctly.
You must replace the battery with a CR2032, 3v Maxell coin cell battery.
The positive side of the battery must face up and the battery must sit securely in the
battery socket.
Warning: Protect the hardware components against damage from electrostatic discharge.
Always wear a grounded wrist strap before you handle components. Always place the
components in a static-free container.