
User's Manual


Chapter 23 Replacing or upgrading a power supply 277
BCM200/400 4.0 Installation and Maintenance Guide
6 Disconnect all cables from the I/O card.
7 Partially remove the base function tray (see “Removing the base function tray” on page 234).
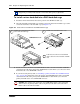
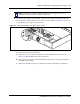
8 Remove the screws that secure the MSC guide bracket to the I/O card. Place the MSC guide
bracket and screws in a safe location (see Figure 134).
Figure 134 Remove the BCM200 MSC guide bracket
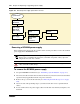
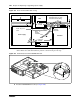
9 Remove the screws that secure the I/O card to the main unit (see Figure 135). Place the screws
in a safe location.
10 Remove the I/O card from the main unit. Place the I/O card in a safe, clean, and static-free
location.
Figure 135 Remove the I/O card from the BCM200 main unit
Note: Power supply and hard disk cables run underneath the I/O card. Remember the
location and position of the power supply and hard disk cables. You will need to route the
cables in the same manner when you reinstall the power supply.
Unfasten BCM200
MSC guide bracket
mounting screws
BCM200 MSC guide bracket
I/O Card