
User's Manual


Chapter 22 Replacing the hard disk 263
BCM200/400 4.0 Installation and Maintenance Guide
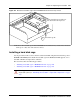
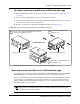
Figure 125 Insert the hard disk cage into the BCM200 main unit
7 Replace the cover (if applicable) and access panel.
8 Restore the BCM system to operation. Refer to “Restarting the system after maintenance” on
page 232.
9 If you installed a new programmed hard disk in a standard configuration (for RAID
configuration, skip to the next step):
a Initialize the hard disk. Refer to “Initializing the hard disk in a single-disk configuration”
on page 273.
b After the disk is initialized, restore your data from your backups. If you did not back up
your keycodes, reenter them (see “Software keycode” on page 181).
10 If you installed a new blank hard disk (mirror or primary) in a RAID, wait for the disk mirror
process to complete. For further information on how to monitor disk mirroring progress, refer
to “RAID disk mirroring” on page 221.
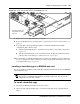
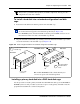
Installing a hard disk cage in a BCM400 main unit
Use this procedure to install the standard or RAID configuration hard disk cage into the BCM400
advanced function tray.
To install a hard disk cage
1 Disconnect the BCM system from the AC power source.
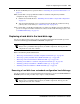
2 Attach one end of the grounding strap to your wrist and the other end to a grounded metal
surface.
Warning: Protect the hardware components against damage from electrostatic discharge.
Always wear a grounded wriststrap before you handle components. Always place the
components in a static-free container.
Slide the hard disk cage
toward the front of the
main unit.