
User's Manual


Chapter 22 Replacing the hard disk 261
BCM200/400 4.0 Installation and Maintenance Guide
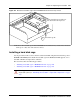
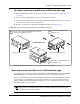
Figure 124 Detach the hard disk cage from the BCM400 advanced function tray chassis
11 Remove the hard disk cage from the BCM400 advanced function tray chassis. Place the hard
disk cage on a flat, clean and static-free surface.
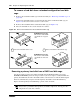
Installing a hard disk cage
Use the procedures in this section to install a standard or RAID configuration hard disk cage into a
BCM200 or BCM400 system. Install the hard disk cage in the BCM after RAID upgrade, or in a
hard disk or RAID card replacement conditions.
This section describes the following procedures:
• “Installing a hard disk cage in a BCM200 main unit” on page 262
• “Installing a hard disk cage in a BCM400 main unit” on page 263
Warning: You must initialize the BCM system when you install a new hard disk on a
single-disk system (see “Initializing the hard disk in a single-disk configuration” on page
273).
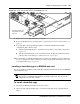
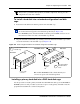
Lift hard disk cage tab
1
2
Slide the hard disk cage toward the rear
of the advanced function tray chassis