Nortel Knowledge Network Meridian Digital Telephones M3905 Call Center Quick Reference Guide Enterprise Voice Solutions Customer Documentation
While you are away from your desk: Call Forward 38
Contents Introduction to the M3905 Call Center telephone 7 M3905 Call Center telephone ...............................................................7 M3905 Call Center telephone keys .......................................................8 Call Center Agent/Supervisor Features 9 Headset interface .................................................................................9 Agent login .........................................................................................
Contents The Meridian SL-100 Multistage Queue Status indicator ...........................25 Display Queue Threshold on Meridian SL-100 .........................................26 Display agent status on the Meridian 1 ...................................................28 Display agent status on the Meridian SL-100 ...........................................29 Your telephone’s non-ACD call features 30 Make a call ..........................................................................................
Contents Directory display and navigation 49 Access your Callers List, Redial List, or Personal Directory .......................49 Directory password protection .............................................................50 Call Log 52 Access and use the Callers List .............................................................52 Access and use the Redial List ..............................................................54 Use the Personal Directory 55 Access the Personal Directory .............
Contents 6 Draft 0.
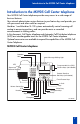
Introduction to the M3905 Call Center telephone Introduction to the M3905 Call Center telephone Your M3905 Call Center telephone provides easy access to a wide range of business features. Your network administrator assigns features to your feature keys and provides you with passwords and other codes as required. Meridian 1 and Meridian SL-100 systems automatically control incoming call routing to answering positions, and can provide music or recorded announcements to waiting callers.
Introduction to the M3905 Call Center telephone M3905 Call Center telephone keys The M3905 Call Center telephone features: • • • Eight Programmable Line (DN)/Feature Keys (self-labeled), giving you access to eight different lines (DNs) or features.
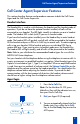
Call Center Agent/Supervisor Features Call Center Agent/Supervisor Features This section describes features and procedures common to both the Call Center Agent and the Call Center Supervisor. Headset interface The Headset Key is used to switch between the headset and the handset mode of operation. If you do not have the optional handset installed, all calls will be connected to your headset. The LED lights steadily to indicate you are in headset mode.
Call Center Agent/Supervisor Features Login with Agent ID and Multiple Queue Assignment (MQA) The process of logging in using MQA consists of entering your four digit Agent ID followed by a Supervisor ID (if your queue requires one) followed by up to five ACD DNs and priority values (if priority values are being used) terminated by ££. To choose the default Priority or Supervisor ID, enter £ instead of a Priority entry or a Supervisor ID entry.
Call Center Agent/Supervisor Features To login with Supervisor ID and with Priority: Dial your Agent ID £ Supervisor ID £ ACD DN 1 £ Priority 1 £ ACD DN 2 £ Priority 2 £ ACD DN 3 £ Priority 3 £ ACD DN 4 £ Priority 4 £ ACD DN 5 £ Priority 5 £ £. In - Calls / 3. Press either the In-Calls Key, or the Not Ready Key to enter the ACD queue. or Not Ready / Note: The MQA feature is not available on the Meridian SL-100. Correct errors during the login procedure Dial ‚£ to correct the previous entry.
Call Center Agent/Supervisor Features Default login If you normally use the same telephone, you need not repeat the entire login process at the beginning of each shift. The default login places you in the same ACD queues and the same supervisor that the set had in the previous login. Default login: In - Calls / 1. Press the In-Calls Key. 2. Dial your Agent ID £££ (if your queue requires a Supervisor ID) or Dial your Agent ID ££ (if a Supervisor ID is not required).
Call Center Agent features Call Center Agent features This section explains the features that are available to ACD agent positions. Use Activity Code This feature allows you to record the type of activity you are performing. Use the Activity Key to record Activity Codes on the Meridian 1 and LOB (Line of Business) Codes on the Meridian SL-100. Both the Meridian 1 and the Meridian SL-100 track items such as the number of specific types of calls and the holding times for these calls.
Call Center Agent features Answer Call Center calls The In-Calls Key is the lower right-hand key on your M3905 Call Center telephone. The In-Calls Key is your main ACD extension (Primary DN). The In-Calls Key allows you to answer the next queued call on the primary DN. This key presents only ACD calls. To disconnect from an ACD call, press the Goodbye Key or press the In-Calls Key a second time.
Call Center Agent features Call Forcing The Call Forcing option automatically connects incoming ACD calls. You do not need to press the In-Calls Key. When Call Forcing is on, you have a time interval between each incoming call that is defined by your network administrator. After the time interval is up, you hear a tone through the headset and Call Forcing automatically connects you with the incoming caller. In - Calls / You hear a short tone.
Call Center Agent features Use Not Ready Use the Not Ready Key, when performing post-call work. When you need time to catch up on post-call processing work: Not Ready / Press the Not Ready Key. This takes you out of the queue. When you are ready to take ACD calls again: In - Calls / Press either the In-Calls Key, or the Not Ready Key to enter the ACD queue. or Not Ready / Note 1: On the Meridian SL-100, you must press the Not Ready Key to begin receiving ACD calls.
Call Center Agent features Contact your supervisor To answer your supervisor when your phone rings and the Supervisor indicator flashes: Supervisor / Press the Supervisor Key. If you are on a call and hear a buzz and the Supervisor indicator flashes: Hold Supervisor / 1. Press the Hold Key. / 2. Press the Supervisor Key. To call your supervisor: Supervisor / Press the Supervisor Key. If you are on a call, this automatically puts the call in progress on Hold.
Call Center Agent features To Transfer to a supervisor, during a call in progress: Supervisor / 1. Press the Supervisor Key. Supervisor / 2. Press the Supervisor Key again when the supervisor answers. / 3. Press the Goodbye Key to disconnect from the call. The caller remains connected with your supervisor. Goodbye Note: On the Meridian SL-100, use the Transfer Key to transfer the call to your Supervisor’s DN. You cannot transfer a call using the Supervisor Key.
Call Center Agent features To Walkaway while in Not Ready mode (Not Ready LED or LCD indicator is on, and Not Ready is shown on the display): Not Ready Hold / 1. Press the Not Ready Key. / 2. Press the Hold Key. 3. Disconnect the headset. Note: On the Meridian SL-100, you need to enter a walkaway code. To return from Walkaway: 1. Connect the headset. In - Calls / 2. Press the key next to the flashing indicator.
Call Center Supervisor features Call Center Supervisor features In addition to the features described in this section, your network administrator can assign any feature listed in the “Agent features” section to a supervisor's telephone (except Supervisor). Agent Keys Agent Keys allow you to connect, observe, or monitor the status of each Agent position. Each Agent Key is linked to a particular agent position and can be used along with the Call Agent or Observe Agent Keys.
Call Center Supervisor features Ans Emerg / 2. Press the Answer Emergency Key. Your position goes into Not Ready state and the Answer Emergency indicator lights continuously. You are connected to the call. To disconnect from the emergency call: Goodbye / Press the Goodbye Key. Call Agent To call an agent: CallAgt / Agent1 or 1. Press Call Agent Key, your position goes into the Not Ready state. 2. Press the Agent Key assigned to the agent or dial the agent's position ID.
Call Center Supervisor features To use the Supervisor Observe feature for a two way conversation: While the headset is plugged in, press the Supervisor Observe Key, the LED lights continuously and the supervisor can participate in the conversation. To mute the Supervisor headset: Press the Supervisor Observe Key a second time and the to put the supervisor headset on mute. The LED turns off. Observe Agent To observe an agent: Obv Agent / 1. Press the Observe Agent Key.
Call Center Supervisor features To activate Interflow: Press the Interflow Key. The indicator flashes and excess calls are routed to the destination. Interflow Note: On the Meridian SL-100, this feature is known as Controlled Interflow. Use the ConIntrFlw Key to activate this feature. To stop Interflow: Press the Interflow Key again. Interflow Night Service To enter Night Service: Night + Press the Night Key and dial fl (6=N for Night). The indicator lights continuously.
Viewing queue status Viewing queue status The Meridian 1 ACD Calls Waiting status indicator The LCD indicator beside the Calls Waiting key gives you a visual indication of the number of calls in the ACD queue. The following table lists the four states of the Calls Waiting LCD indicator. Indicator Queue Status Meaning Off Light There are few or no calls waiting. On Normal An acceptable number of calls are waiting. Slow Flashing Busy Calls are backing up in the queue.
Viewing queue status Calls waiting Number of manned positions WAITING MAND LWAIT TOFQ 13 9 0:20 0 Forward Callers Redial Quit Calls time overflowed into this queue Length of time first call has waited Copy 553-9093 Note 1: In an MQA environment, the display will scroll through the different queues at 2 second intervals. The queues are presented in the order in which they were entered at login.
Viewing queue status Display Queue Threshold on Meridian SL-100 On the Meridian SL-100, the Display Queue Threshold or Waiting Calls Key allows an ACD Agent or Supervisor to view the number of calls waiting in the queue, or how long the first call in the queue has been waiting. To display the queue threshold for your Meridian SL-100 ACD group: / DisplayQue Dsply Queue Press the Display Queue Key. Information on your current ACD queue appears on the display as shown on the following page.
Viewing queue status 5551234 T2 CALLQ 026 Number of calls in the queue Forward Callers Redial Quit Copy 553-9095 Note 1: The information includes the threshold level, the threshold type (CALLQ or WAIT), and the current value of the threshold. Note 2: In some systems, this information is also displayed when the Not Ready feature is in use. The information is updated regularly and is visible until you exit the Not Ready state.
Viewing queue status Display agent status on the Meridian 1 The Display Agent feature gives ACD Supervisors a summary of the current status of all agent positions for which they have Agent Keys. Press the Display Agent Key. The display shows summary of the current status of all agent positions which have a key assigned on the supervisor's phone.
Viewing queue status Display agent status on the Meridian SL-100 The Display Agent feature gives ACD Supervisors a summary of the current status of all agent positions for which they have Agent Keys. Press the Display Agent Key. The display shows summary of the current status of all agent positions which have a key assigned on the supervisor's phone.
Your telephone’s non-ACD call features Your telephone’s non-ACD call features This section describes non-ACD features commonly used for call processing. Your network administrator assigns features to your programmable feature keys. Whenever this guide describes a procedure that requires special codes ask your network administrator to provide these to you.
Your telephone’s non-ACD call features Note 2: Press the Pause Key to insert a 1.5 second pause in the dialing string. 2637 2. Press an Individual Line (DN) Key to receive dial tone. The displayed predialed number is automatically dialed. Note: You cannot use the Predial feature if the Live dial pad feature is active. Auto Dial Auto Dial lets you dedicate a feature key to a specific telephone number. When the Auto Dial Key is pressed, the number is dialed automatically. To use Auto Dial: 2637 1.
Your telephone’s non-ACD call features Ring Again Use the Ring Again feature when you dial a number and receive a busy tone or no answer. The Ring Again feature lets you know when the person you dialed is available or has used their telephone. The feature notifies you when to redial your party. The Ring Again feature automatically redials the number. To use Ring Again: 1. Dial a number and receive a busy tone or no answer. Note: On the Meridian SL-100, Ring Again is available on busy tone only.
Your telephone’s non-ACD call features 2. Press the Individual Line (DN) Key again. 2637 The last number you dialed is automatically redialed. Note: On Meridian SL-100, press the £ Key twice. Use Speed Call The Speed Call feature allows you to automatically dial frequently called numbers by entering a one, two, or three digit code. Contact your network administrator to determine the capacity of your Speed Call list.
Your telephone’s non-ACD call features 4. Press the Done Key to save the code and number. Done To make a Speed Call: 1. Press an Individual Line (DN) Key. 2637 SpcCtrl or SpcUsr 2. Press the Speed Call Controller Key or the Speed Call User Key. The screen displays Enter code. 3. Dial the Speed Call code assigned to the telephone number. The number is automatically dialed.
Your telephone’s non-ACD call features Answer a call When you receive an incoming call on an Individual Line (DN), your telephone rings and the LCD indicator flashes. To answer a call: Press the Individual Line (DN) Key beside the flashing LCD indicator. 2637 Note: If you have the handset option and you pick up the handset, you must also press the Individual Line (DN) Key, otherwise the handset is not operable. However, you may terminate a call by replacing the handset in the cradle.
Your telephone’s non-ACD call features Transfer a call Use the Transfer feature to redirect a call to a third party. To use the Transfer feature: 1. Press the Transfer Key. Trans The other party is on hold and you receive a dial tone. The screen displays Call on hold, dial number. 2. Dial the number of the telephone where the call is to be transferred. Swap or Connect 3. Press the Swap Key to switch between talking with the original caller and the new caller.
Your telephone’s non-ACD call features Trace a Malicious call Malicious Call Trace provides a way for you to trace nuisance calls. The feature is available for both internal and external calls. When the key is pressed, your Directory Number and the telephone number of the caller are recorded for access by your network administrator. To use Call Trace while you are on a call: Press the Call Trace Key. CallTrace Note: On the Meridian SL-100, press the MalcsHold (Malicious Call Hold) Key.
Your telephone’s non-ACD call features Forward calls The Call Forward feature allows you to direct your calls to ring at another Line (DN). You cannot forward calls while your telephone is ringing. To forward your calls: Forward 1. Press the Forward Key. The previously stored forward number appears, if one exists, and the screen displays Enter forward number. 2. If desired, enter a new number. The existing number is automatically deleted.
Your telephone’s non-ACD call features Set up a Conference call You can set up a Conference call for up to six people (including yourself). Contact your network administrator to determine the maximum number of people your system allows on a conference call. To set up a conference call: 1. Press the Conference Key while you are on a call. Conf The other party is on hold and you receive dial tone. The screen displays Call on hold, dial number. 2.
Options List Options List The Options List allows you to customize certain characteristics of your phone. Screen prompts take you step-by-step through procedures and keep you informed on the status of the following settings: Language, Change feature key label, Screen contrast, Volume adjustment, Ring type, Call log options, Preferred name match, Area code set-up, Call timer enable, Date/time format, Key click enable, Headset type, and Display diagnostics. To change any option’s setting: Options 1.
Options List Select a language The display is available in multiple languages. After you select Language. . . from the Options List menu, 1. Use the Navigation Keys to highlight the desired language (e.g., German). Deutsch Select 2. Press the Select Key. Press the Done Key to save changes. Press the Quit Key or Options Key to exit. Change a Feature Key label You can change the name on the Programmable Line (DN)/Feature Keys (self-labeled).
Options List Note: Use the Case Key to change the case of the letter, as needed.Press the Up Navigation Key to access special characters you may want to include in the label. Use the Navigation Keys to locate the character you want to include. Press the Select Key to choose the highlighted character. Press the Return Key to return to label entry without selecting a special character. 6.
Options List Adjust Screen contrast The Screen contrast option allows you to adjust the contrast of the display on your telephone. After you select Screen contrast from the Options List menu; Lower or Higher From the Contrast screen, press the Lower Key to decrease the display contrast level, or press the Higher Key to increase the display contrast level. Press the Done Key to save changes. Press the Quit Key or Options Key to exit.
Options List Choose Ring type The Ring type option allows you to choose from among the various ringing sounds available for your telephone model. After you select Ring type. . . from the Options List menu; 1. Use the Navigation Keys to scroll through the list of ring types. Ring type 3 Play 2. Press the Play Key to sample a ring tone. Select 3. Press the Select Key to activate the desired ring type. Press the Done Key to save changes. Press the Quit Key or Options Key to exit.
Options List Use Live dial pad The Live dial pad option allows you to press any dial pad key to automatically access a dial tone. After you select Live dial pad from the Options List menu; On or Off From the Live dialpad screen, press the On Key to turn on Live dial pad, or press the Off Key to turn off Live dial pad. Press the Done Key to save changes. Press the Quit Key or Options Key to exit.
Options List Enable Call timer The Call timer enable option measures how long you are on each call. After you select Call timer enable from the Options List menu; On or Off From the Call timer screen, press the On Key to turn on the Call timer, or press the Off Key to turn off the Call timer. Press the Done Key to save changes. Press the Quit Key or Options Key to exit. Select Date/time format There are eight Date/time formats.
Options List Headset type selection The Headset type option allows you to select one of the three different headset types: Type 1, Type 2, or Amplified. Select the setting that works best for the headset that you are using. After you select Headset type from the Options List menu; From the Headset type menu, use the Navigation Keys to highlight and select either: Type 1 headset Type 1 or or Type 2 headset or or Amplified headset Type 2 Amplified Press the Done Key to save selection.
Options List Activate Headset port external alerter When the Headset port external alerter option is activated, it supports a visual or audible alerter and/or recorder device. This device plugs into the Headset port, which is located on the bottom of the telephone. After you select Headset port ext alerter from the Options List menu; On or Off From the External alerter screen, press the On Key to turn on Headset port external alerter, or press the Off Key to turn off Headset port external alerter.
Directory display and navigation Directory display and navigation With the M3905’s display, you can view two lines of information. The figure below shows the status once you log into the directory. 01 Directories Personal Directory Call Log (Callers List) Select Quit Copy 553-9092 Access your Callers List, Redial List, or Personal Directory To access the M3905 Directory/Log: Dir/Log 1. Press the Directory/Log Key.
Directory display and navigation To access the M3905 Callers List or Redial List using a Context Sensitive Soft Key or a Programmable Feature Key: Callers or Redial Press the Callers Key to access the Callers List, or press the Redial Key to access the Redial List. To exit the Directory/Log: Press the Quit Key or the Directory/Log Key to exit. Quit or Dir/Log Directory password protection You can password protect your Personal Directory, Callers List, and Redial list on the M3905.
Directory display and navigation 6. Dial the password. Enter 7. Press the Enter Key. 8. Dial the password again to confirm your password. Enter Done 9. Press the Enter Key. 10. Press the Done Key to save changes. 11. Press the Quit Key or the Directory/Log Key to exit. Quit or Dir/Log To disable Personal Directory password: Dir/Log 1. Press the Directory/Log Key. 2. Dial the password. Enter 3. Press the Enter Key. 4. Use the Navigation Keys to highlight Password Administration.
Call Log Select 6. Press the Select Key again to select Password enabled: ON. Off 7. Press the Off Key to disable password protection. Done 8. Press the Done Key to save changes. 9. Press the Quit Key or the Directory/Log Key to exit. Quit or Dir/Log Call Log The Call Log records the name and number of incoming and outgoing calls and can be password protected. You can activate Call Log to record all calls, record only the unanswered calls, or record no incoming calls.
Call Log 3. Press the Select Key. Select New Old or 4. Press the New Key to go to the top of the new calls list, or press the Old Key to go to the top of the old calls list. To access the Callers List using a Context Sensitive Soft Key or a Programmable Feature Key: Callers Press the Callers Key. You are presented with the first call in the new calls list. To make a call from the Callers List: 1. Use the Navigation Keys to highlight the number you want to call.
Call Log Access and use the Redial List The Redial List records your last 20 outgoing calls and can be password protected. On the M3905, you can copy these numbers to your Personal Directory. To access the Redial List using the Directory/Log Key: Dir/Log 1. Press the Directory/Log Key. 2. Use the Navigation Keys to highlight Call Log (Redial List). Call Log (Redial List) Select 3. Press Select.
Use the Personal Directory Use the Personal Directory The Personal Directory provides a personalized directory of names and telephone numbers. The Personal Directory allows you to add, delete, search, and edit entries and can be password protected. The Personal Directory holds up to 100 entries (an entry is one name and one telephone number). You can add a directory entry by copying the entry from your Callers List or Redial List.
Use the Personal Directory Example: To enter the name and telephone number for Chris: 1. Dial the name using the key pad. Note: Press the Up Navigation Key to access special characters you may want to include in the name. Use the Navigation Keys to locate the character you want to include. Press the Select Key to choose the highlighted character. Press the Return Key to return to name entry without selecting a special character. ¤¤¤ ›› ‡‡‡ ››› ‡‡‡‡ 2.
Use the Personal Directory Add an incoming call Copy / 1. Press the Copy Key. The displays shows the message Copy to. Dirctry Next or Clear 2. Press the Directory Key. 3. Press Next to copy the incoming call without editing the name. Edit the number, if required (see note for step 4) and go to step 5. or Press Clear to make changes to the name before saving. Add the name using the dial pad, Delete, and Case Keys as needed. 4. Press the Next Key.
Use the Personal Directory Add an outgoing call Copy / 1. After the person you called answers, press the Copy Key. The displays shows Copy to. Dirctry 2. Press the Directory Key. 3. Add the name, using the dial pad, Delete, and Case Keys as needed. Next 4. Press the Next Key. Done 5. Press the Done Key to save the changes. Quit or Dir/Log 6. Press the Quit Key or the Directory/Log Key to exit. Note: You can edit the name or number before or after you save to the Directory.
Use the Personal Directory To edit a Personal Directory entry: 1. Press the Edit Key to change the telephone number or name. Edit 2. Use the Navigation Keys to highlight the character you want to change. 3. Use the dial pad to enter the desired changes. Refer to“Add a Personal Directory entry” on page 55 for an example of how to use the dial pad to enter names. Next 4. Press the Next Key. Edit the number if necessary. Done 5. Press the Done Key to save the changes. 6.
Use the Personal Directory Quit or 3. Press the Quit Key or the Directory/Log Key to exit. Dir/Log Use the Personal Directory to make a call To use the Personal Directory to make a call: 1. Use the Navigation Keys to highlight the desired name or number. Purchasing Dial 2637 Note: If you are dialing an external or long distance number, be sure that your directory entry includes the access codes required by your system to make an external or long distance call. 2. Press the Dial Key. 3.
Use the Personal Directory To dial from the Card View: 1. Use the Navigation Keys to show the name and number of the currently selected entry in the Card View. Note: If you are dialing an external or long distance number, be sure that your directory entry includes the access codes required by your system to make an external or long distance call. Dial 2. Press the Dial Key. 3. Press an Individual Line (DN) Key to call the person whose name is highighted.
Use the Personal Directory Copy a number from the Redial List You can copy a number from the Redial List to the Personal Directory. To copy a number from the Redial List: 1. Use the Navigation Keys to highlight the name or number in your Redial List that you want to copy to your Personal Directory. 2498 Copy / Dirctry Next or Clear Next 2. Press the Copy Key. The displays shows Copy to. 3. Press the Directory Key. 4. Press Next to copy the incoming call without editing the name.
Set-to-Set Messaging Set-to-Set Messaging With the Set-to-Set Messaging application activated, an internal caller using an M3903, M3904, or M3905 receives a quick visual message, which you have selected, whenever they dial your telephone number. The length of your message is limited to 24 characters. The message is entered through the dial pad keys using a process similar to the one used for entering names in the Personal Directory.
Set-to-Set Messaging 2. From the Edit Mode screen, use the dial pad to enter a text message. Press the Delete Key to delete a character. Press the Case Key to toggle between upper and lower case characters. Press the Cancel Key to exit the screen without saving changes. Note 1: Please refer to “Add a Personal Directory entry” on page 55 for detailed instructions on using your telephone’s dial pad to enter text.
Set-to-Set Messaging 3. From the Edit Mode screen, use the dial pad to customize the message. Press the Delete Key to delete a character. Press the Case Key to toggle between upper and lower case characters. Press the Cancel Key to exit the screen without saving changes. Note 1: Please refer to “Add a Personal Directory entry” on page 55 for detailed instructions on using your telephone’s dial pad to enter text.
Corporate Directory Note 2: If messages have been provided by your network administrator, up and down arrows appear on the right side of the display. The On and Off Keys appear for the most recently selected message. Quit or App's 2. Press the Quit Key or the Applications Key to exit the Set-to-Set Messaging application. Note: If you press the Quit Key or the Applications Key before you press the Done Key, you exit the application without saving your changes.
Corporate Directory Note 1: The comma is the first character on the ⁄ Key on your dial pad. Note 2: You do not need to enter the entire name. When the Done Key is pressed, the application will highlight the first directory entry that matches the text that you entered. Done 5. Press the Done Key. The application highlights the first entry that matches the text you entered in step 4. If there is no match, the screen displays No matches found for . . . (the text that you entered). 6.
Corporate Directory To find another directory listing or to refine your current directory search: NewFind or Resume Press the NewFind Key to begin a new search, or press the Resume Key to enter additional characters so that you may narrow your search. To exit the Corporate Directory application: Quit or Press the Quit Key or the Applications Key. App's To copy an entry from the Corporate Directory to your telephone’s Personal Directory: / 1.
While you are away from your desk: Call Forward 38
Copyright © 2006 Nortel Networks. All rights reserved. The information in this document is subject to change without notice. The statements, configurations, technical data, and recommendations in this document are believed to be accurate and reliable, but are presented without express or implied warranty. Users must take full responsibility for their applications of any products specified in this document. The information in this document is proprietary to Nortel Networks.