CallPilot 100/150 Quick Start Guide www.nortelnetworks.
Regulatory information for CallPilot 100/150 Regulatory information for CallPilot 100/150 Copyright © 2004 Nortel Networks All rights reserved. 2004. The information in this document is subject to change without notice. The statements, configurations, technical data, and recommendations in this document are believed to be accurate and reliable, but are presented without express or implied warranty. Users must take full responsibility for their applications of any products specified in this document.
About CallPilot 100/150 3 About CallPilot 100/150 CallPilot 100/150 is a voice messaging product suited for small to medium sized businesses. It combines the voicemail and call processing features of a large business system into a compact, easy to use system. For information about installing two CallPilot 150 units on one KSU, refer to the CallPilot 100/ 150 Installation and Maintenance Guide.
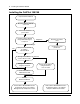
Installing the CallPilot 100/150 Installing the CallPilot 100/150 Unpack CallPilot 100/150 Mount the CallPilot 100/150 on the wall Connect the TCM and power cables Initialize CallPilot 100/150 using CallPilot Manager or a telephone Telephone Determine the feature codes CallPilot Manger Yes Configure the initial parameters Can you use the default IP address 192.168.110.
Installing the CallPilot 100/150 5 Mounting the CallPilot 100/150 on the wall 1 Attach the wall mount bracket to a secure surface by the two inner holes. Use anchors, as necessary. 2 Slip the slot on the back (near the top) of the CallPilot 100/150 onto the bracket. 3 Secure the CallPilot 100/150 using a screw in the lower screw hole.
Initializing the CallPilot 100/150 5 Connect the power cable to the CallPilot 100/150 and the wall socket. 6 Run all the cables through the cable trough at the top of the CallPilot 100/150. 7 Close the lid. Initializing the CallPilot 100/150 Initializing the CallPilot 100/150 sets the system parameters to their default settings and sets some global parameters. When the initialization is completed, the CallPilot 100/150 is operational and ready for you to begin administration programming.
Initializing the CallPilot 100/150 7 Connecting to the CallPilot 100/150 To connect to the CallPilot 100/150, you need the IP address of the CallPilot 100/150 and a connection to the network that the CallPilot 100/150 is on. The default IP address for CallPilot 100/150 is 192.168.110.10.
Initializing the CallPilot 100/150 For information about how to set these parameters, refer to the documentation for your terminal or terminal emulation program. Changing the IP address using the terminal 1 Attach the serial cable to the serial port on the CallPilot 100/150. 2 Attach the other end of the cable to the serial port on the terminal or computer. 3 Ensure that your terminal or computer is powered up. 4 If you are using a computer, start your terminal emulation program.
Initializing the CallPilot 100/150 9 16 Connect the LAN cable to the Ethernet port on the CallPilot 100/150. You can now initialize the CallPilot parameters. For information about how to initialize the CallPilot, refer to “Running the Quick Install Wizard” on page 9. Changing the IP address using an Ethernet crossover cable Using an Ethernet crossover cable, you can connect the CallPilot 100/150 to your computer.
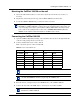
Initializing the CallPilot 100/150 2 In the URL address box, type the CallPilot 100/150 IP address. For example: HTTP://192.168.110.10 Note: You must include HTTP:// to access CallPilot Manager. The Quick Install Wizard screen appears. Depending on your system, this can take several minutes. 3 Configure the Quick Install parameters for a CallPilot 100/150 according to following table.
Initializing the CallPilot 100/150 11 Table 3 Quick Install Wizard parameters for a CallPilot 100/150 Field name Description Primary UI Style Select the user interface style assigned to the mailboxes. You can select NVM or CallPilot. If you select NVM, the mailbox user interface operates like Norstar Voice Mail and FlashTalk. Users will hear Norstar Voice Mail voice prompts and see Norstar Voice Mail text prompts. If you select CallPilot, the mailbox user interface operates like Meridian 1 CallPilot.
Initializing CallPilot 100/150 using a telephone Table 3 Quick Install Wizard parameters for a CallPilot 100/150 Field name Description Outdial Method Select the outdial method you want to assign to the mailboxes created using the From Extension and To Extension boxes. You can choose None, Line, Pool or Route. If you select None, no outdial method is assigned to the mailboxes.
Initializing CallPilot 100/150 using a telephone 13 Determining CallPilot 100/150 Feature Codes Default Feature Codes are assigned to CallPilot 100/150 by the Norstar system. These default codes are listed in Table 4. When these default Feature Codes are used by other Norstar applications, the Norstar system assigns Feature Codes between 900 and 999 to CallPilot 100/150. These codes might not be assigned in sequential order. Record the assigned Feature Codes in Table 4.
Initializing CallPilot 100/150 using a telephone Configuring the CallPilot 100/150 initial parameters To configure the CallPilot 100/150 initial parameters: 1. Press ≤·°‹. This is the default System Administration feature code. If your system does not use the default feature codes, enter the System Administration feature code you determined earlier. Pswd: RETRY OK Bilingual? YES NO 2. Enter ¤flfl‹›› (CONFIG) and press OK. 3.
Configuring the CallPilot 100/150 Primary UI:NVM CHNG NEXT 15 11. Press CHNG to toggle the setting between NVM and CP. If you choose NVM, the mailbox users will see and hear Norstar Voice Mail prompts when they use their mailboxes. If you choose CP, the mailbox users will see and hear CallPilot prompts when they use their mailboxes. 12. Press NEXT. System config RETRY OK 13. Press OK. Configuring... This message appears on the display. System ready Initialization takes about three seconds.
Additional information N0008008 02