
BayStack User Guide


Installing the BayStack 350 Switch
304376-B Rev 00
2-7
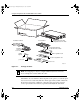
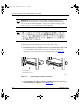
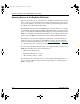
Figure 2-3. Attaching Mounting Brackets
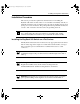
3.
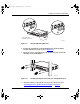
Position the switch in the rack and align the holes in the mounting
bracket with the holes in the rack (see Figure 2-4
).
4.
Insert two screws, appropriate for your 19-inch rack, into each of the
mounting brackets and tighten.
Figure 2-4. Installing the BayStack 350 Switch in an Equipment Rack
5.
After the switch is secured in the rack, proceed to the next section,
“Attaching Devices to the BayStack 350 Switch
” on page 2-8.
BS35036A
1 = Flush with rack
2 = Extended from rack
2
1
BS35037A
kombk.book Page 7 Thursday, February 18, 1999 10:59 AM